Category: Christmas

Chocolate Crinkle Cookies

Oct 26, 2017 by Anne Hernandez

Pintesting Chocolate Crinkle Cookies
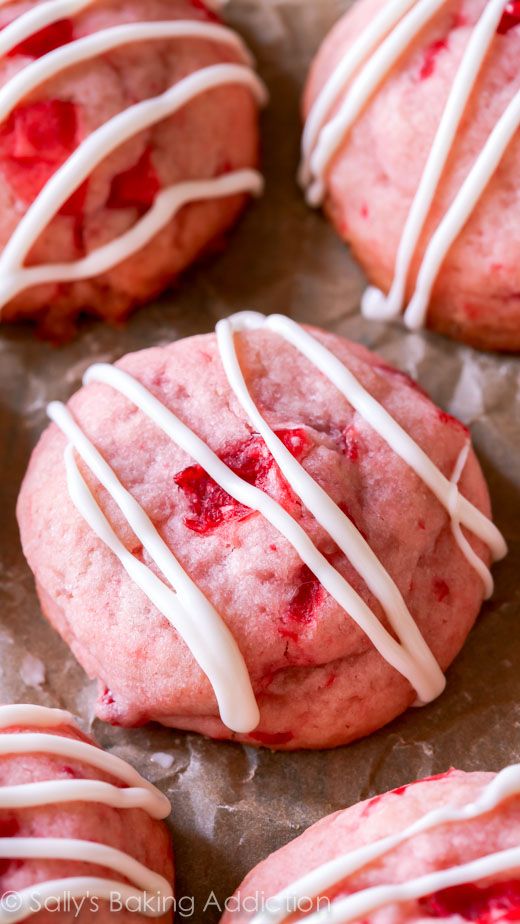
While we’re getting our costumes and candy ready for Halloween, it seems like Thanksgiving is around the corner and Christmas is only weeks away. One of my favorite holiday traditions is baking all kinds of cookies – LOTS of them. It’s so nice to have goodies ready for company or to take to a gathering and an easy way to be prepared is to start now. My friend Miranda of Cookie Dough and Oven Mitt has a cookie cookbook coming out at the end of this month and I’m so excited to be sharing one of her recipes today. It’s this pin for Chocolate Crinkle Cookies. I remember these as Chocolate Snowball Cookies. They’re rich and chocolatey with a snowy dusting of powdered sugar.

CLICK HERE TO PIN          CLICK HERE FOR THE RECIPE

Miranda even made a great tutorial video on how easy they are.

As a special bonus, she’s doing a GIVEAWAY for her new Easy Homemade Cookie Cookbook! Check out the Pintesting review and then enter below to win a copy. If you can’t wait, you can pre-order a copy right now by clicking here.

CookieCookbookCover

The Pintesting:

Chocolate Crinkle Cookies – take 1:

The Ingredients are basic chocolate cookie ingredients with one exception; I don’t recall ever making cookies with oil. There’s a first time for everything.

Pintesting Chocolate Crinkle Cookies

First, mix the dry ingredients.

Pintesting Chocolate Crinkle Cookies

Next, cream the sugars and fats until fluffy then add the eggs and vanilla.

Pintesting Chocolate Crinkle Cookies

I thought it looked a little loose, but since I’ve never made this kind of cookie before I just went with it.

Next, add the dry ingredients.

Pintesting Chocolate Crinkle Cookies

I thought this looked more like brownie batter than cookie dough. Still, I continued on.

I scooped and dropped it into powdered sugar to coat the “dough” but my bowl was too small and the dough/batter spread. *sigh*

I transferred the powdered sugar to a larger, more shallow bowl. This helped with the coating but not the texture.  Not one to quit, I trayed and baked them. The cookies spread a lot so I chilled the remainder of the dough/batter and that helped a bit with the handling but they baked with the same results.

Pintesting Chocolate Crinkle Cookies

The flavor was delicious! I packaged them and shared with several friends who thought they were wonderful.

They tasted like brownie cookies but I was not happy. I reviewed the recipe for the umpteenth time and watched the video until the jingle played in my dreams. My cookies weren’t right and I couldn’t give proper Pintesting results like this. It required a remake. *Darn* The things I do for this blog. . .

Chocolate Crinkle Cookies – take 2:

The next day I made the cookies again. I checked and re-checked the measurements on all of the ingredients multiple times before starting. One thing that I did differently – I sifted the dry ingredients; first the cocoa powder to get out all of the clumps, then the lot in order to ensure that everything was combined thoroughly. See the difference?

Pintesting Chocolate Crinkle Cookies

Next, I creamed the sugars and fats, added the eggs and vanilla, and finally mixed in the dry ingredients. (Very déjà vu.)

Pintesting Chocolate Crinkle Cookies

Now, THIS looks like cookie dough! I wish I knew exactly where the first batch went off, but it was obviously human error.

Pintesting Chocolate Crinkle Cookies

The chocolate dough was scooped, covered in powdered sugar, trayed, and baked.

Pintesting Chocolate Crinkle Cookies

They turned out perfectly. My scoop size might be a smidge bigger than the one that Miranda used for her cookies as mine made fewer and look larger than her video and pictures. Nobody seemed to mind an extra bite.

Pintesting Chocolate Crinkle Cookies

These would be a hit for any holiday gathering. They are moist enough to ship or travel well, too – perfect for gift giving.

Pintesting Chocolate Crinkle Cookies


The Giveaway:

***Update: WE HAVE A WINNER! Congratulations to M. Linney.***

I spent some time reviewing the Easy Homemade Cookie Cookbook; thumbing through the recipes, checking out the varieties, seeing how easy, complicated, and clear the instructions are, etc. This is DEFINITELY a keeper! With over 150 cookie recipes to try, I’m sure you’ll find new favorites. They’re well categorized and I can’t wait to try more of them.

If you want a chance win a copy of the Easy Homemade Cookie Cookbook, just leave a comment below and let me know your favorite cookie. That’s it! The winner will have the cookbook sent to you once it’s released. And remember, you can pre-order yours here. They make great gifts!

CookieCookbookCover

The Pintesting Results:

Overall Results: 4.85 Pins

Pintesting Seal 5 Pins

Accuracy: These Chocolate Crinkle Cookies, when made correctly, are exactly like I remember the chocolate snowball cookies of my childhood. The chocolate has a richness that’s fudgy and brownie-like. The powdered sugar gives the crinkly snow effect. 5 Pins

Pintesting Rating - 5 Pins

Difficulty:  These really are not hard to make (assuming you measure the ingredients properly) and would be a great cookie to make with kids. 5 Pins

Pintesting Rating - 5 Pins

Time:  It did take longer than the listed 12-14 minutes of bake time since there are too many cookies to bake at one time. It took me 45 minutes from start to finish so I’m giving this 4 Pins.

Pintesting Rating - 4 Pins

Cost: All of the ingredients are basic to most kitchens, or kitchens that bake often, and none are overly expensive. My total cost per cookie was roughly 10 cents. 5 Pins

Pintesting Rating - 5 Pins

Practicality:  Don’t wait until the holidays to make these Chocolate Crinkle Cookies. They’re delicious any time of the year. A friend said she does a 50/50 mixture of powdered sugar and cocoa powder to roll the cookies in to lessen the sugar and up the flavor. I’m also going to try adding a bit of instant espresso powder the next time I make them – just because. 5 Pins

Pintesting Rating - 5 Pins

Christmas Lights Manicure

Dec 24, 2015 by Anne Hernandez

I can’t believe it’s nearly Christmas! Since the day after Thanksgiving, my Handsome Husband and I have been busy decorating our home; even the laundry room has a wreath. Trees, garland, wreaths, stockings, snowmen, Santas, and the Nativity set are all in their proper places making nearly every room in the house festive. I’ve even decorated my office at work and changed my phone ring tone.

I’ve done some fun Pinterest inspired manicures that are seasonally appropriate every week, too. First I did my take on a beautiful Christmas Tree with a black background, which was a combination of two styles.

Pintesting Christmas Tree Manicure

Then I did a tipped manicure with some Santa Bling that was inspired by these two manis.

Pintesting Santa Nails Manicure

I needed another idea for a Christmasy mani, so when I saw this pin, I knew it was exactly what I was looking for. I was very excited to already have the same or very similar China Glaze polish and the cute bling, so it seemed like this was meant to happen.

Pintesting Christmas Lights Nails


If you follow my blog, then you know that I always, ALWAYS give credit to the original source. Unfortunately, the site listed on the photo, ArtigoBeauty.com, is down. Google searches did not produce any other way to trace this source. Thankfully, the picture was simple enough to follow.

The Pintesting:

Pintesting Christmas Lights Nails

First I did a base coat and two coats of China Glaze Glistening Snow. This polish has some texture, so I did a top coat of China Glaze Fast Forward Top Coat and gave it a day to cure well.

Pintesting Christmas Lights Nails


The next day I added the “string” for the lights with a black Sharpie marker. It gave the right look and was easier to control than a thin black nail polish. I had my HH do my right hand.

Pintesting Christmas Lights Nails

These are the rhinestones that I used. There were 3,000 in the case when I had purchased them from Amazon for less than $3.00. (What a great deal!)

Pintesting Christmas Lights Nails

To apply, I put a coat of the top coat and used tweezers to place them where I wanted them to go on the “string” of lights. Do this quickly.

Pintesting Christmas Lights Nails


This is how the first one turned out. Once I placed all of the rhinestones, I covered each nail with another coat of the top coat. One benefit is that because it’s fast drying, there is less chance of smudges or other accidents that would mar the manicure.

Pintesting Christmas Lights Nails

This is the finished results. I was so excited to wear my mani while doing some last minute Christmas shopping. Sadly, I lost one rhinestone on my thumb while trying to get my payment card from my wallet. Then I found this base and top coat specifically made for rhinestones at Sally Beauty Supply. It’s too late to use it as a base coat for this manicure, but I put two coats after replacing the lost rhinestone and haven’t lost any more since.

Pintesting Christmas Lights Nails

I got lots of compliments on all of the manicures, but this one seemed to get the most so far. Now for the Pintesting results.

The Pintesting Results:

OVERALL RESULTS: 4.55 Pins

Pintesting Seal 5 Pins

Accuracy:  The manicure turned out exactly like the picture. EXACTLY! 5 Pins

Pintesting Rating - 5 Pins

Difficulty:  Easy Peasy. Using a black Sharpie marker instead of the black nail polish really made this effortless. If you don’t like the way that the squiggly line turned out, just erase it with rubbing alcohol and do it again. 5 Pins

Pintesting Rating - 5 Pins

Time:  As fancy manis go, this one was fairly quick. One base coat, color, the squiggly line, the rhinestone application, and top coat. I let the base color cure overnight, but you could just use the fast-drying top coat and save the time. 4 Pins

Pintesting Rating - 4 Pins

Cost:  I happened to have everything on hand.  Even if I had to purchase everything except the base coat, it would still cost less than a regular manicure at a salon. The $3.99 for the special top coat was worth every penny, and it will last for many manis to come. 5 Pins

Pintesting Rating - 5 Pins

Practicality:  This is great for the holidays, but I was always worried that a rhinestone would fall off every time I reached in my wallet to remove a payment card since they’re wedged in there pretty tightly, or when I typed, cooked, ate, or did just about anything. It’s fun to wear and show off for an event, but this isn’t an easy manicure that would last for a week. Mine lasted 3 days so it gets 3 Pins.

Rated 3 Pins

Cherry Almond Shortbread Cookies

Jan 30, 2015 by Anne Hernandez

This is the year that I get completely organized, stay ahead of the game, and don’t let circumstances control the direction of my life.

*Cue Laugh Track*

Each January, like so many others, I make goals and resolutions to get my life organized. Then life sits back and just laughs and laughs. Well this year I’m doing a few things differently to plan better. For example, I’m not waiting until February 13th or 14th to start working on a post for Valentine’s Day.

The Pin for these Cherry Almond Shortbread Cookies came across my Pinterest radar a few days after Christmas; Sally from Sally’s Baking Addiction had posted them as a Christmas treat. While I see how their colors look holiday festive, I think the pink, red, and white is much more perfect for Valentine’s Day. That they combine one of my favorite flavor combinations (cherry almond) with one of my favorite cookies (shortbread) is a major bonus for moi.

Pintesting Cherry Almond Shortbread Cookies by Sally's Baking Addiction

The Pintesting:

There are only 8 ingredients – including the optional (therefore not shown) white chocolate.

Pintesting Cherry Almond Shortbread Cookies - Ingredients

Cream the butter, then add the sugar, extracts, and maraschino cherry juice.

Pintesting Cherry Almond Shortbread Cookies

Add the flour…

Pintesting Cherry Almond Shortbread Cookies - Add Flour

…and cherries

Pintesting Cherry Almond Shortbread Cookies - Add Cherries

Wrap and chill the dough – I chilled it overnight.

Pintesting Cherry Almond Shortbread Cookies - Wrap and Chill

Roll the dough into balls and chill again. The chilling was very stressed in order to keep the dough from spreading into cookie puddles.

Pintesting Cherry Almond Shortbread Cookies

Bake the cookies just until they’re done – NOT browned – then cool completely.

Pintesting Cherry Almond Shortbread Cookies - Baked Cookies…then drizzle with melted white chocolate “if desired” – because who doesn’t like chocolate on cookies??? I tried melting the chocolate in the microwave, but it started to seize before it got very melty. Rather than just lose the battle, I decided to try making the nearly ruined chocolate into a white chocolate ganache to drizzle. Both tasted amazing (which is why there are only a half dozen in the picture), but for looks I like the melted chocolate. It gives a nicer visual contrast.

Pintesting Cherry Almond Shortbread Cookies - Cookies Finished

The Pintesting Results:

Overall Results:  4.55 Pins

Pintesting - 5 Pins Overall Rating

Accuracy:  These cookies were very simple to make and delicious. Mine didn’t seem to come out quite as pink as Sally’s did, but that could have something to do with either my camera, the lighting in my kitchen (which is terrible), or because today is National Inane Answering Message Day. I’m going with the first two. 5 Pins

Pintesting Rating - 5 Pins

Difficulty:  The recipe was well written with detailed step-by-step instructions. A novice baker should be able to make these as long as they follow the recipe. That said, I might not recommend this for children unless they had adult supervision. 4 Pins

Pintesting Rating - 4 Pins

Time:  While the mixing of this recipe goes pretty quickly, it calls for a lot of chilling time throughout the process. I chilled the dough overnight and then stuck the first baking sheet in the freezer while rolling the dough for the second sheet. This is definitely a plan ahead recipe; not something you can whip together at a moment’s notice. 3 Pins

Rated 3 Pins

Cost:  The ingredients are very basic to most kitchens with the exception of the maraschino cherries. The jar was less than $3. 5 Pins

Pintesting Rating - 5 Pins

Practicality:  These bite-sized cookies started vanishing before they were even drizzled with the chocolate. They were loaded with flavor, and my favorite Valentine (aka Handsome Hubby) loved them. They’re perfect for popping in your mouth. Don’t wait for Valentine’s Day, Christmas or any other holiday. Show yourself some love and make these now. 5 Pins

Pintesting Rating - 5 Pins