Category: Food & Drink

Infused/Detox Water Bar

Aug 25, 2015 by Anne Hernandez

It’s the end of August and school has begun again. (WHERE has the summer gone?) I’ve seen a lot memes on the interwebs about looking forward to hoodies, football, leaves, pumpkin spice everything, and cooler weather.

Well as you can see, cooler weather is nowhere in sight in my world. Yes, that’s Fahrenheit – at 5:10 pm after I’d been driving a few miles.

Pintesting Infused Water Bar

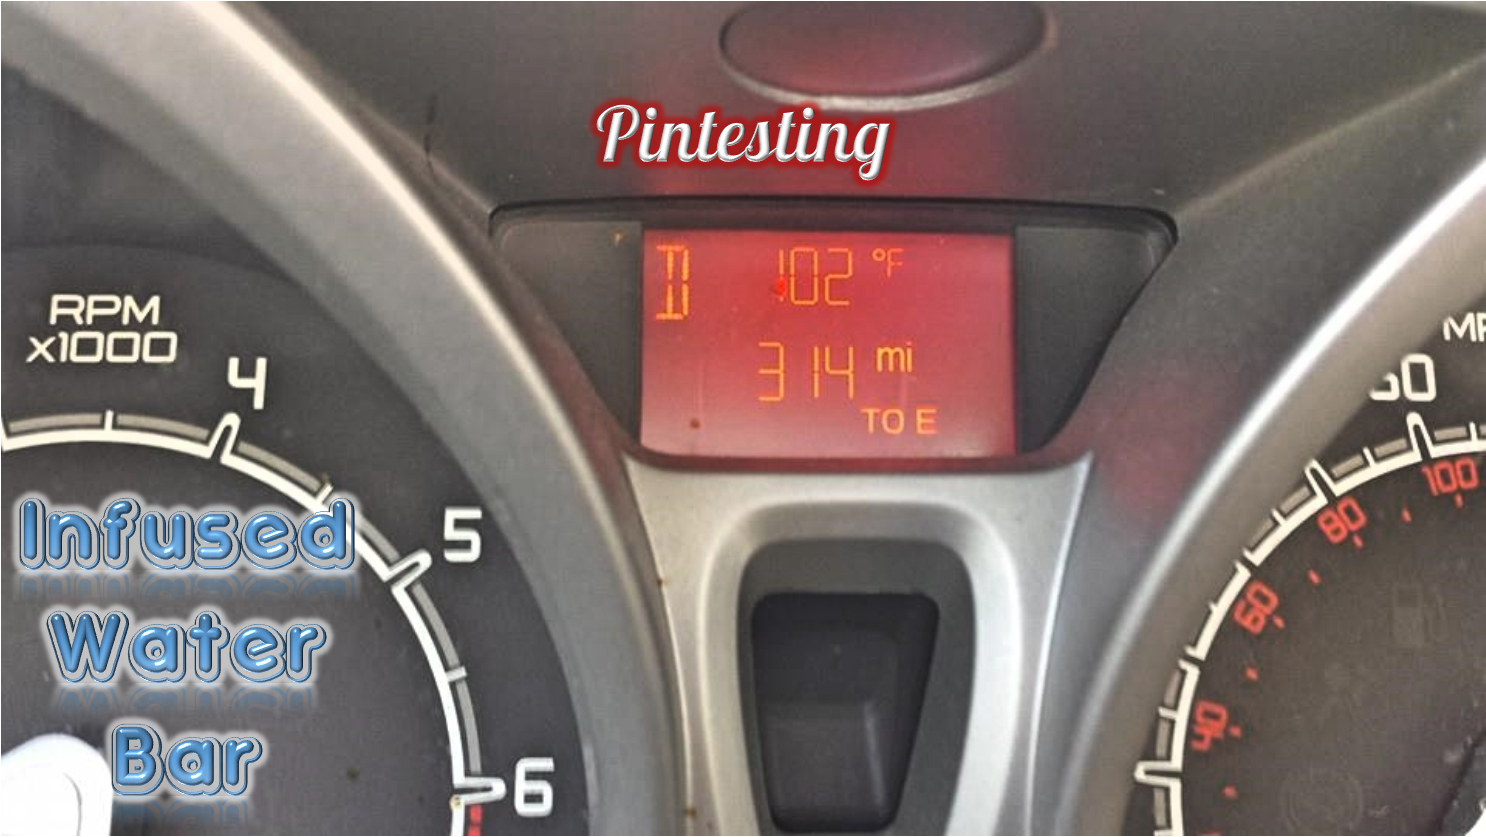
Now don’t get me wrong, I’m not really complaining because in a matter of weeks the temps will drop. In a few months I’ll be enjoying perfect weather while the cold starts to descend on the north, so I can put up with needing a fan and air conditioner. What I’ve been having trouble with is staying hydrated; meeting the minimum 64 oz. per day. I can usually get over half way there without problem, it’s just that after that plain water gets boring. (Sorry, but I’m just being honest.)

I have lots of friends who use water flavorings in order to give their water a boost of flavor, but they often have artificial sweeteners, fake flavorings, and chemicals that you need a PhD to pronounce.

I’ve seen lots of pins for infused water; like this, this, and this. Not only does infused water keep the boredom away, but it’s also very healthy and can help your body to naturally detoxify. This is more of a general review of several pins and a great concept.

Pintesting - Infused Water Bar

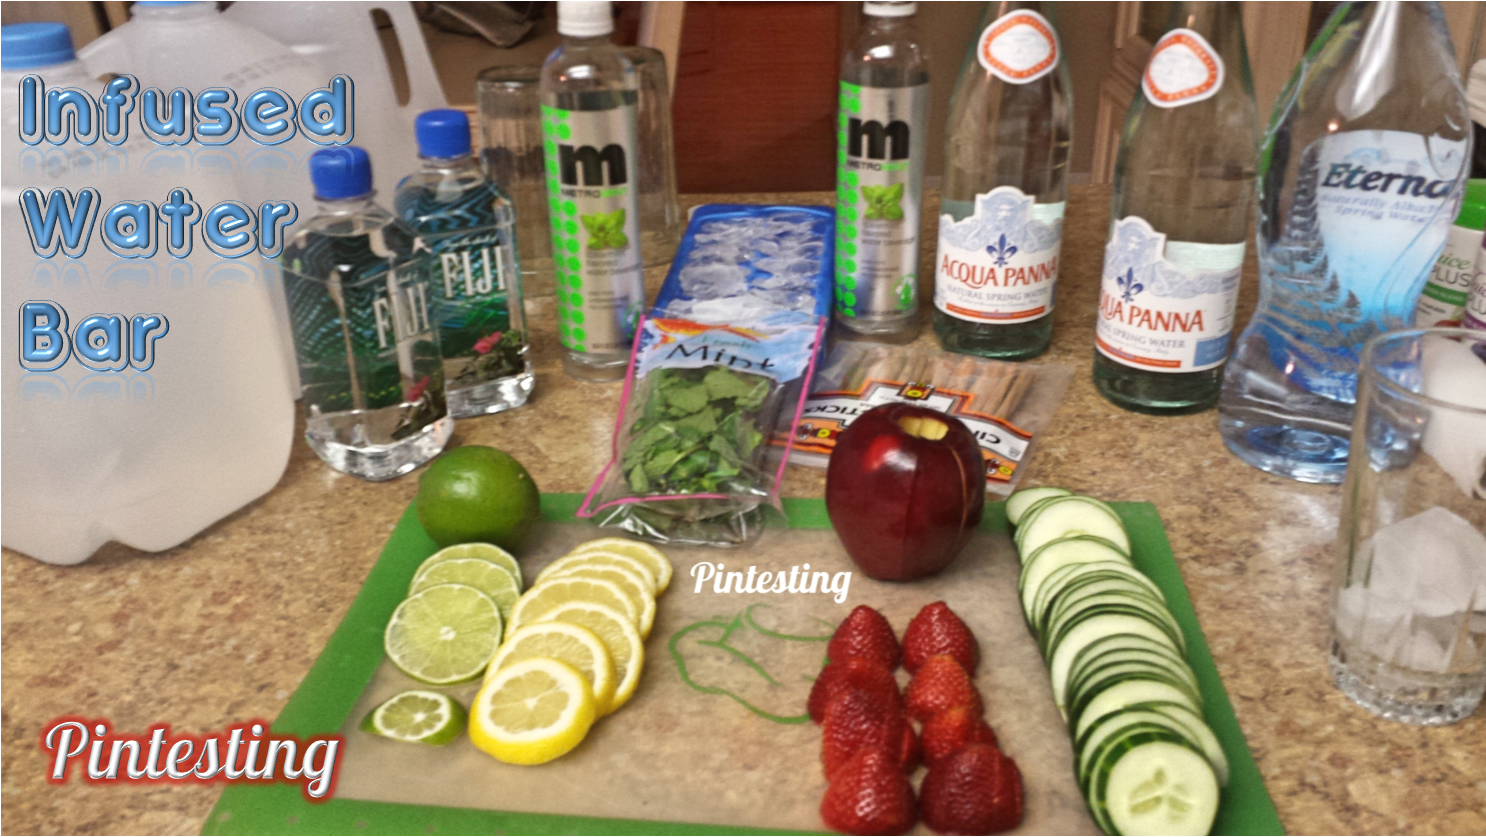
So we decided to get a variety of ingredients together, and have some friends over to see what we could come up with for a nearly calorie-free, fun, and healthy entertainment idea.

Pintesting - Infused Water Bar

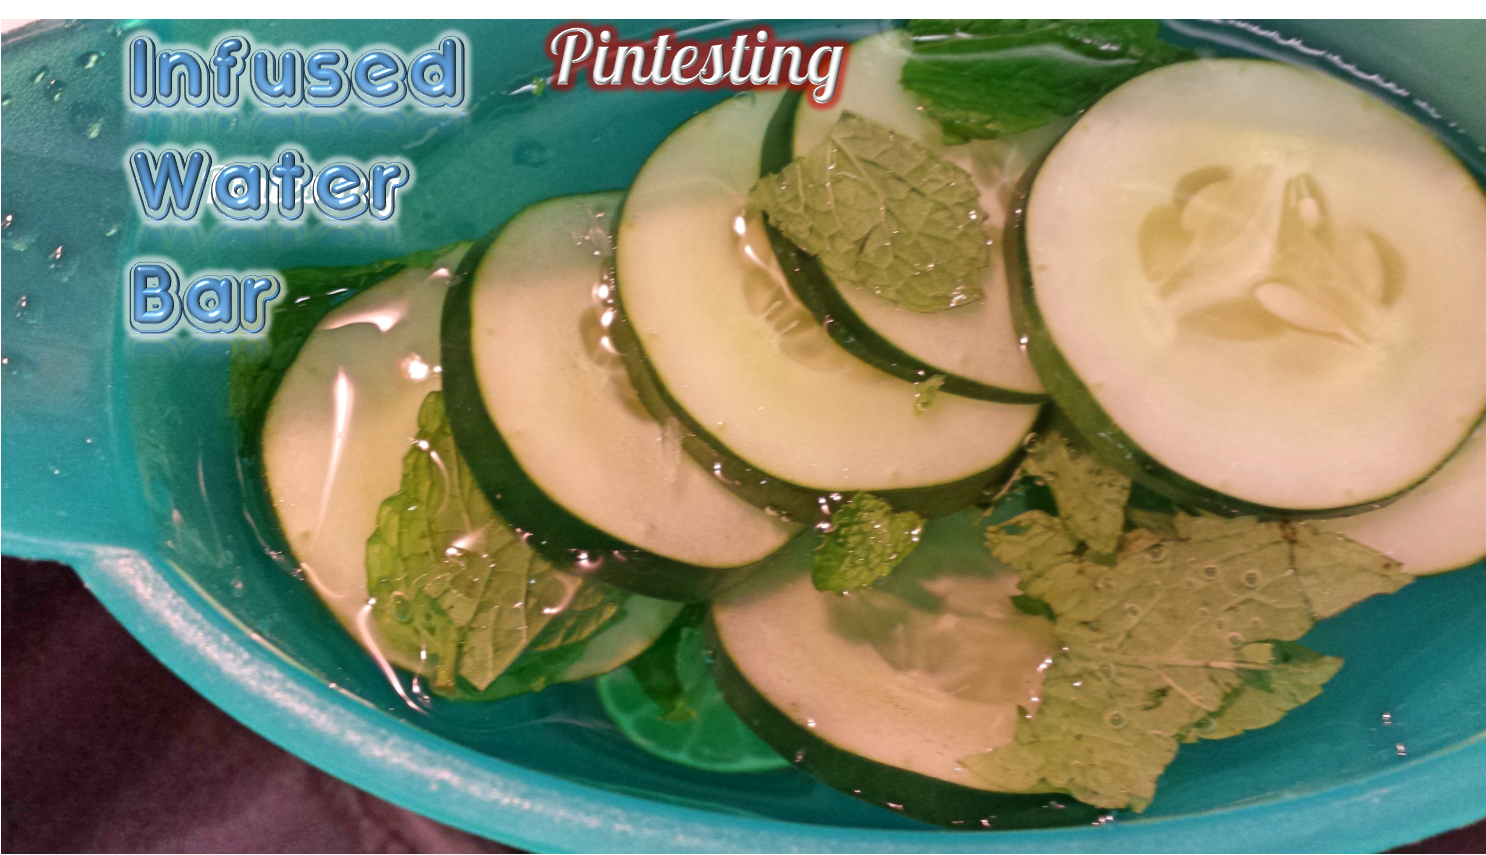
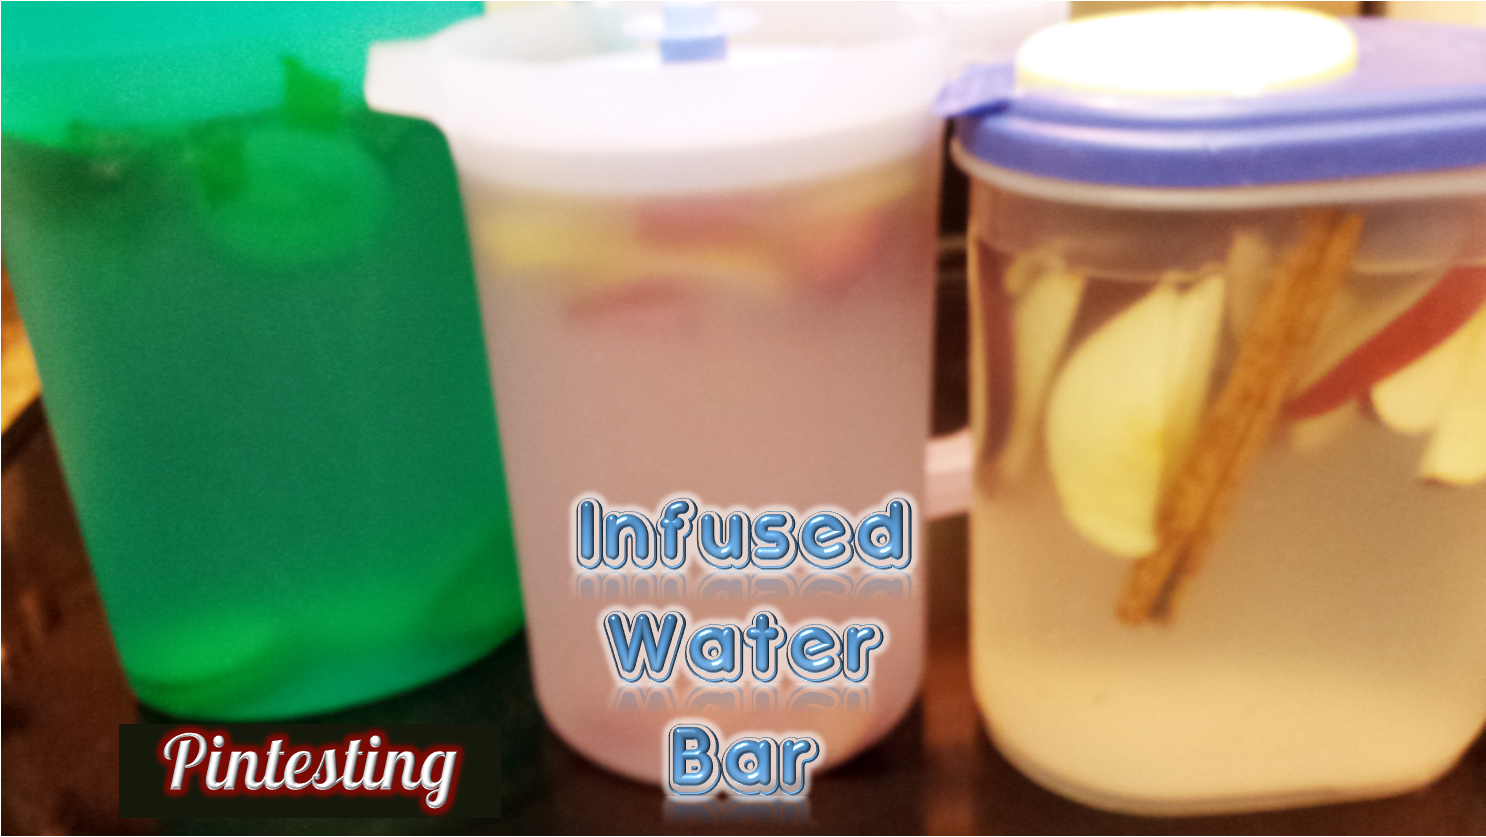
The first one was cucumber, lime, mint. This was very cool, crisp, and bright.

Pintesting - Infused Water Bar

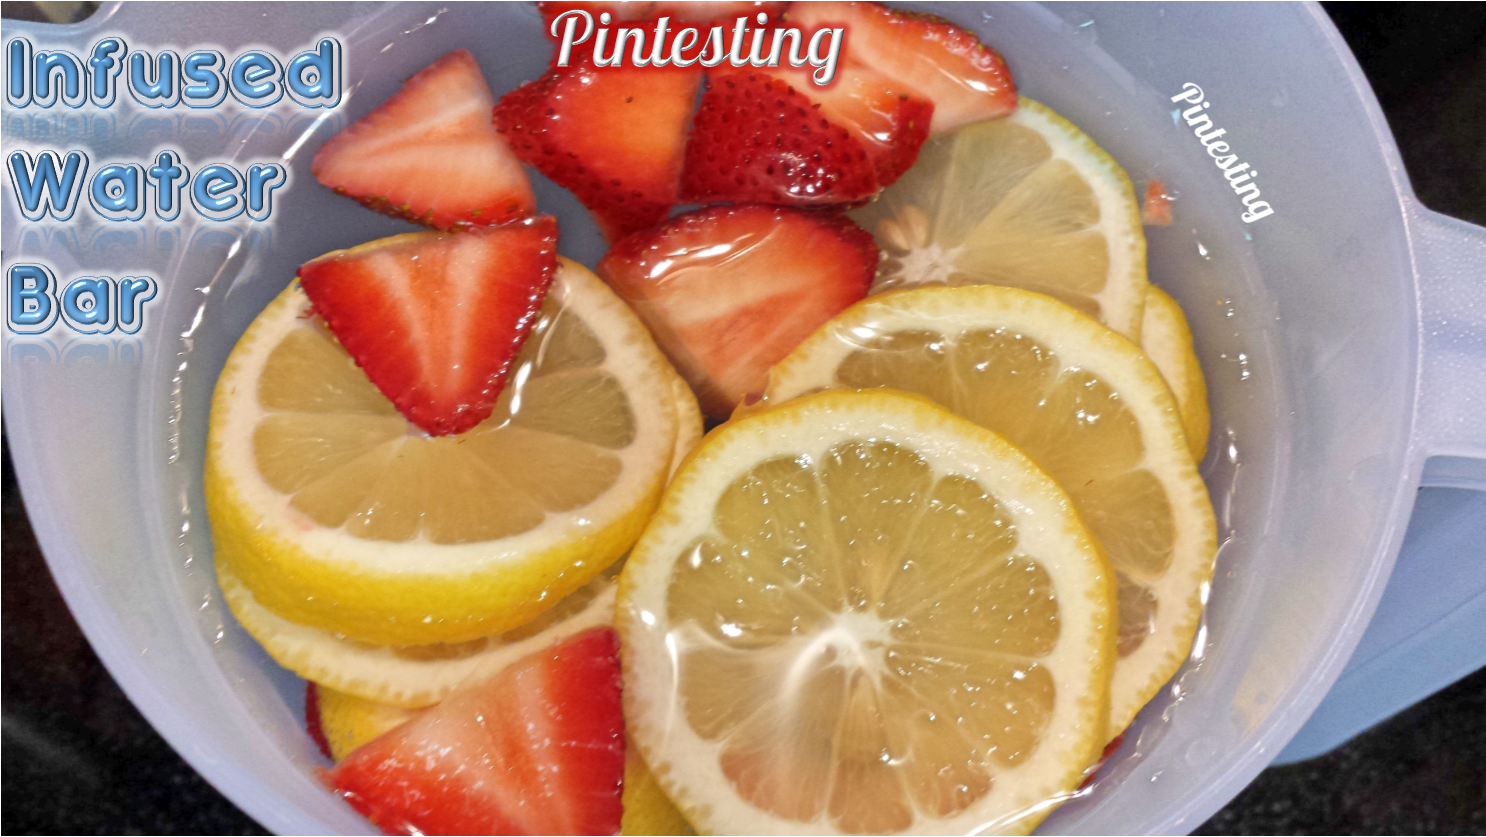
I’ve already done a Pintesting on Lemon Strawberry Detox Water, but since it was so delicious we made a pitcher for our friends. This one is a nice combination of sweet and tart.

Pintesting - Infused Water Bar

The apple and cinnamon surprised me the most, and was my personal favorite. It was sweet, cinnamony, and so refreshing.

Pintesting - Infused Water Bar

We were going to see how long they lasted before they went bad, but thee pitchers only lasted a couple of days. Not only were they a GREAT way to get excited about drinking water, but the flavorings made the garbage disposal smell wonderful once the water was gone.

Go drink to your health. Salude!

Overall Results: 5  Pins

Pintesting - 5 Pins Overall Rating

Accuracy: This was a fun and nearly calorie-free way to entertain some friends and get creative ideas for better hydration. You can use the combinations online or find what you like best. 5 Pins

Pintesting Rating - 5 Pins

Difficulty: The hardest part about this is deciding which combination you want to make that day. I liked making a pitcher-full for the convenience of having fancy frou-frou water all day. 5 Pins

Pintesting Rating - 5 Pins

Time: To make the fancy bar with all of the options took about 15 minutes including the time to soak the fruit in vinegar water to clean them. It too longer to get everything placed just right. 5 Pins

Pintesting Rating - 5 Pins

Cost: Since I was setting up for company and decided to play around with different waters, as well. Also, I wanted to have a LOT of options with the flavors, so I spent much more than if I was just making a specific “recipe” of water. On the other hand, we had a LOT of fun and I know that I spend a lot more than $20.00 when we entertain, so I guess I got off cheap. 4 Pins

Pintesting Rating - 5 Pins

Practicality: This is a great way to stay hydrated, add health and detox benefits, and take the boring out of plain water. The options are unlimited, so you never get bored. 5 Pins

Pintesting Rating - 5 Pins

Flower Shaped Mini Lemon Curd Tarts

Some days it seems like the angels sing, the stars align, and everything falls into place in order to make things happen. When that happens, life is easy as pie – or in this case, tarts.

My HH and I were thinking about how nice it would be to have just a little something sweet but didn’t want to go through a lot of fuss (or dishes). Then I remembered seeing this pin that had crossed my path recently. These Flower Shaped Mini Lemon Curd Tarts on the Inspired Dreamer site seemed like the perfect little treats. That I had one pie crust, one jar of lemon curd, and the exactly the right cookie cutter was just shy of divine intervention to make this. So let’s get on with this test!

The Pintesting:

Pintesting Flower Shaped Mini Lemon Curd Tarts - ORIGINAL PIN

There are only 3 main ingredients; one pie crust, a jar of lemon curd, and powdered sugar. Also helpful is flour for dusting while handling the pie crust. The hardware required is a flower-shaped cookie cutter and mini muffin pan.

Pintesting Flower Shaped Mini Lemon Curd Tarts

Roll out the pie crust and start cutting flowers with the cookie cutter. Does anyone else think the flower cutter looks groovy? Flower Power!

Pintesting Flower Shaped Mini Lemon Curd Tarts

Cut out 12 flowers; rerolling the scraps and cutting to make the 12.

Pintesting Flower Shaped Mini Lemon Curd Tarts

Carefully put them into a mini muffin pan.

Pintesting Flower Shaped Mini Lemon Curd Tarts

Fold 3 alternate petals toward the center, gently place the dough into the cup, then work the petals on the sides by overlapping the three inner petals.

Pintesting Flower Shaped Mini Lemon Curd Tarts

Bake for about 5 minutes.

Pintesting Flower Shaped Mini Lemon Curd Tarts

The flower tart shells pop right out of the pan – no greasing was required. Use some caution when removing them after baking as they are a little more delicate and can crumble if handled too roughly.

Pintesting Flower Shaped Mini Lemon Curd Tarts

Cool, dust with powdered sugar, and spoon with lemon curd.

Pintesting Flower Shaped Mini Lemon Curd Tarts

This almost can’t be called a recipe, but it was inspired, cute, and easy. It did perfectly satisfy our sweet tooth craving, and there were plenty left over to share. We had them with a cup of tea. It was a perfect pairing. Now for the results.

The Results:

Overall Results: 5 Pins

Pintesting - 5 Pins Overall Rating

Accuracy:  These tarts turned out PERFECTLY. The pin photo was almost step-by-step enough to make these, but the recipes’ detailed instructions help ensure great results. The little tarts were a lovely combination of sweet, tangy, crisp, delicate, and pretty. 5 Pins

Pintesting Rating - 5 Pins

Difficulty:  This very simple recipe would be fun to do with kids. The pie dough is very forgiving. I had several flowers tear a bit while I was working with them, but this was fixed while patting them into the tin. 5 Pins

Pintesting Rating - 5 Pins

Time:  These took about 20 minutes from start to finish, and that included the photos and dishes. 5 Pins

Pintesting Rating - 5 Pins

Cost:  I happened to have everything on hand this time, so there was no extra shopping costs.  I had purchased the lemon curd at World Market for $3.99 to serve with scones. The pie crusts come two to a package (mine was the leftover in the back of the fridge), and cost about $3.00. That’s 29 cents per tart. 5 Pins

Pintesting Rating - 5 Pins

Practicality:  These were quick, easy, and the tart shells are extremely versatile. You could fill them with any curd, custard, or pudding to make a bouquet of desserts. If you leave off the powdered sugar, you could use the shells with savory fillings, too. They’re perfect for a tea party, garden party, or mother’s day. 5 Pins

Pintesting Rating - 5 Pins

Easy Cheeseburger Sliders

Jul 30, 2015 by Anne Hernandez

The other day was National Hamburger Day. Who comes up with these “holidays”? Well, thank you to whomever, because even though I’m not a huge carnivore, I LOVE a good burger.

Burgers are like pizza in that there are so many different ways to approach them: big and juicy, stuffed with fillings, thin with a quick sear, to tiny little sliders. I used to love getting the sliders in the cute little boxes. Does anyone else remember these?

White Castle Burgers

When I saw this pin for Easy Cheeseburger Sliders by Kristina Vanni, I was all in! These use King’s Hawaiian rolls and a really different method for cooking. I went straight to the store to pick up the ingredients, and got cooking.

Pintesting Easy Cheeseburger Sliders - ORIGINAL PIN

The Pintesting:

The recipe calls for 2 lbs of hamburger. Because it’s just my Handsome Hubby and me, we didn’t need to make 2 pounds worth of sliders, so we halved the recipe with some help from Taste of Home website, and from the kitchn website for what size pan to use. Did you know that half of a 9×13 pan is an 8×8? I love learning new things!

Pintesting Easy Cheeseburger Sliders

Mix the ground meat, bread crumbs, onion, and salt in a bowl.

Pintesting Easy Cheeseburger Sliders

Put the mixture in a pan, press it nice and flat, then poke it with holes with a fork.

Pintesting Easy Cheeseburger Sliders

Bake it (SO much easier than grilling or pan frying a bunch of burgers). Look at that shrinkage!
Pintesting Easy Cheeseburger Sliders

Cover it with cheese and pop it back into the oven for a couple more minutes.

Pintesting Easy Cheeseburger Sliders

The big square cheeseburger patty came out of the pan easily, and I cut it into 9 squares to fit the buns.

Pintesting Easy Cheeseburger Sliders

Here you have the final results. Yes, I made 9 sliders. Yes, there are only 8 in the picture. My HH snatched one before I could stop him. He says that they smelled too good to wait.
Pintesting Easy Cheeseburger Sliders

The Pintesting Results:

Overall Results: 4.85 Pins

Pintesting Seal 5 Pins

Accuracy:  These cheeseburger sliders were very easy to make, as the title says. They produced a lot of delicious, juicy burger without having to flip a bunch of minis a bunch of times. I would pick these over their fast-food version any day. 5 Pins

Pintesting Rating - 5 Pins

Difficulty:  The recipe title didn’t lie. By baking the meat mixture in a pan, you let the oven do the work. 5 Pins

Pintesting Rating - 5 Pins

Time:  This one was a tough call. If you were making a regular burger vs. a slider, it takes about 5-10 minutes depending on how you like your burger cooked. These took 30 minutes of cooking time. That’s not a long time to cook supper, but it is longer than traditional burger cooking methods. 4 Pins

Pintesting Rating - 4 Pins

Cost:  These are an inexpensive way to feed a crowd, or to make ahead as for freezing. (Cheeseburger sliders ready to heat and eat? Yes please!) My local Fresh Market has ground chuck on sale every Tuesday for $2.99/lb. If you look at the ingredients picture, you’ll notice that the package of meat was $3.06. Add the cost of the rest of the ingredients, and that’s about 50 cents per slider. I was full at 2 sliders; HH was full at 3. The extra 4 sliders made both of our lunches – much better than fast-food. 5 Pins

Pintesting Rating - 5 Pins

Practicality:  If you need to feed a crowd, then these are absolutely the way to go. They were simple, juicy, flavorful, and I didn’t feel guilty about throwing away a bunch of cute cardboard boxes. Since the oven does the cooking, you don’t have to stand and flip anything. These are absolutely going into my recipe box! 5 Pins

Pintesting Rating - 5 Pins

Pintesting Weave Your Bacon BLT

Jul 24, 2015 by Anne Hernandez

Sometimes less is more, and there is a lot of minimalist going on lately. (Wait. Is that an oxymoron?)

Tiny houses are all the rage right now. Have you seen them? They look like glorified tree houses, or doll houses on steroids. They’re so cute, but I can’t live in a house that’s smaller than my kitchen. I already almost live in my kitchen. Almost…

Food portion sizes are shrinking, too – not that that’s a bad thing. Meal portions had gotten so big that most restaurant meals can equal 2-3 appropriate portions. Super sized is not a super thing.

The Minimalist decorating style is very popular and all over Pinterest.

And according to a business article, even our attention spans are shrinking (from 12 seconds in 2000 to eight in 2012), and so our meetings and emails need to be shorter.

So just as a fun experiment, I’m going to use as few words as possible to describe this Pintesting.

The biggest problem with the traditional BLT is that there are always those bites that either don’t have enough bacon, or they have none at all. *GASP*  This is NOT the time to be minimalist! Then I saw this pin for a video that solves the problem completely. Watch this 35-second video. (Even the video is short!)

Ingredients

Pintesting Basket Weave Bacon BLT

Bacon

Pintesting Basket Weave Bacon BLT

Cut Bacon

Pintesting Basket Weave Bacon BLT

Weave Bacon


Pintesting Basket Weave Bacon BLT


Bake Bacon

Pintesting Basket Weave Bacon BLT

Cooked Bacon

Pintesting Basket Weave Bacon BLT

Bacon – BLT

Pintesting Basket Weave Bacon BLT

Crumbs

Pintesting Basket Weave Bacon BLT

So there you have it – my minimalist post. Somehow I think the story got across.

Overall Results: 5 Pins

Pintesting - 5 Pins Overall Rating

Accuracy:  The video was detailed and self  explanatory. By using the cooling rack on top of the bacon, it cooked nice and flat. Most importantly, there really was bacon in every single bite. 5 Pins

Pintesting Rating - 5 Pins

Difficulty:  This was simple, and the video did a great job showing the step-by-step instructions. 5 Pins

Pintesting Rating - 5 Pins

Time:  The total time, including prep, weaving, baking, and sandwich assembly was less than 30 minutes. It took a little longer for the thick-cut bacon to cook, but it was sooooo worth it. 5 Pins

Pintesting Rating - 5 Pins

Cost:  The basic BLT ingredients are often already in my kitchen. I was lucky to find this thick cut bacon that normally sells for $7-8 on sale for $3.00. (Score!)  The rest of the ingredients work out to be about $1.00 per sandwich, plus there was lots of leftovers of everything. 5 Pins

Pintesting Rating - 5 Pins

Practicality:  This is a great way to cook bacon for any sandwich application; BLT, breakfast, burgers, etc. I’ve seen a similar idea in which you weave the bacon in a muffin tin to make bacon cups to fill with breakfast foods, salads, or what have you. I could see that being a possibility, but we’ll have to test it another day. THIS test gets 5 Pins.

Pintesting Rating - 5 Pins

Cheesy Broccoli Orzo

Does anyone else seem like you make and eat the same meals? The dinner rut is a tough one to deal with because we all have our favorites, comfort foods, and quick-on-the-table meals that are the family approved stand bys. Don’t get me wrong – pizza night is not to be trifled with, but you can completely mix it up with different types of crusts, sauces, and toppings. Taco Tuesdays are a close second, but even there you’ve got a lot of choices that can make it seem different from week to week. Sometimes changing the side dishes can change the taste and feel of a whole meal.

That’s why I was super excited when i saw this pin for Cheesy Broccoli Orzo by Kristin from Iowa Girl Eats. It’s the perfect trifecta of a side dish.

  1. It’s fast
  2. It’s easy
  3. It only uses a handful of ingredients (most are likely to be in your kitchen right now)

Pintesting Cheesy Broccoli Orzo

Well, who’s going to argue with a trifecta? Not me – I choose my battles, so let the Pintesting begin.

As I said, there are only a handful of ingredients – 6 if you don’t count the salt or water to boil the pasta and broccoli.

Pintesting Cheesy Broccoli Orzo

Boil the orzo pasta. Now this seems easy, but wait…

Pintesting Cheesy Broccoli Orzo

Kristin says to cook for 3 minutes, add broccoli, then cook for another 3 minutes or so.

Pintesting Cheesy Broccoli Orzo

My orzo box calls for 9 minutes of cooking time for al dente. You can see in the picture below that it still has a way to go, so I waited another couple of  minutes before adding the broccoli.

Pintesting Cheesy Broccoli Orzo

Next I added the broccoli and cooked it for about 3 minutes to let the orzo get to the al dente state and let the broccoli cook well.

Pintesting Cheesy Broccoli Orzo

Drain everything really well.

Pintesting Cheesy Broccoli Orzo

Return to the pot and add the cheeses, butter, and milk.

Pintesting Cheesy Broccoli Orzo

After mixing and per Kristin’s instructions, I checked the seasoning. Good call! I added a touch of salt and several grinds of pepper.

Pintesting Cheesy Broccoli Orzo

That’s it. Really! We’re done – except for the plating.

Pintesting Cheesy Broccoli Orzo

I love risotto, and this totally puts me in mind of that creamy dish but without the half hour of constant stirring. It’s the perfect alternative if you need something quick, and want to get some extra veggies in your meal. And who doesn’t need extra veggies? That’s what I thought. So let’s get to the Pintesting Results:

Overall Results: 4.6 Pins

Pintesting - 5 Pins Overall Rating

Accuracy:  The dish was delicious, uncomplicated, and quick. The flavors of the pasta with the broccoli and cheeses all played wonderfully together. But the pasta cooking time was off by 50%, and a novice cook might not catch that. In all fairness, it might have been the difference from one pasta brand to another, so keep an eye on what the directions on your box indicate. 4 Pins

Pintesting Rating - 4 Pins

Difficulty:  There’s nothing hard about this dish. I bought the broccoli florets pre-cut which eliminated a lot of the prep work. I did grate the cheeses to balance the level of work (and because I like fresh-grated cheese better). Boil, drain, mix, serve. 5 Pins

Pintesting Rating - 5 Pins

Time:  The whole recipe came together in under 20 minutes even with me taking the pictures. PERFECT for a busy weeknight dinner. 5 Pins

Pintesting Rating - 5 Pins

Cost:  The broccoli ($2.00 on sale) and orzo pasta (less than $2.00 – not on sale) were the only two ingredients that I had to buy, and there was enough of each to double the recipe and still have leftover broccoli. The remaining ingredients came to about $2.00. At $4.00 for 4 servings, that’s $1.00/serving.  5 Pins

Pintesting Rating - 5 Pins

Practicality:  The trifecta totally worked with this recipe. Not only is it a delicious side dish, but it has the makings for an easy casserole just by tossing in a cooked protein of choice. (I’m thinking this would be a great way to use up some leftover turkey next Thanksgiving…)I bet you could play with the cheeses for slightly different takes on the flavor, too. It’s also very kid-friendly – it’s practically mac & cheese with broccoli. 5 Pins

Pintesting Rating - 5 Pins


Homemade Bean and Bacon Soup

I’m a Daddy’s Girl. Always have been, always will be. Don’t get me wrong, I love my mom very dearly, and as I get older, I see the best parts of her in me. I know I’m blessed beyond words to have the parents that I do. But daddy was the first man in my life, and he set a very high bar as a standard for what to look for in a man. Even though it’s been more than 10 years since he’s walked this earth, I still get excited on his birthday. The quirky little memorable things are what I love to celebrate. He loved God, his family, Tab (does anyone remember that diet cola before there was Diet Coke or Pepsi?), butter pecan ice cream, Fritos & bean dip, mom’s chili when it was so spicy that the steam would peel paint, and he always seemed happy.

His favorite canned soup was Bean & Bacon. I’m pretty sure that Campbell’s has changed the recipe over the years, because it just doesn’t taste the same, nor does it have the same texture. Our family has been avoiding canned soups since they’re usually high in sodium and other “stuff” that we don’t want as a part of our diet. So when I saw this pin for Homemade Bean and Bacon Soup by Deborah of Taste and Tell, I looked up and smiled into the heavens and told dad that I was going to make this for him.

Pintesting Homemade Bean and Bacon Soup

You know how they say that girls usually marry a man like their dad? Yes! My HH is like my dad in so many ways – including a love of butter pecan ice cream, Fritos & bean dip, HE makes the chili, and he used to drink Tab. And guess what his favorite canned soup is. Go on – guess… Yup! So with my HH cheering me on, and daddy watching from above, let’s get on with this Pin Test!

The Pintesting:

There aren’t a lot of ingredients, which means that the flavors come from simple ingredients and should shine through (I hope).

Pintesting Homemade Bean and Bacon Soup


Cook the bacon until it’s rendered a good amount of fat and is nice and crispy.

Pintesting Homemade Bean and Bacon Soup

Remove the bacon and most of the drippings, leaving a couple of tablespoons of the rendered fat to give flavor and to cook the mirepoix. (That’s equal parts of onions, carrots, and celery.) I seasoned with salt and pepper at this stage rather than waiting until the end. Once the aromatics are softened, add the garlic and cook for another minute.

Pintesting Homemade Bean and Bacon Soup

Add the beans and broth and let it cook for an hour. The recipe says to remove half of the soup and blend in a blender or food processor. That makes a lot of extra dishes and (in my world) potentially puts me in harm’s way. Instead, I used my immersion blender to pulse it enough times that it looks like it was about half blended and half whole beans and veggies.

Pintesting Homemade Bean and Bacon Soup

Add the tomato sauce and 3/4 of the bacon, and let it heat through for another 5 minutes or so.

Pintesting Homemade Bean and Bacon Soup

Serve and garnish with the reserved bacon.

Pintesting Homemade Bean and Bacon Soup

You can’t really see the beans in the bowl because they sink to the bottom and are covered by the broth, but they’re there. (Did you catch that beautifully correct grammar?) I have to say that daddy would have loved this soup – probably a lot more than the canned variety. I know the HH and I did. It was hearty, flavorful, and filling without being heavy. I liked that I could control the sodium levels (and add more bacon garnish, if I want to). So now for the Pintesting results.

The Pintesting Results:

Overall Results: 4.7 Pins

Pintesting - 5 Pins Overall Rating

Accuracy:  This soup brought back the memory of how the canned name-sake in my past used to taste. It was like a time machine in a bowl. The flavors were spot-on, and the texture was creamy and rich. 5 Pins

Pintesting Rating - 5 Pins

Difficulty:  The steps weren’t hard, but it’s not something for kids in the kitchen. Cooking bacon can cause grease burns from the popping and splattering if you have the heat too high. Also, the extra step of blending half of the soup, while necessary, comes with its risks. 4 Pins

Pintesting Rating - 4 Pins

Time: The prep work only took about 20 minutes, but then add an hour of simmering time after that, plus one more time of heating it through and you’re looking at 1 1/2 hours to make from start to finish. 4 Pins

Pintesting Rating - 4 Pins

Cost: This is a great soup if you’re on a budget. The most expensive ingredient was the bacon, which I got on sale for less than $5, and I had leftover bacon for BLTs. I had the rest of the ingredients on hand and the cans of beans were only about $1 each. We can estimate the total cost at $10. The recipe says 4 servings, but the HH and I got 6 good-sized servings from the pot of soup. That’s less than $2 per serving. 5 Pins

Pintesting Rating - 5 Pins


Practicality: If you like bacon, or have fond memories of bean and bacon soup, or if you like soup, this is a must-try recipe. My HH and I love this recipe, now one of our favorites, and I’ve made it twice now. 5 Pins

Pintesting Rating - 5 Pins

Brigadeiros

Mar 20, 2015 by Anne Hernandez

Today is (yesterday was) chocolate caramel day!

So obviously my perfect intentions for staying ahead of the game this year didn’t work out as perfectly as I’d hoped. Does anyone else have this problem?

That’s okay – chocolate makes everything better, so let’s focus on that. Combine chocolate with caramel and you take “better” to a whole new level. When I saw this recipe for Brigadeiros, and saw how few ingredients they needed, I knew I had to give this a go.

Pintesting Brigadeiros - ORIGINAL PIN

You’ve never heard of Brigadeiros??? Don’t feel bad; neither had I until this pin came across my Pinterest feed by Stacy of Food Lust People Love. They are a Brazillian chocolate caramel (swoon) made from only 4 ingredients. Shall we get on with the Pintesting?

Pintesting Brigadeiros

Here are the ingredients. I had everything on hand – hooray for a well stocked pantry. Not shown is the butter; 1 Tablespoon for the recipe and more to coat your hands when shaping them.

Pintesting Brigadeiros

Pour the sweetened condensed milk and butter into a skillet, then sift the cocoa into the mixture.

Pintesting Brigadeiros

Don’t miss this step or you’ll have clumps of cocoa! Use the back of a spoon to break up the clumps.

Pintesting Brigadeiros

Heat on medium heat, stirring to combine well.

Pintesting Brigadeiros

Keep stirring…

Pintesting Brigadeiros

…and stirring, until the mixture is nice and thick. Stacy says 10-15 minutes; it was just over 10 minutes for me.

Pintesting Brigadeiros

Pour the chocolate sprinkles into a container and grease your hands with butter while the caramel cools enough to handle. Roll spoonfuls into little balls,

Pintesting Brigadeiros

and then coat them in the chocolate sprinkles.

Pintesting Brigadeiros

I did several at a time; dropping them in and swirling the bowl of sprinkles.

Pintesting Brigadeiros

My friend was having a birthday, and so I thought it would be fun to use these to top mini cupcakes.

Pintesting Brigadeiros

To go with the chocolate and caramel candy, I did rich chocolate mocha cupcakes with a salted caramel buttercream. The cupcakes were delicious, but the Brigadeiros were the star. Everyone loved them – especially the Birthday girl.

Now for the Pintesting results.

Overall Results: 5 Pins

Pintesting - 5 Pins Overall Rating

Accuracy: These sweets were as easy to make as Stacey’s’ blog said they would be. Her step-by-step instructions were easy to follow and the Brigadeiros turned out perfectly on the first try. 5 Pins

Pintesting Rating - 5 Pins

Difficulty: This is one of the easiest candy recipes I’ve ever made. No melting sugar, no worrying about melting chocolate seizing, and no candy thermometer needed. Once the caramel has cooled sufficiently, you could let children help with the rolling and shaping, but use caution since it does stay quite warm to the touch. 5 Pins

Pintesting Rating - 5 Pins

Time: Start to finish, this was done in 30 minutes – including the dishes! The recipe makes quite a lot, which requires quite a lot of rolling and shaping the caramels, so I thought it might take a long time. Nope! 5 Pins

Pintesting Rating - 5 Pins

Cost: Since I had everything on hand, this was free for me. Even if you had to buy everything, the four ingredients would set you back fewer than $10 and you’d have lots of leftovers. 5 Pins

Pintesting Rating - 5 Pins

Practicality: Stacy made these and served them in cute little paper cups, but don’t let that limit your creativity. I topped cupcakes with them. They’d be great to garnish a cake. You could even press them into candy molds or hand shape them into unique designs for any occasion. These are quick and easy – so much so that I’m going to be making more to bring as a class treat. 5 Pins

Pintesting Rating - 5 Pins

Cherry Almond Shortbread Cookies

Jan 30, 2015 by Anne Hernandez

This is the year that I get completely organized, stay ahead of the game, and don’t let circumstances control the direction of my life.

*Cue Laugh Track*

Each January, like so many others, I make goals and resolutions to get my life organized. Then life sits back and just laughs and laughs. Well this year I’m doing a few things differently to plan better. For example, I’m not waiting until February 13th or 14th to start working on a post for Valentine’s Day.

The Pin for these Cherry Almond Shortbread Cookies came across my Pinterest radar a few days after Christmas; Sally from Sally’s Baking Addiction had posted them as a Christmas treat. While I see how their colors look holiday festive, I think the pink, red, and white is much more perfect for Valentine’s Day. That they combine one of my favorite flavor combinations (cherry almond) with one of my favorite cookies (shortbread) is a major bonus for moi.

Pintesting Cherry Almond Shortbread Cookies by Sally's Baking Addiction

The Pintesting:

There are only 8 ingredients – including the optional (therefore not shown) white chocolate.

Pintesting Cherry Almond Shortbread Cookies - Ingredients

Cream the butter, then add the sugar, extracts, and maraschino cherry juice.

Pintesting Cherry Almond Shortbread Cookies

Add the flour…

Pintesting Cherry Almond Shortbread Cookies - Add Flour

…and cherries

Pintesting Cherry Almond Shortbread Cookies - Add Cherries

Wrap and chill the dough – I chilled it overnight.

Pintesting Cherry Almond Shortbread Cookies - Wrap and Chill

Roll the dough into balls and chill again. The chilling was very stressed in order to keep the dough from spreading into cookie puddles.

Pintesting Cherry Almond Shortbread Cookies

Bake the cookies just until they’re done – NOT browned – then cool completely.

Pintesting Cherry Almond Shortbread Cookies - Baked Cookies…then drizzle with melted white chocolate “if desired” – because who doesn’t like chocolate on cookies??? I tried melting the chocolate in the microwave, but it started to seize before it got very melty. Rather than just lose the battle, I decided to try making the nearly ruined chocolate into a white chocolate ganache to drizzle. Both tasted amazing (which is why there are only a half dozen in the picture), but for looks I like the melted chocolate. It gives a nicer visual contrast.

Pintesting Cherry Almond Shortbread Cookies - Cookies Finished

The Pintesting Results:

Overall Results:  4.55 Pins

Pintesting - 5 Pins Overall Rating

Accuracy:  These cookies were very simple to make and delicious. Mine didn’t seem to come out quite as pink as Sally’s did, but that could have something to do with either my camera, the lighting in my kitchen (which is terrible), or because today is National Inane Answering Message Day. I’m going with the first two. 5 Pins

Pintesting Rating - 5 Pins

Difficulty:  The recipe was well written with detailed step-by-step instructions. A novice baker should be able to make these as long as they follow the recipe. That said, I might not recommend this for children unless they had adult supervision. 4 Pins

Pintesting Rating - 4 Pins

Time:  While the mixing of this recipe goes pretty quickly, it calls for a lot of chilling time throughout the process. I chilled the dough overnight and then stuck the first baking sheet in the freezer while rolling the dough for the second sheet. This is definitely a plan ahead recipe; not something you can whip together at a moment’s notice. 3 Pins

Rated 3 Pins

Cost:  The ingredients are very basic to most kitchens with the exception of the maraschino cherries. The jar was less than $3. 5 Pins

Pintesting Rating - 5 Pins

Practicality:  These bite-sized cookies started vanishing before they were even drizzled with the chocolate. They were loaded with flavor, and my favorite Valentine (aka Handsome Hubby) loved them. They’re perfect for popping in your mouth. Don’t wait for Valentine’s Day, Christmas or any other holiday. Show yourself some love and make these now. 5 Pins

Pintesting Rating - 5 Pins

Spinach, Feta, and Sundried Tomato Stuffed Pork Chops

Oct 20, 2014 by Anne Hernandez

Sometimes Pinspiration strikes at the most random times; for example, while walking through the grocery store at 5:15 pm while you have no idea what you’re going to make for supper. There were these beautiful thick boneless pork chops on sale. When I say thick, I mean about 2 inches thick – perfect for splitting and stuffing.

Pintesting - Spinach, Feta and Sundried Tomato Stuffed Pork Chops - THICK Pork Chops

After a quick search on my cell phone, I found this pin for Spinach, Feta and Sundried Tomato Stuffed Pork Chops by Mary Kay of Homemade Cravings. Our family loves Mediterranean flavors, we had most of the ingredients, and it appeared simple and healthy, so this seemed like a great choice.

UPDATE: I’m sorry to say that the Homemade Cravings blog is no longer available. However, I have Mary Kay’s permission to link to the archived page and to print her original recipe which is at the bottom of the page.

Pintesting - Spinach, Feta and Sundried Tomato Stuffed Pork Chops - Original Pin

The Pintesting:

There are only 6 ingredients. The recipe calls for 1/2 cup chopped spinach but doesn’t specify fresh or frozen. I had frozen chopped spinach on hand, so that’s what I used. It also calls for 4 pork chops, but since it’s just the HH and me we used two and saved the extra stuffing to use in omelets. Also, the recipe called for pork chops with the bone in. I think these work well with or without the bone.

Pintesting - Spinach, Feta and Sundried Tomato Stuffed Pork Chops - Ingredients


You really want to use thick chops for this recipe. You can see that they’re thicker than my 1/2 cup measuring cup.

Pintesting - Spinach, Feta and Sundried Tomato Stuffed Pork Chops - THICK Chops

Mix the spinach, feta, and sundried tomatoes in a bowl.

Pintesting - Spinach, Feta and Sundried Tomato Stuffed Pork Chops - Filling


Season with salt and pepper

Pintesting - Spinach, Feta and Sundried Tomato Stuffed Pork Chops - Filling Mixed

Cut a slit in the pork chops, season with salt and pepper, and stuff them.

Pintesting - Spinach, Feta and Sundried Tomato Stuffed Pork Chops - Chops stuffed

The recipe says to soak toothpicks to secure the chops, then grill them. Our grill happened to be out of gas, so we chose to bake them standing up like they’re pictured.

Pintesting - Spinach, Feta and Sundried Tomato Stuffed Pork Chops - Supper

As you can see, this worked very well. The meat was moist and flavorful, and the stuffing was delicious. I served these with couscous and broccoli. I’d like to try them grilled the next time we make them just to see if it adds another level of flavor.

The Recipe:

Pintesting - Spinach, Feta and Sundried Tomato Stuffed Pork Chops - ORIGINAL RECIPE


The Pintesting Results:

Overall results:  4.7 Pins

Pintesting - 5 Pins Overall Rating

Accuracy:  As I hoped, this was a simple yet delicious entree. The pork chops were juicy, and the flavors of the stuffing really made a delicious combination. It executed just as the recipe said. 5 Pins

Pintesting Rating - 5 Pins

Difficulty: You get a lot of taste for as simple as this recipe is. Mix a few ingredients, season, slice, stuff, and grill (or bake). You want to use caution when cutting the chop so that you don’t go all the way through, but i didn’t feel that was increasing the difficulty level. 5 Pins

Pintesting Rating - 5 Pins

Time: This would be perfect for a 30-minute-meal if you’re grilling. Since I baked them, it took a bit longer – about 45 minutes. Still, that isn’t very long for supper. The rest of the meal came together while they were in the oven. As a bonus, the extra stuffing ingredients make a fantastic omelet filling, so that cuts down on breakfast time the next day. 4 Pins

Pintesting Rating - 4 Pins

Cost: I was fortunate to get the thick boneless pork chops on sale – BECAUSE they were on sale. I also lucked out because I had bought sundried tomatoes on a buy one get one free sale, too. I don’t know that every kitchen normally stocks feta and sundried tomatoes, so I’m giving this 4 Pins.

Pintesting Rating - 4 Pins

Practicality: The simplicity, fast preparation, and delicious flavors of this were wonderful. The HH really enjoyed it and said he’d like to have it again. I also love that, in our case, we could use the filling as a way to get extra veggies and pump up the flavor of breakfast, too.  5 Pins

Pintesting Rating - 5 Pins


Oatmeal Fudge Bars

Oct 13, 2014 by Anne Hernandez

Some of you know that I’ve been working very hard to change to a healthier lifestyle and lose weight, although the weight loss is secondary to getting healthy and fit. The problem is that I also love to cook and bake, and I don’t always want to choose the celery and peanut-butter rather than a rich dessert. Don’t get me wrong – I really like healthy foods, but I’m honest enough to admit to having moments of weakness. (Don’t we all?)

So when I saw this pin for Oatmeal Fudge Bars by Deborah from her blog Taste and Tell, my eyes lit on the “Oatmeal” and my brain tried to convince me that these were healthy. Well, oatmeal IS healthy… and chocolate has lots of antioxidants… and it would pair so nicely with coffee, which also has antioxidants.

Pintesting - Oatmeal Fudge Bars - ORIGINAL PIN

Yes, I followed that logic right down the path to the kitchen. I mean, wouldn’t you? And since I had all of the ingredients, I thought it was a sign that this was the right thing to do. As you can see, the ingredients are pretty basic.

Pintesting - Oatmeal Fudge Bars - Ingredients

The first step is to prep the pan with non-stick spray, parchment paper, and more spray.

Pintesting - Oatmeal Fudge Bars - Prep the Pan

Cream the sugar and butter,

Pintesting - Oatmeal Fudge Bars

…until it’s light and fluffy.

Pintesting - Oatmeal Fudge Bars

Add in the eggs and vanilla.

Pintesting - Oatmeal Fudge Bars

Mix the dry ingredients

Pintesting - Oatmeal Fudge Bars - Mixed Dry Ingredients

Then add them to the creamed mixture

Pintesting - Oatmeal Fudge Bars - Crust combinedPintesting - Oatmeal Fudge Bars - Crust

and pat it into the pan, reserving 1/3 of the mixture.

Pintesting - Oatmeal Fudge Bars - Pat Crust Into Pan

Now for the fudge layer.  Melt the milk, chocolate, and butter in a saucepan, stirring until smooth.

Pintesting - Oatmeal Fudge Bars - Fudge Filling

Stir in the vanilla and salt.

Pintesting - Oatmeal Fudge Bars - Add vanilla and salt and stir until smooth

Spread the fudge mixture over the crust (after a quick taste test), then crumble the reserved crust mixture over the fudge layer.

Pintesting - Oatmeal Fudge Bars - Top with reserved crust mixture

Bake at 350 for 25 minutes.

Deborah says to let the bars cool before cutting, but she didn’t say for how long. I waited for 20-30 minutes because they smelled so good and I didn’t want my coffee to get cold. (Seems like a legit reason.) You can see that in the first picture that the fudge layer didn’t have long enough to get really set and solidified. The next day, however, these cut much better and the fudge layer seemed fudgier (2nd picture).

Pintesting - Oatmeal Fudge Bars - warm and cold

These bars were a huge hit. The HH loved them. They were delicious both warm-ish and completely cooled. Will I make these again? ABSOLUTELY!

Overall Results: 4.7 Pins

Pintesting - 5 Pins Overall Rating

Accuracy: These bars turned out exactly like they were portrayed. The oat cookie crust and crumble were the perfect compliment to the rich fudgy filling. The recipe was detailed and straightforward with no issues or surprises. It would have been good to know that these are best served completely cooled for the filling, but they were delicious either way. 5 Pins

Pintesting Rating -  5 Pins

Difficulty: The bars were simple to make and the recipe was easy to follow. Because of the added cooking step rather than just mixing and baking, I’m giving this 4 Pins.

Pintesting Rating - 4 Pins

Time: The prep time took 20-25 minutes – longer than the 15 minutes in the recipe. However, I’m trying to take pictures while working a recipe for the 1st time. The total time, including cooling time which is necessary, came to almost 1 1/2 hours. This is a perfect recipe to make early in the day or even the night before. 4 Pins

Pintesting Rating - 4 Pins

Cost: I had every single ingredient in my cupboard for this recipe. Not running out to the store is a good thing. Even if you did have to make a grocery run, not any ingredient is more than a few dollars. 5 Pins

Pintesting Rating -  5 Pins

Practicality: We had these for dessert, in our lunches, and as snacks. They would be great for a cookie exchange, potluck, or… anything. The cookie on top and bottom makes it not as messy for eating with your hands rather than a fork – again, perfect for kids lunches. 5 Pins

Pintesting Rating -  5 Pins