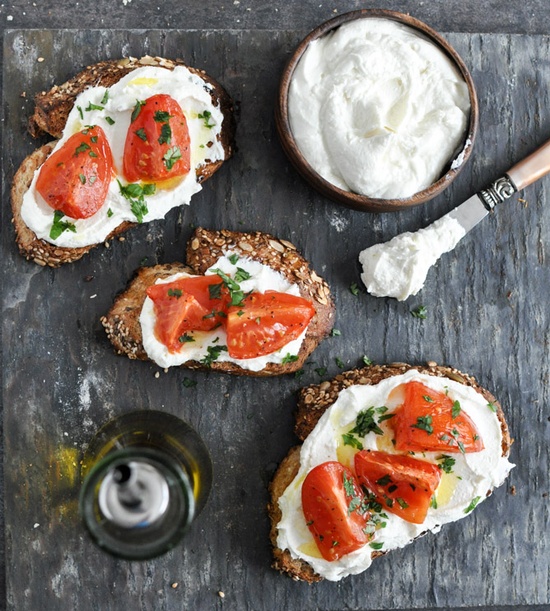
Pies, Tarts, and Crostatas – usually, when I think of pies and tarts they’re filled with something sweet and fruity, chocolate, or other lusciously sweet concoction. That’s part of why I was so excited to be a judge at the American Pie Council National Championships this year. I mean, who wouldn’t want to sit and eat pie for two days? I learned very quickly that you should NOT pick your favorite kind of pie to judge. Why? Because after more than 30 cherry pies (including gluten-free and no sugar added) I think it’s going to be a very long time before I’ll want another cherry pie again. It was really inspirational to see all of those beautiful pies – some were works of art. I don’t usually make pies so I was searching pies and tarts when I came across this pin for Creamy Herbed Ricotta and Asparagus Puff Pastry Tart by Michelle of The Brooklyn Cook. Ooh, a SAVORY option!
I hadn’t really thought of savory for pies except for pot pies. There was something very fresh and light looking about this one so I knew I wanted to try it.
The Pintesting:
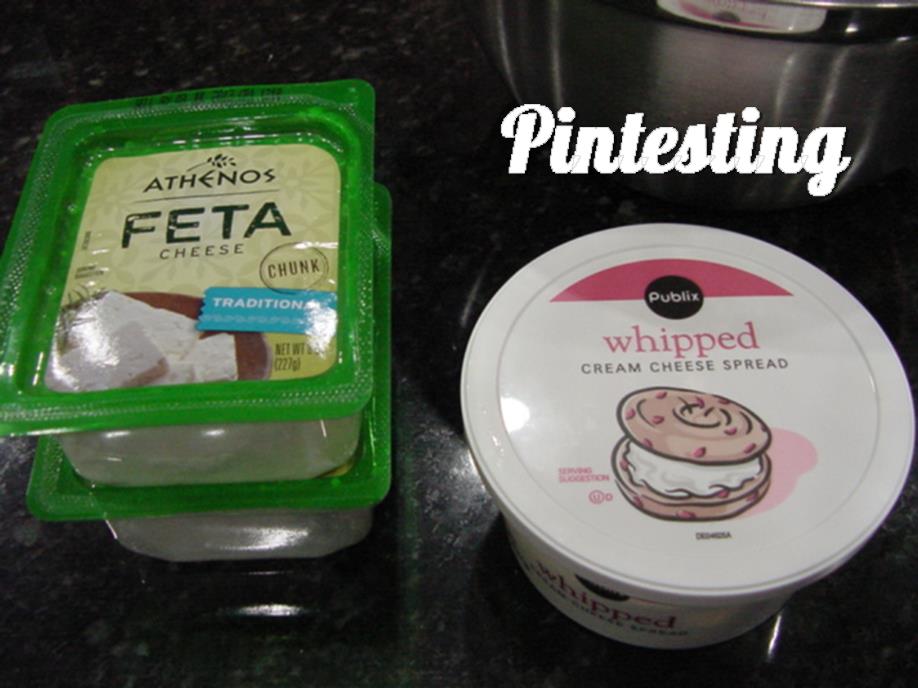
The ingredients were pretty simple and using puff pastry made the crust a breeze. The only down side is that I couldn’t find fresh for all of the herbs so I decided to use the 1:3 ration and substitute dried herbs. More about that later.
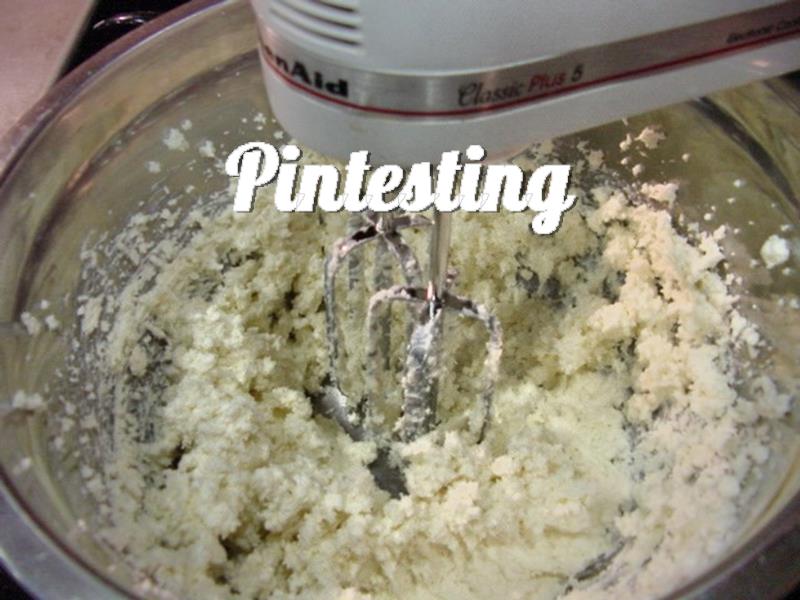
First, mix the ricotta mixture.
Then score the puff pastry around all of the sides. This will help give the crust its edges when it bakes.
Spread the ricotta mixture inside the scored part of the crust.
Lay the asparagus on top of the ricotta. The recipe called for 1/2 pound of asparagus, trimmed, which is what I used. I suggest using thinner asparagus and perhaps a bit more.
Brush the edges with an egg wash.
Bake it until the crust is a beautiful golden brown and the ricotta mixture is cooked through.
This is listed as an appetizer, but it would also make a nice vegetarian lunch or dinner dish with a salad.
The HH and I both thought it was a bit too herby for our taste. This could be because I used dry herbs rather than fresh, so the next time I’ll definitely use fresh and maybe add just a touch of lemon juice or zest into the ricotta mixture. Lemon and asparagus play so nicely together. I will also use more asparagus and alternate every other one so that there will be tips on both sides, and I’ll also try to measure the cut by the width of the pastry if possible.
>/div>
After you’ve had your appetizer or dinner, go ahead and have some pie for dessert! Here are a few pie pictures from the competition. If you’re not up for entering a pie, the American Pie Council is always looking for judges. Like I said, it’s a tough job but somebody’s got to do it.
The Pintesting Results:
Overall Results: 4.3 Pins
Accuracy: The recipe looked just like the original post. Usually you can use the 3 (fresh) to 1 (dried) ratio for herbs, but in this case the “herbiness” was overwhelming when using dried. I wasn’t able to get the fresh herbs but looking at the quantity of fresh herbs in the photos of the original post leaves me to believe that fresh would still be very herby. 4 Pins
Difficulty: This doesn’t take a lot of cullinary skill. You do have to trim the ends of the asparagus so there is a bit of knife work. However, it’s rather minimal so I’m giving this 4 Pins.
Time: Start to finish this took just under half an hour and is a great weeknight meal or a quick appetizer. 5 Pins
Cost: Puff pastry and asparagus are the two most expensive ingredients in this recipe. Even so, the total cost was roughly $16. There were 4 entrée-sized portions or $4/serving. You can cut that in half for 8 appetizers. This cost could be higher if you bought fresh herbs at the grocery store (or free if you have an herb garden). 4 Pins
Practicality: This is a lovely idea for an appetizer, side dish, or even as a vegetarian entrée. You can adjust the amount and kinds of herbs used to suit your taste. (I’m definitly going to try some lemon, too) You can even switch up the veggies used if you don’t care for asparagus. The options are pretty open on this one so I’m giving this 5 Pins.
Sometimes I get things that look amazing as an impulse purchase. Some people might be tempted by a cute pair of shoes, a new outfit, or the latest tech gadget. More often than not, my impulse buys are food related. I see a recipe that sounds good and I’m off to the store, and that’s what happened when I saw these BLT Lettuce Wraps.
I first saw this video clip on Facebook and then the pin popped up on my Pinterest feed. I love BLT sandwiches as you can see from the Weave Your Bacon BLT and Egg Salad BLTA Sandwich posts. This BLT Lettuce Wraps recipe was trying to sound healthy since it doesn’t have any bread and is, therefore, no-carb. I thought, sure, let’s go with it. Anytime you want to try to combine BLT + healthy I’m willing to give it a try.
The Pintesting:
The beauty of this recipe is in its simplicity. Large leafy romaine lettuce, juicy tomatoes, mayo and bacon. Although not specified, I seasoned my tomato halves with salt and pepper.
Spread some mayonnaise on a romaine lettuce leaf and top with several tomato halves. TIP: make sure your romaine lettuce leaves are blotted dry if you want the mayo to stick.
Add the bacon and you’re done.
I put three on a plate thinking that this should be the serving size because that’s what the video did. After all, these BLT Lettuce Wraps are supposed to replace a BLT sandwich.
I have to say that it was not easy to get the pictures before digging into these BLT Lettuce Wraps.
I made a total of 6; three each for my HH and me. They were delicious if just a wee bit messy. I’m not sure if I should have used two slices of bacon on each wrap, but I think that would have thrown off the balance of the B-L-T. That said, after finishing them we both still felt hungry and agreed that these would be a fantastic appetizer, salad, or finger salad (if there’s such a thing, and if not I just made it up).
The Pintesting Results:
OVERALL RESULTS: 4.85 PINS
Accuracy: The recipe was very simple and straight forward and the taste was delicious. I was very pleased that it turned out exactly as the recipe and video said that it would. I also liked how refreshing they looked. 5 Pins
Difficulty: This was one step easier than a traditional BLT in that there’s no bread to toast, but the rest of the process was pretty much the same. 5 Pins
Time: Putting this together took very little time. The longest part was cooking the bacon, and I did that on the stove-top so it took about 15 minutes for crispy thick-cut bacon. From prep to plate took 20 minutes – 5 Pins.
Cost: This is a low cost dish – especially if you get the bacon on sale (which I did; buy one get one free). The romaine came two heads to a package and there was a LOT leftover that I used for salads. The tomatoes were also buy one get one free, so the cost per BLT wrap was less than a dollar. 5 Pins
Practicality: If you’re looking for a satisfying meal then you might be disappointed. If you’re looking for some great taste, a gluten-free or paleo BLT snack, an appetizer, or a salad that’s finger food, then this is a fantastic recipe. The original recipe doesn’t specify that it will be as filling as a BLT sandwich, but three to a serving size should have at least been close. Even people on diets don’t want to feel hungry after eating. Therefore, I’m giving this 4 Pins.
I’m always on the lookout for delicious and healthy food. Yes, I want to lose weight (as does the handsome husband), but more importantly, we want to eat real and healthy food as much as possible. Diets that cut out whole food groups never sounded healthy, balanced or sustainable. The minute you eat a carb or fat gram, you blow up like a puffer fish. That’s not realistic, nor is it any way to live. I prefer the European mindset on eating – particularly the French. They eat amazing food that’s esteemed as the top of the culinary ladder. They drink wine with their meals. They celebrate food, family and friends. And with all of this partying, they don’t have the obesity problems, heart problems, and other health problems that we do here in the US.
So five years ago, when we started researching a diet we could live with, we focused on Mediterranean diets. After spending days looking online and in book stores, we ended up choosing The Sonoma Diet. Their philosophy is to celebrate food by eating the best foods in the proper portions, which will make you healthier and lose weight. As long as we “keep to the code” and don’t start eating processed or junk food, we have had great success with this. The recipes are delicious and we felt great and were losing weight. There have been times when we drifted for the sake of convenience, laziness, or even for Pintesting. But we always come back to the good way of eating since this is a marathon for life, not a sprint toward a number on the scale.
I LOVE Feta. Okay, I love cheese. Period. But there’s something about the salty, tangy, briney bite of Feta that makes my taste-buds dance and sing. Crumbled on a salad or pizza or sandwich… Mmm! It’s the crumble part that sometimes makes it hard to work with. So when I saw This Pin for Whipped Feta from Jessica’s blog How Sweet It Is, that seemed like it could be worked into a healthy lifestyle AND make a spreadable version, I was ready to give this a go.
Ingredients – there are two; whipped cream cheese and feta cheese. VERY IMPORTANT!!! Both need to be at room temperature. I set these out in the morning before going to my Saturday morning Zumba class. They were just right when I got home almost 2 hours later.
Mix them together until they’re thoroughly combined. In her blog post, Jessica used her food processor for this, and I totally understand why. Mine was already occupied, so I spent extra time with a hand mixer. This is why you want the cheeses at room temperature.
That’s it! Now you can spread this whipped feta onto whatever you want to make delicious. I toasted several slices of pumpernickel bread and asked my friend, who carpools with me to Zumba, for her opinion. First we tasted the whipped feta with a spoon so that we could get the unadulterated flavor. In a word – YUM! The salty, tangy taste of the feta was predominant, but the creamy smoothness of the whipped cream cheese softened it a bit. It was also delicious on the pumpernickel toast. But when we topped it with tomato slices and a drizzle of balsamic vinegar, as Jessica suggested, that was beyond amazing. I can’t even tell you how good it was. Just go and make some for yourself, because I’m not sharing any more.
The results of the Pintesting are as follows:
Overview: 5 Pins
Accuracy: The creamy smooth texture with the taste of feta was wonderful. I didn’t follow the instructions precisely since I didn’t use my food processor, but the extra time with the hand mixer gave wonderful results. For those who don’t have a food processor, this is welcomed news. 5 Pins
Difficulty: Two ingredients, mix, serve. Just don’t forget to bring them to room temperature or you won’t get the same results. 5 Pins
Time: The mixing time is super quick – maybe 5 minutes with a hand mixer. Since the cheese need to be at room temperature, which takes a couple of hours, I’m giving this 4 Pins.
Cost: The whipped cream cheese and feta both came to just under $6.00, and this makes enough to use for several days. 5 Pins
Practicality: This was delicious served on the pumpernickel bread, both with and without the tomatoes and balsamic vinegar. I can’t wait to try it as a spread for sandwiches, wraps, and crostini. I think it would be amazing with mix ins like dill, oregano, olives, roasted red peppers, roasted garlic, or even swirled with hummus. It’s simplicity lends to lots of uses. 5 Pins
This is the second of two Pin Tests that I made one evening for supper. I thought it would be great to be able to do a two-for-one meal. The theory was a good one, but not everything turned out exactly as I had hoped. The first post (voted first by my readers) was for Baked Parmesan Tomatoes. You can read about the results by clicking the link.
THIS post is for a recipe with one of the most fun food names I’ve heard in a long time – Meatball Bubble Biscuits. Say that five times fast. Meatball Bubble Biscuits… Meatball Bubble Biscuits… Meatbub Bubba Biscuits… (I bet you’ve got a grin on!)
I love to laugh. Ages ago, when my girls were little, I did home childcare. Kids come up with some of the funniest things without trying. I have 15 years worth of funny daycare stories about nearly a hundred children I loved as my own. One of my little 5-year old guys was sitting at the kitchen counter after morning kindergarten. The other kids were down for naps already and were talking while he was having lunch. He told me something that I can’t remember, but my response was, “are you serious?” He replied, with a perfectly straight face, “yes, I’m very serious”. I said, “Oh, well I’m serious, too”, with an equally straight face. With a perfect poker face he said, “we are very serious”. This “serious” banter went on back and forth for several minutes before we looked into each others eyes and started laughing and laughing.
So other than the recipe having a funny name, what does that have to do with the story? Not a blessed thing. But I think the kids would have liked a food called Meatball Bubble Biscuits. So glad that I saw this pin from Kathie, of the blog Kathie Cooks.
Let the Pin Test begin! There aren’t a lot of ingredients, and all are easy to find. The only flaky-style biscuits I could find were the Grands variety, so that’s what I went with.
I cut the meatballs and string cheese, and split the biscuits in half.
Each biscuit got one half meatball and a piece of mozzarella,
then was wrapped up in the biscuit dough. I pinched to seal the dough, then rolled each one to make a bit more round.
Put them all in a round cake pan. No need to grease the pan.
Sprinkle the lot with the seasonings and Parmesan. I went light with the Parmesan after what happened to the Parmesan Baked Tomatoes, and decided to sprinkle more as they came out of the oven.
Kathie says to bake for 18-20 minutes, so I went with the lowest time.
And this is what you get. You can see the extra Parmesan that got sprinkled as soon as these beauties came out of the oven.
I served them with spaghetti and meatballs, extra spaghetti sauce for dipping, and the Baked Parmesan Tomatoes. Yes, everything is sprinkled with Parmesan – I mean, it’s cheese! Doesn’t cheese make almost everything better?
Overall Rating: 5 Pins
Accuracy: The recipe was simple and the results were just like Kathie’s picture. The garlic and Italian seasoning gave a nice flavor to what would have been plain dough. I might try brushing the tops with some melted butter next time – just to see what happens. The meatballs were thoroughly cooked and the mozzarella was melted. 5 pins
Difficulty: This was easy – perfect to let the kids help assemble. 5 pins
Time: It took about 5-10 minutes to assemble these, and roughly 20 baking time (or less). At just over half an hour, 5 pins.
Cost: The meatballs were on sale for $3.95, which was the most expensive ingredient. I had the seasonings on hand, but those can be gotten very inexpensively. 5 pins.
Practicality: This recipe would be nice as an appetizer or as part of the main meal. It’s kid friendly, but also delicious to adults. My husband thought they were the best part of the meal. 5 pins