There are a lot of the fun versions of the original “Keep Calm and Carry On,” many of which made it to my Things for My Wall board on Pinterest. Some of them just crack me up. These are some of my favorites. They’re really not in any kind of order, so just scroll through and see what keeps you calm – or not.
Well, that’s all for now. Have a wonderful rest of the weekend and Keep Calm – things have a way of working out. What are your favorite “Keep Calm” saying? Please share them in the comments below.
I’m always on the lookout for delicious and healthy food. Yes, I want to lose weight (as does the handsome husband), but more importantly, we want to eat real and healthy food as much as possible. Diets that cut out whole food groups never sounded healthy, balanced or sustainable. The minute you eat a carb or fat gram, you blow up like a puffer fish. That’s not realistic, nor is it any way to live. I prefer the European mindset on eating – particularly the French. They eat amazing food that’s esteemed as the top of the culinary ladder. They drink wine with their meals. They celebrate food, family and friends. And with all of this partying, they don’t have the obesity problems, heart problems, and other health problems that we do here in the US.
So five years ago, when we started researching a diet we could live with, we focused on Mediterranean diets. After spending days looking online and in book stores, we ended up choosing The Sonoma Diet. Their philosophy is to celebrate food by eating the best foods in the proper portions, which will make you healthier and lose weight. As long as we “keep to the code” and don’t start eating processed or junk food, we have had great success with this. The recipes are delicious and we felt great and were losing weight. There have been times when we drifted for the sake of convenience, laziness, or even for Pintesting. But we always come back to the good way of eating since this is a marathon for life, not a sprint toward a number on the scale.
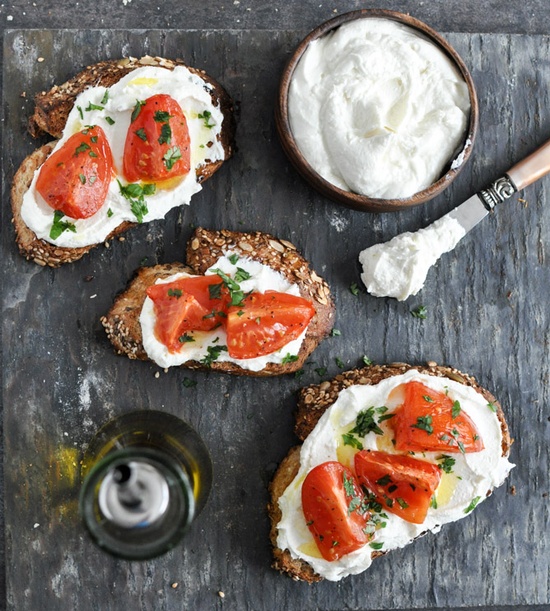
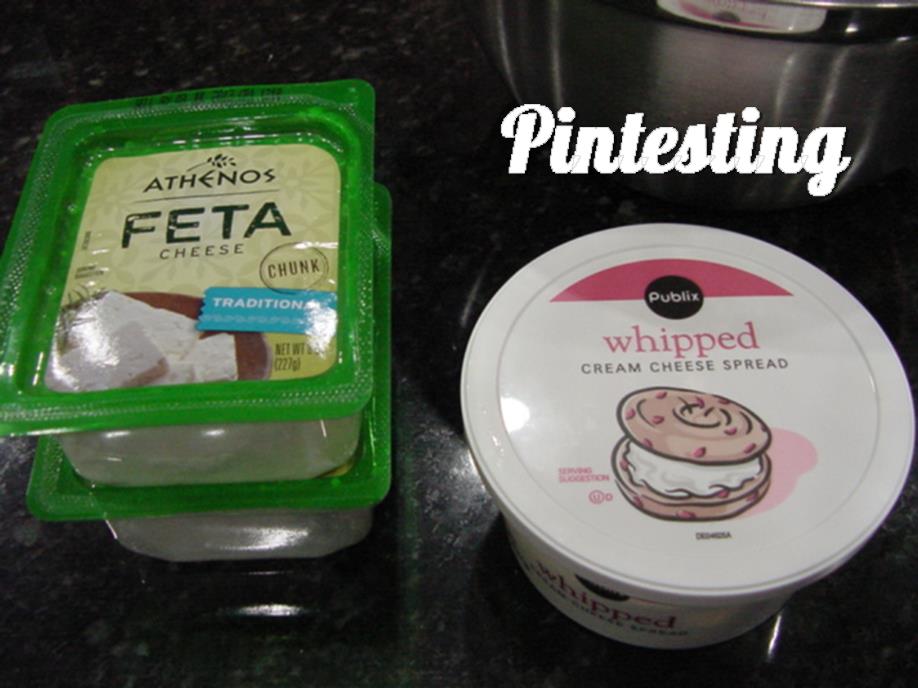
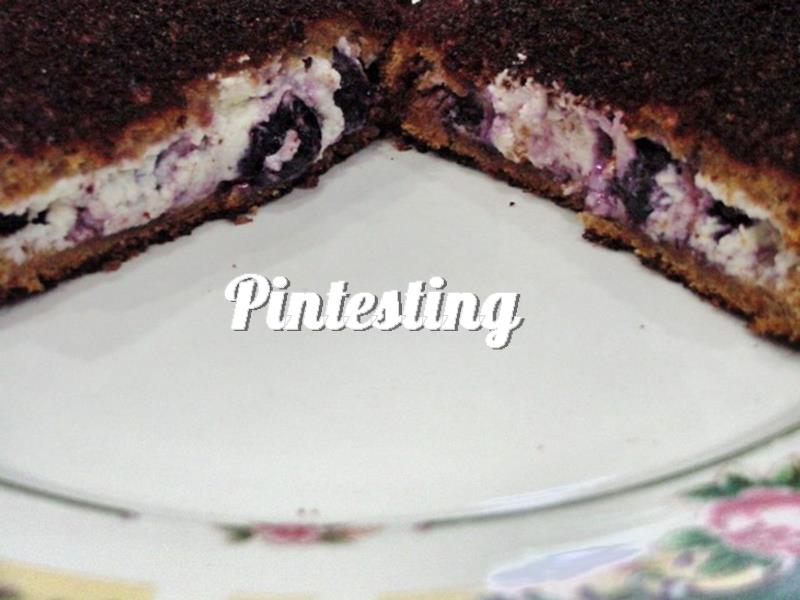
I LOVE Feta. Okay, I love cheese. Period. But there’s something about the salty, tangy, briney bite of Feta that makes my taste-buds dance and sing. Crumbled on a salad or pizza or sandwich… Mmm! It’s the crumble part that sometimes makes it hard to work with. So when I saw This Pin for Whipped Feta from Jessica’s blog How Sweet It Is, that seemed like it could be worked into a healthy lifestyle AND make a spreadable version, I was ready to give this a go.
Ingredients – there are two; whipped cream cheese and feta cheese. VERY IMPORTANT!!! Both need to be at room temperature. I set these out in the morning before going to my Saturday morning Zumba class. They were just right when I got home almost 2 hours later.
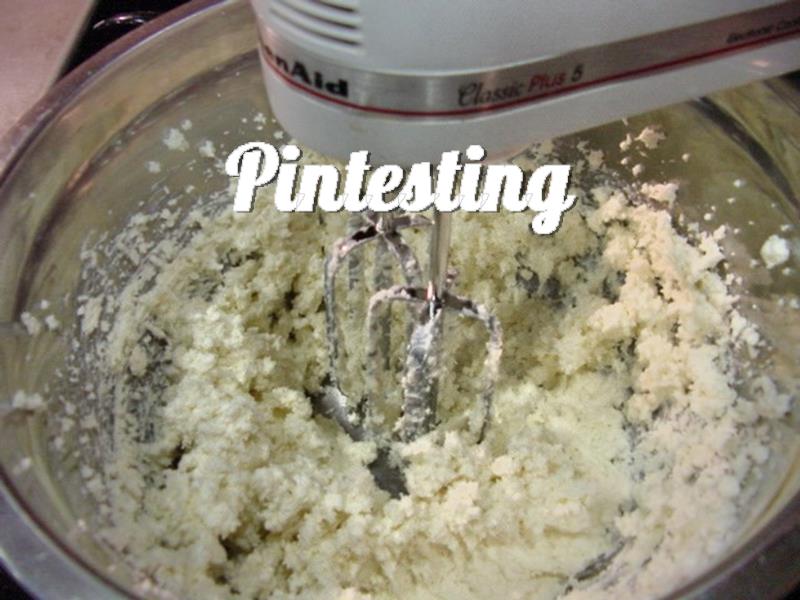
Mix them together until they’re thoroughly combined. In her blog post, Jessica used her food processor for this, and I totally understand why. Mine was already occupied, so I spent extra time with a hand mixer. This is why you want the cheeses at room temperature.
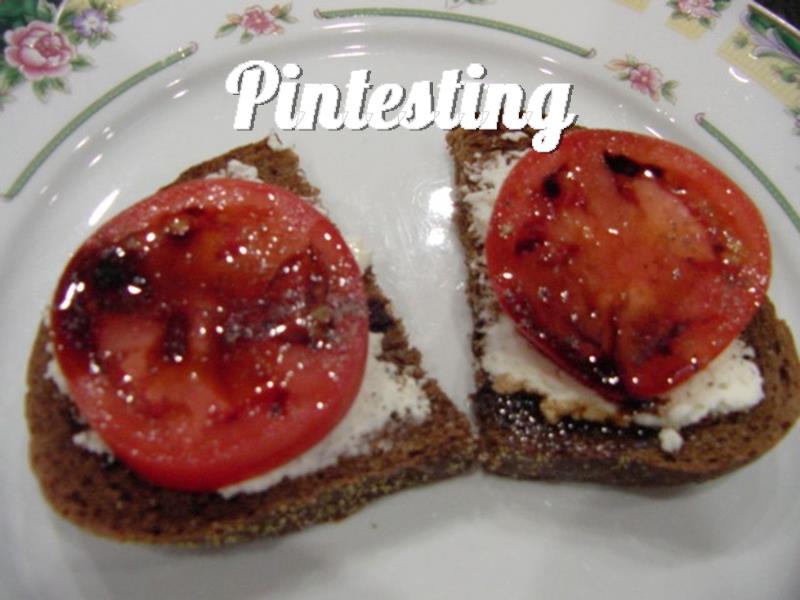
That’s it! Now you can spread this whipped feta onto whatever you want to make delicious. I toasted several slices of pumpernickel bread and asked my friend, who carpools with me to Zumba, for her opinion. First we tasted the whipped feta with a spoon so that we could get the unadulterated flavor. In a word – YUM! The salty, tangy taste of the feta was predominant, but the creamy smoothness of the whipped cream cheese softened it a bit. It was also delicious on the pumpernickel toast. But when we topped it with tomato slices and a drizzle of balsamic vinegar, as Jessica suggested, that was beyond amazing. I can’t even tell you how good it was. Just go and make some for yourself, because I’m not sharing any more.
The results of the Pintesting are as follows:
Overview: 5 Pins
Accuracy: The creamy smooth texture with the taste of feta was wonderful. I didn’t follow the instructions precisely since I didn’t use my food processor, but the extra time with the hand mixer gave wonderful results. For those who don’t have a food processor, this is welcomed news. 5 Pins
Difficulty: Two ingredients, mix, serve. Just don’t forget to bring them to room temperature or you won’t get the same results. 5 Pins
Time: The mixing time is super quick – maybe 5 minutes with a hand mixer. Since the cheese need to be at room temperature, which takes a couple of hours, I’m giving this 4 Pins.
Cost: The whipped cream cheese and feta both came to just under $6.00, and this makes enough to use for several days. 5 Pins
Practicality: This was delicious served on the pumpernickel bread, both with and without the tomatoes and balsamic vinegar. I can’t wait to try it as a spread for sandwiches, wraps, and crostini. I think it would be amazing with mix ins like dill, oregano, olives, roasted red peppers, roasted garlic, or even swirled with hummus. It’s simplicity lends to lots of uses. 5 Pins
Does anyone else have a busy life? Dumbest. Question. Ever. Trying to balance all of life’s aspects requires about 32 hours a day, but we only get 24. That’s why I LOVE crock pot cooking. It’s a HUGE time saver! Simply dump (or carefully layer) the ingredients into the magical appliance, turn it on, and walk away. Hours later I come home to a house that smells amazing and dinner (or supper, depending on where you are in the world) is DONE! I have some family favorite recipes but am always on the lookout for something new. I found such a recipe while perusing through Pinterest and spotted this pin for Crock Pot Spicy Buffalo Ranch Chicken from Tammilee’s Tips. Three ingredients that look like a cross between BBQ Chicken in texture and Buffalo Chicken in taste.
THREE INGREDIENTS – I’m in! Let’s try this.
The Pintesting:
So here are the ingredients; chicken, buffalo sauce, and ranch mix.
Dump everything into the crock pot.
Turn it on low, then walk away. For those who have an aversion to leaving a kitchen appliance on all day – especially if you’re not home to watch it (yes, I know you’re out there and it’s okay), just put the crock pot on your stove top. I have a friend who just couldn’t leave a crock pot on her counter to cook while she was gone to work. When I suggested this, it made everything okay and she started making crock pot meals 3-4 times a week. Don’t ask or question, just do it.
After you get home (6-8 hours later), it will look like this.
Shred the chicken. I used the two carving forks that came with my knife set because of their long handles which allowed me to shred it in the crock pot without getting my hands too close to the food or the hot sides.
There, the chicken is DONE! Since this is buffalo chicken, I wanted a side that would balance the spiciness. What could be better than the traditional carrots and celery with ranch? How about a coleslaw salad with lots of carrots and celery and a ranch-slaw dressing? YES! So here’s my non-recipe recipe.
One bag of coleslaw, about half of a bag of shredded carrots, and 3-4 stalks of celery chopped small.
For the dressing, I used equal parts of coleslaw dressing and ranch dressing.
Toss it all together and serve. That’s 5 minutes for a super yummy salad!
We’re trying to lose some weight in my family, so when I asked if the chicken should be served with or without the buns, the unanimous response was without. Here’s our supper, and I have to say it was amazing! Tons of flavor with a nice balance between the coolness of the slaw and the heat from the chicken. It makes a lot, so it’s perfect for sharing. The next time I make this, I will try making buffalo tacos with the combo. Now, for the Pintesting results.
The Pintesting Results:
Overall Results: 4.85 Pins
Accuracy: This captured the fun of Buffalo Wings, but in a form that’s easy to cook and serve without the messy fingers and moist towelettes. My husband and I don’t like lots of heat, so we used the regular buffalo sauce rather than the extra hot. I’d try mild if I could find it. If it’s still too much for your heat index, then try substituting a little barbecue sauce or add a bit of brown sugar. Even though it was spicier than just about anything we usually cook, we couldn’t stop eating – it was that good. 5 Pins
Difficulty: Three ingredients, dump, walk away, shred, eat, good. Folks, it doesn’t get much easier than that. 5 Pins
Time: I struggled with this because on the one hand, the prep was almost nonexistent. I literally dumped the bag of frozen chicken breasts into the crock pot, poured the bottle of buffalo sauce on top, then sprinkled the ranch mix. Two minutes tops. Once I got home, it took about 3 minutes to open the lid and shred the chicken. That’s 5 minutes, which would normally get 5 Pins. On the other hand, I feel like I have to account for the 8 hours of cook time while I was at work, which would normally get about 2-3 Pins if you were actively cooking for that length of time. I decided to go between the two, and look at it similarly to required chilling time. It’s necessary, but you’re not doing anything so I’m giving this 4 Pins.
Cost: The chicken breasts were about $6.50 for the bag and by far the most expensive ingredient. Total cost was about $10.00. But since this makes a lot of food, and will serve a family of 4 with plenty of leftovers, I’m giving it 5 Pins.
Practicality: Any crock pot meal is very practical for busy weekdays. The lack of chopping or other prep work makes this recipe even easier to throw together. It would also be PERFECT for a Super Bowl party. This would be great for any kind of party! 5 Pins
Summer is almost here. Depending on where you live, school is either already finished or nearly so. That means it’s time for summer vacations, and in my world that means lots and lots of snacks and foods in miniature sizes – perfect for taking to the park, to the beach, on a road trip, on an airplane, or just about anywhere.
I used to love having sandwiches cut up into quarters instead of just cut in half. Somehow that made them fancy and taste better. Little boxes of raisins, small packages of cheese and crackers, baggies of washed grapes, little bottles of soda (or pop, if you’re from Michigan), and individual bags of chips were some of the foods I remember on road trips. Mom was smart and did not let us have a bunch of sugary sweets when we would be stuck in the back seat of a car for hours, but sometimes we’d get Twinkies or cupcakes or Swiss rolls.
Now nothing can beat a good all-American apple pie, but they’re not very easy to eat when you’re on a road trip. Thankfully I saw this pin by Laurie from Cookin’ Up North who came up with a great solution. So let’s see if this is worthy of vacation food.
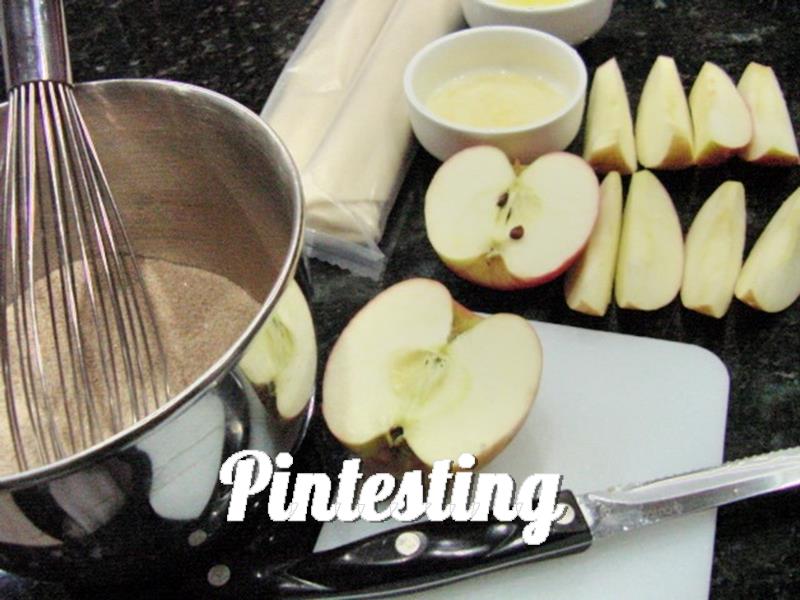
The ingredients are super simple; cinnamon, sugar, pie crust, butter and apples.
Mix the cinnamon sugar and slice the apples. Laurie wasn’t sure if the skins should be left on or peeled and chose the leave the skins on – this time. I decided to do both; one apple each way.
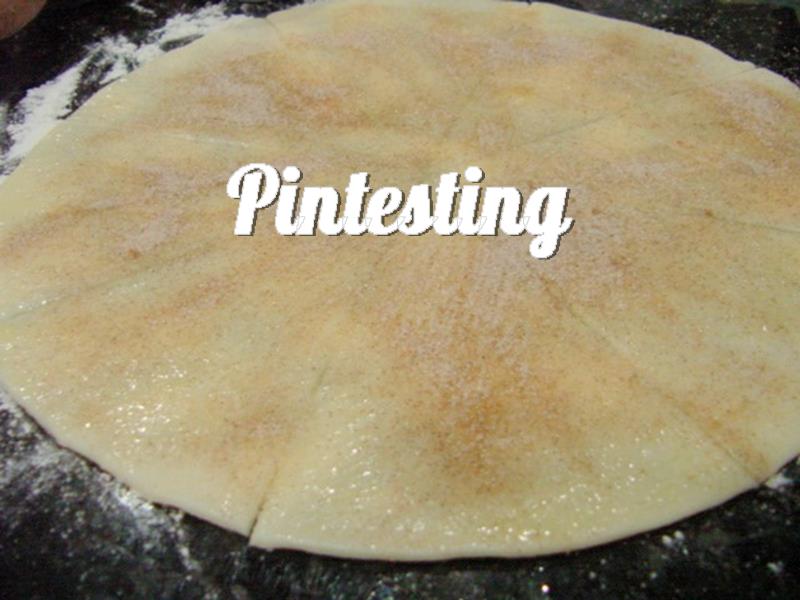
Brush the pie crust with melted butter and sprinkle with cinnamon sugar. Cut the crust into wedges. I used a pizza cutter for this step and it works like a charm!
Roll up the apple slices in the pie crust wedges.
Brush the outsides with butter and cinnamon sugar, then bake.
Let them cool at least a little before trying to eat these.
My oldest daughter and husband were there to give their opinion for the two varieties of the mini apple pies (with and without the peel). All three of us liked the peeled apple slices better than the skin-on apples. We found that the peel had a tendency to get stuck in our teeth, much like when you eat corn on the cob. The simple ingredients really showed off their flavors for both versions. I think I’d call these “Easy Peasy Apple Pies” because these cute little pies need a cute little name. Now, for the Pintesting results.
Overall Rating: 5 Pins
Accuracy: These little pies give a quick and easy way to enjoy the deliciousness of apple pies in a way that’s mobile friendly. BONUS – the built in portion control (IF you can eat just one). The crust was crispy and flaky, and the “filling” was perfect. 5 Pins
Difficulty: This was extremely simple. It would be a great recipe for kids to do with minimal adult supervision. 5 Pins
Time: The prep time was about 10 minutes, and the bake time was about 15 minutes for a total of 25 minutes. That’s really quick for home made apple pie. 5 Pins
Cost: The most expensive ingredient was the store-bought pie crust, which I bought on sale at 2 for $5. You could easily make your own pie crust, which would increase the time, but if you have a favorite recipe go ahead and us it. The remaining ingredients were already in my kitchen, and you’re likely to find in most other kitchens, too. 5 Pins
Practicality: These little pies would be perfect for lunches, after-school snacks, a picnic, road trip or even as flight food. They’re also perfect for a quick dessert. I think served warm with vanilla icecream would be fantastic! 5 Pins
I love goat cheese – especially with honey. My oldest daughter got me hooked on that, paired with a nice wine. (thank you sweetie). But I’d never heard of roasted grapes. I had no choice but to try this.
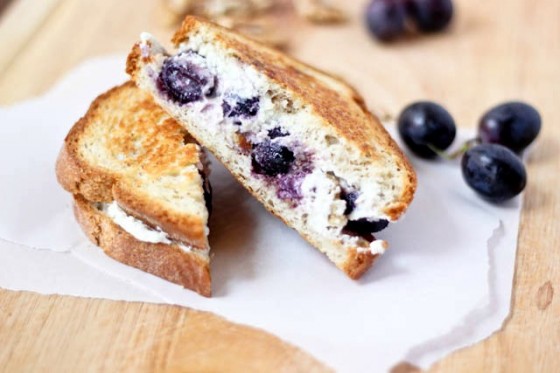
There’s something wonderful about Grilled Cheese. It’s one of my ultimate favorite comfort foods. I mean, what’s not to love? It’s about cheese – and well, that’s enough for me. But then take a grilled cheese sandwich and pair it with tomato soup and some apple slices, and I’m a happy 8-year-old again. And isn’t that what comfort food is all about? It brings you back to that time and place when everything in the world is “as it should be”.
The Pintesting:
The ingredients are few and simple. One note about grape seed oil, it has all of the same great health benefits that olive oil has, but it has a much higher smoke point. It also has a more neutral taste than olive oil, which can make it a better choice when cooking with delicate flavors. I keep both on hand in my kitchen at all times. Okay, back to the Pintesting.
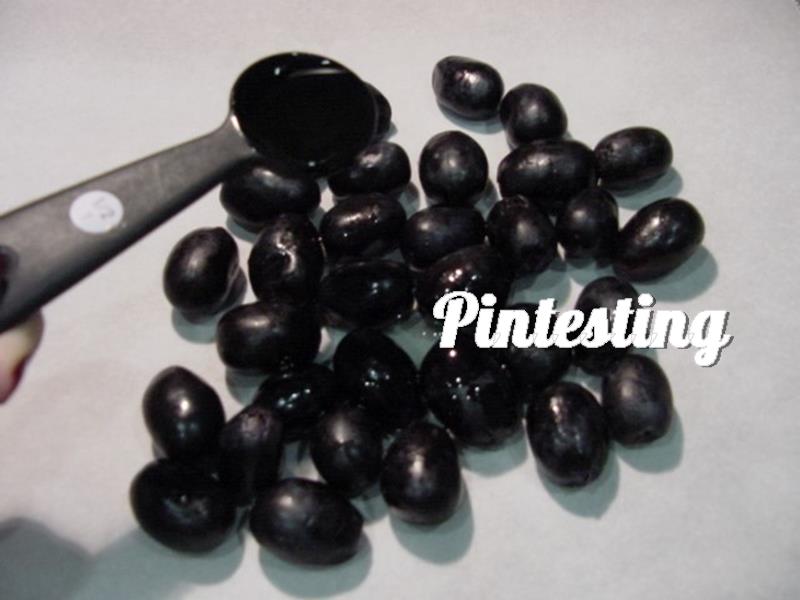
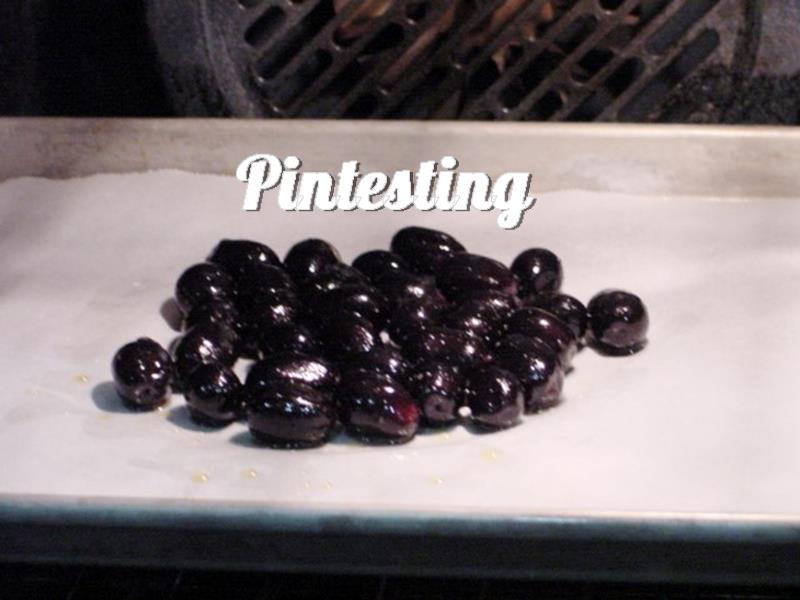
Prepare the grapes for roasting by tossing in a little grape seed oil, honey and a tiny pinch of salt.
Roast the grapes in the oven. . .
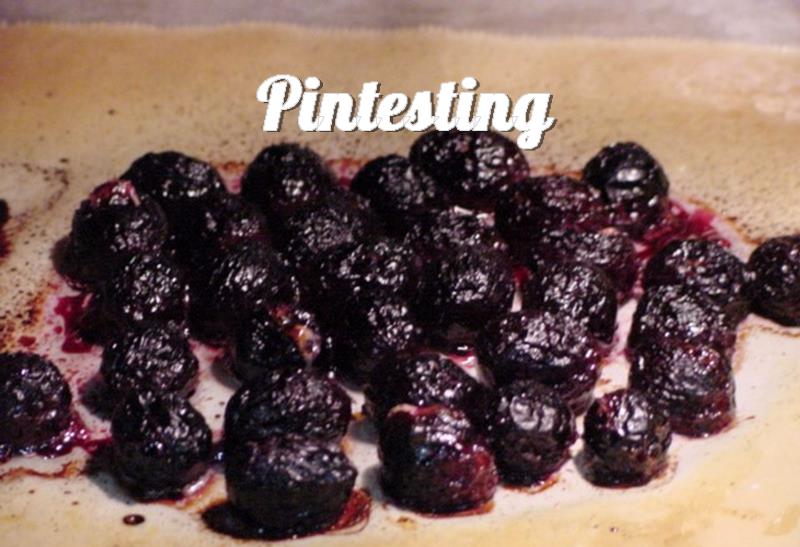
. . .until they look like this and make you drool from how amazing they smell.
NOTE: You might want to pop them in your mouth, but they’re HOT. Please refrain unless you like the feeling of your soft pallet melting.
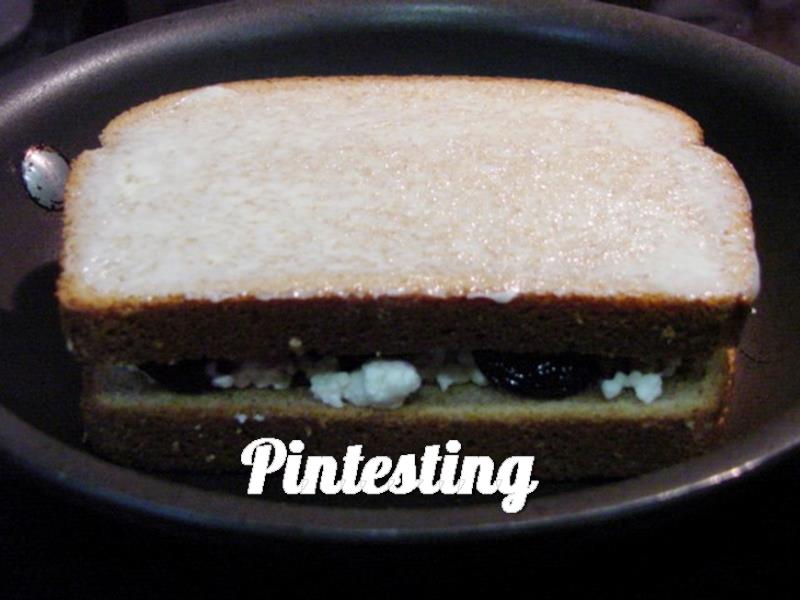
Build the sandwich by buttering the bread (don’t be stingy here). Put one slice buttered side down on the pan. Cover it with the goat cheese crumbles.
Top it with the grapes, walnuts and a drizzle of honey.
Then put the other slice of buttered bread on top of the sandwich.
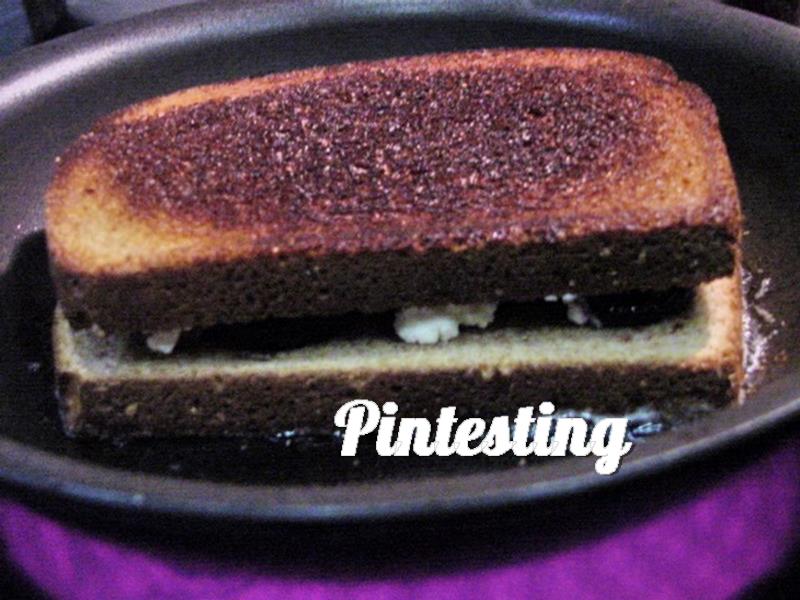
Make sure you preheat the pan and cook the sandwich no higher than medium heat. You don’t want to rush this or the bread will burn and the inside will be cold. This tip works on all grilled cheese sandwiches. Some things are worth the wait.
Cut, plate, eat. You’re welcome. After enjoying this over the weekend, I decided to make another to take to work on Monday. I ate half and cut the rest into bite-sized pieces to let my foodie friends to taste. I had marriage offers. Yes, they know I’m happily was married. THIS is how to win friends and influence people – with food.
The Pintesting Results:
Overall Rating: 4.85 PinsAccuracy: These sandwiches are a fabulous twist on the traditional grilled cheese. The honey roasted grapes are pure genius! Roasting intensifies and deepens the flavor of the grapes. One of my co-workers said the flavor reminded her of concord grape juice or jelly. The combination of the tangy goat cheese with the sweet but not too sweet grapes, and the crunchy walnuts is a perfect trifecta of Umami. 5 PinsDifficulty: The recipe is easy to follow, and the hardest part is to NOT pop a roasted grape into your mouth as soon as they come out of the oven. The hardest part was flipping the sandwich after the first side was grilled. I needed careful maneuvering to keep the grapes and walnuts from falling out; I used one hand to guide while flipping with the spatula. It was worth the effort. 5 PinsTime: The grapes took 20 minutes to roast, and the sandwich was grilled in about 7 minutes since I cooked it lower and slower. I recommend making a double batch of the grapes and saving the extra for sandwiches or making these open-faced as an appetizer on crostini. 5 PinsCost: While none of the individual ingredients are overly expensive, grape seed oil and goat cheese crumbles are not common to all kitchens. Even though they are in most grocery stores, depending on where you live they could be a bit pricey. I happen to keep grape seed oil as a staple in my pantry, but had to run out to get the goat cheese. For that reason I give cost 4 Pins.Practicality: This is a wonderful grown-up version of a grilled cheese sandwich that somehow makes me think of French cooking. I brought some to a friend who is French and was a restaurateur for many years; now he has a lovely wine shop with his lovely wife. He said that although it isn’t a French recipe that he’d heard of, it had a French quality about it and was delicious. Vive fromage grillé! 5 Pins
Mmmm, Sangria! A fruity party in a pitcher. May is a month of celebrations; Star Wars Day (May the fourth be with you), Cinco de Mayo, Mother’s Day, and Memorial Day. Cinco de Mayo is a favorite of the foodie in me. I asked my handsome husband what foods would he like to celebrate the day. Being half Mexican I expected him to respond with some really awesome meal ideas like Chilies Rellenos or something on those lines. He tipped his head in thought for a moment, then said, “I think corned beef and cabbage sounds good. Doesn’t that sound good to you?”
WHAT?!?!?!? Okay, maybe he enjoyed St. Patty’s Day so much that he wanted a re-do. Maybe the Irish part in him was speaking up very loudly. Or maybe he was holiday confused. I just don’t know.
There was a brief moment where I considered just going with it, but it was very very brief. I LOVE Mexican and Tex-Mex food and just couldn’t let the day go by without so much as a taco. At the same time, I find it extremely difficult to not give my wonderful hard-working husband whatever he wants (within reason). So after considering several options, we decided to go with food from the greater Hispanic cuisine that would still give my sweetie some of his wish – Puerto Rican Corned Beef and Rice served with Sangria. Call it Spanish fusion and go with it.
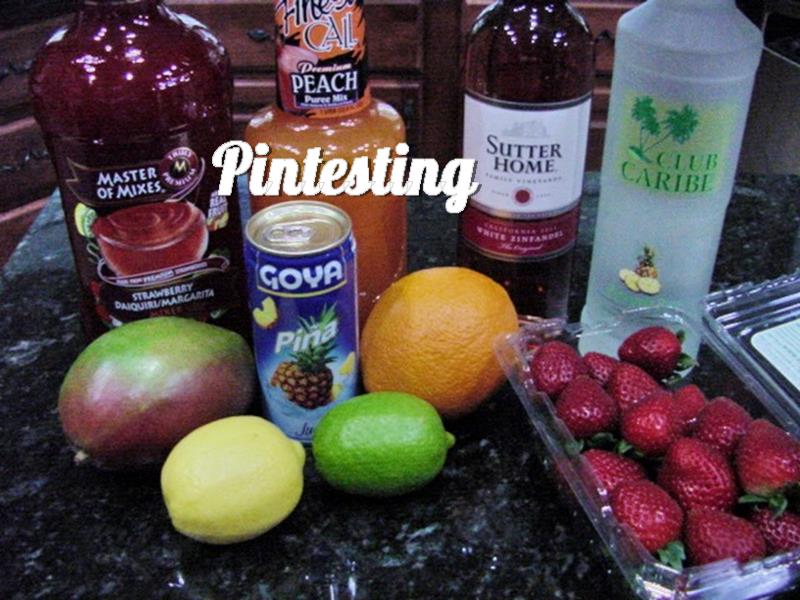
I have seen and posted several Sangria recipes on Pinterest, but for this day I wanted to try the Pink Summertime Sangria by Jacki of Crafting Mom. It seemed very fruity, which I think is a huge plus in Sangria, and fairly simple, which I think is a huge plus in life.
http://craftingmom.com/pink-summertime-sangria/
I gathered the ingredients, chilled the wine, washed and cut the fruit, and added them to a pitcher.
There was not enough room in the pitcher to add the mango, so I went with half of each of the citrus fruits and a half-dozen strawberries and then chilled the lot for half an hour. I think it would have tasted even better with longer chilling time but once dinner was ready we weren’t waiting any longer. We were not disappointed. This Sangria was perfect.
Here is our celebratory meal. Not fancy or Mexican or Irish, but D-E-L-I-C-I-O-U-S! Ole!
Now I really need to put in a little warning or disclaimer or some words of caution. This Sangria goes down very smooth and yummy which makes it easy to drink more than you realize if you’re not paying attention. This recipe calls for a bottle of wine AND some pineapple rum. It has a delayed kick which will make you very sleepy if you have too much – at least that’s what I was told when hubby decided to take a nap following the third glass.
Now for the Pintesting results.
Overall Rating: 5 Pins
Accuracy: This Sangria was fruity and sweet, but the lemon, lime and orange gave it a nice citrusy tang to keep it balanced. It went down smooth and easy. I used a 2-quart pitcher, but could have used a larger one in order to have enough room for all of the desired fruit and ice (which I omitted completely from the pitcher for the lack of room). Too much sangria? No such thing. 5 Pins
Difficulty: Measure, pour, stir, chill. The hardest part of the recipe was slicing the strawberries. Actually, I used a tip that I learned so long ago that I don’t even know the source. To easily and evenly slice strawberries, use an egg slicer. So simple! 5 Pins
Time: The chill time should be at least a couple of hours in order to let the flavors blend together – overnight would be even better. 4 Pins
Cost: We used a really inexpensive bottle of White Zinfandel wine since it was basically a mixer base. The rum was a door prize, so we didn’t have to purchase it. However, the extra costs of the rum, mixers, and fruit bring up the total enough that this gets 4 Pins.
Practicality: As I said in my opening sentences, Sangria is a party in a pitcher, and this party was a great one. The mixers will make a LOT of pitchers of Sangria, and that means a lot of parties. With summer around the corner, that means 5 Pins.
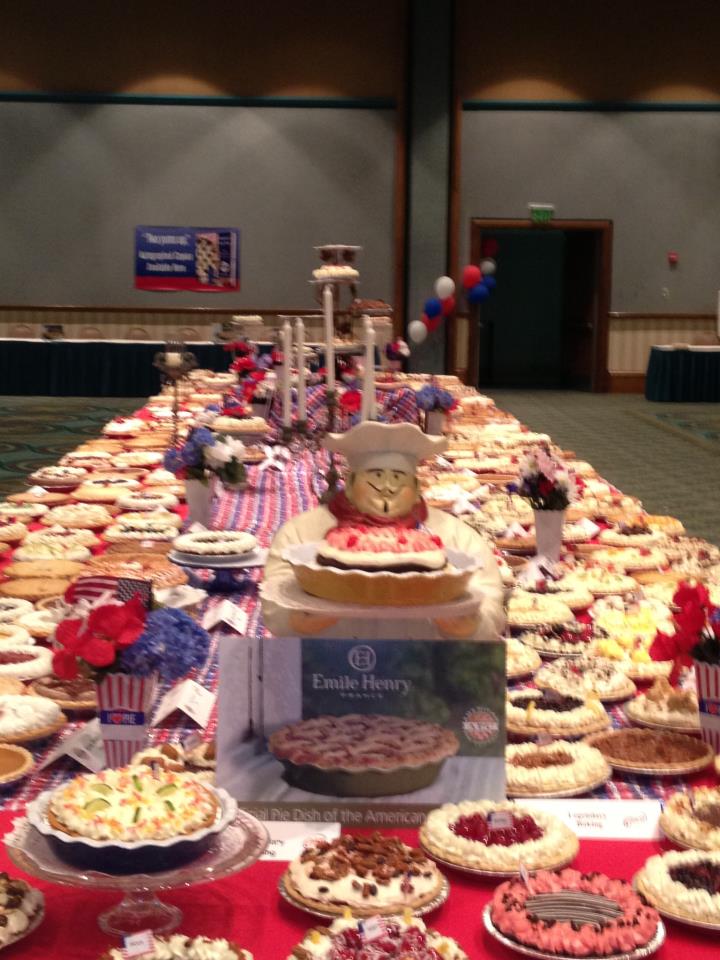
Happy Weekend! I hope yours has been a time to recharge your batteries. This Sunday Reflections has a theme – Pies! This weekend was the Great American Pie Festival in Celebration, Florida. I have not entered any of the competitions (yet), but I’m an experienced sampler. All the pies you can eat at $10 for adults and $5 for children. What’s not to love? I’m including a few pictures of the festival, but also some of the pins from my Pies-Tarts-Crostatas board. One of these pins will be posted on this week. Have a wonderful rest of the weekend!
The Great American Pie Festival is put on by the American Pie CouncilWelcome to the wonderful world of getting Pie-eyed!Part of the 2013 CompetitionCookie Dough Tart Crusts
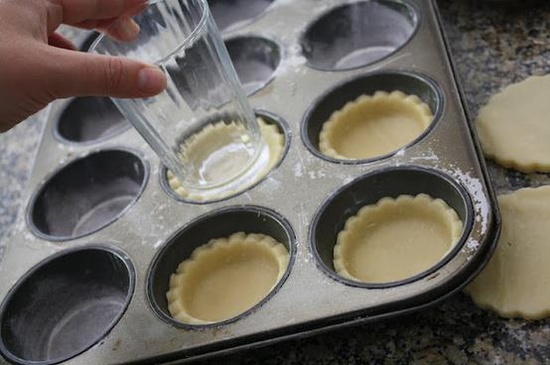
These Cookie Dough Tart Crusts are from this pin and link to the Two Llamas and a Whole Lotta Drama Facebook page.
I made this for a work pot luck. Do you want to know how to REALLY win friends and influence people? Feed them this and they’ll love you forever. This pin links to Rosie’s Sweetapolita blog.
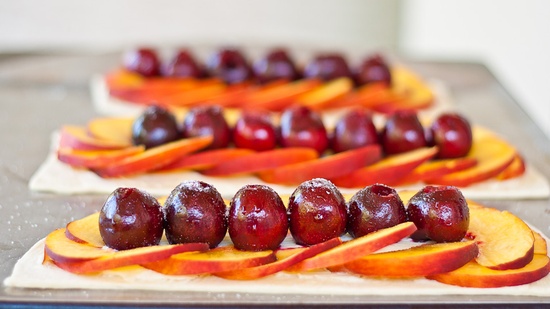
Peach and Cherry Tarts
This is a super simple dessert that allows the natural flavors of the fruit to take center stage. This pin links to Jo’s blog, Jo Cooks.
Bite Sized Apple Pies
These are perfect snack-sized treats for lunches or after school or a light dessert.This pin links to the blog Six Sisters’ Stuff.
Well, I hope you enjoyed the pie theme this week. Let me know your favorite pie in the comments!
As I’m writing this post, I’m memory-listening to a little boy singing his favorite song from his favorite movie. Memory-listening, for those who don’t know, is a lot like when you get a song stuck in your head (now referred to as an earworm), but it’s a song you’ve heard in the past. In this case, it’s a little boy from my day care, about 2-3 years old, singing “You’ve Got a Friend in Me” from Toy Story. I’d hear him sing it over and over again. He’s rather grown up now and probably getting ready for his first car, but I hear a little boy’s voice singing.
I have been blessed with some amazing friends, and I am most thankful for this great gift. One of the best things about the gift of friendship is that it comes in so many shapes and sizes. I’m not referring to the shapes and sizes of the friends, but the kinds of friends. New friends. Old friends. Friends that are close by. Friends that live far far away. Work friends. Gym friends. Zumba friends. (YES, they get a special category!) Church friends. Neighbor friends. High School and College friends. Cooking and baking friends. Blogging friends that you’ve never met in person, but look forward to meeting someday friends. Random-stranger-that-you-met-at-the-wine-shop-and-have-been-hanging-out-together-since friends.
My point is that no matter how or when or where you met, friendship is a precious gift.
And every now and then a friend will gift me with the gift of friendship bread. Except it doesn’t look like bread. Actually, it looks more like a bag or tub of goo, or the science experiment from the back of their fridge.
Appropriate response, “Um, gee thanks”. (Insert big sincere looking smile that ends up looking like a grimace.)
It’s a starter that needs to be fed and stirred in the fridge or on the counter for about 2 weeks before you can divide it, then share and bake. I don’t know about you, but if I want to bake bread, I don’t think about it 2 weeks in advance. “Wow, I think I’d like to bake in a couple of weeks.” Nope! Nope! Nope! I can be patient for some things, but I’m an instant gratification kind of girl. If I want to bake, then I’m going to bake now!
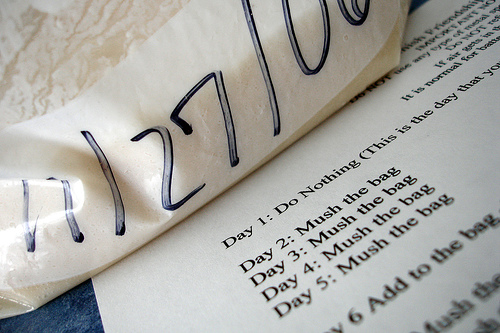
This is an example of traditional friendship bread with daily instructions of what to do for 10-14 days.
Photo by tizzie from Flickr, from The Curvy Nerd blog.
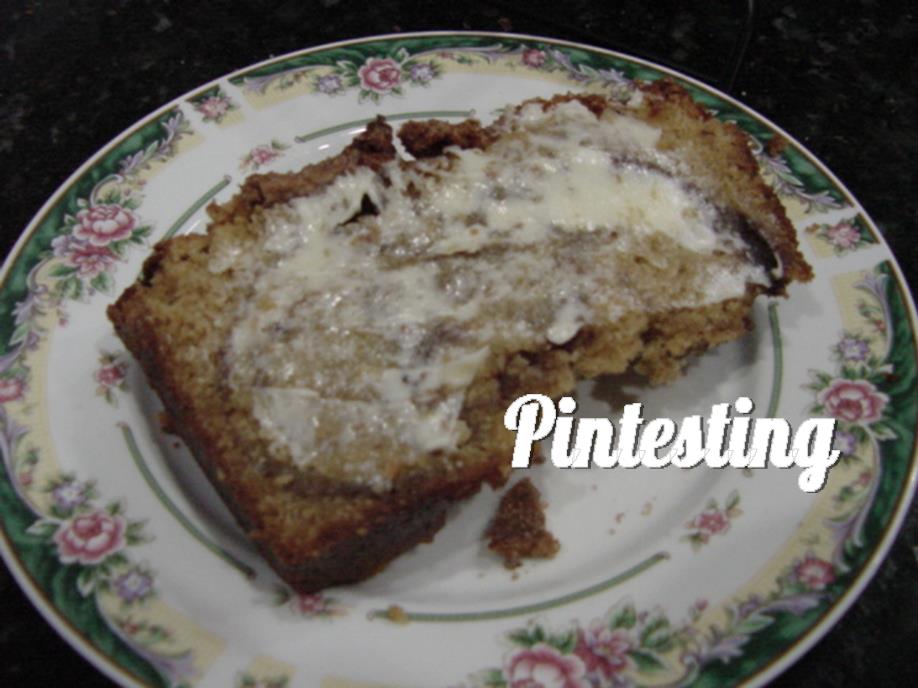
So when this pin came across my radar, I was so ready to try the bread and make a new friend – or at least feed the ones I already have. Melissa at Redfly Creations showed this quick recipe for a short-cut cinnamon bread. Yes! I’m in.
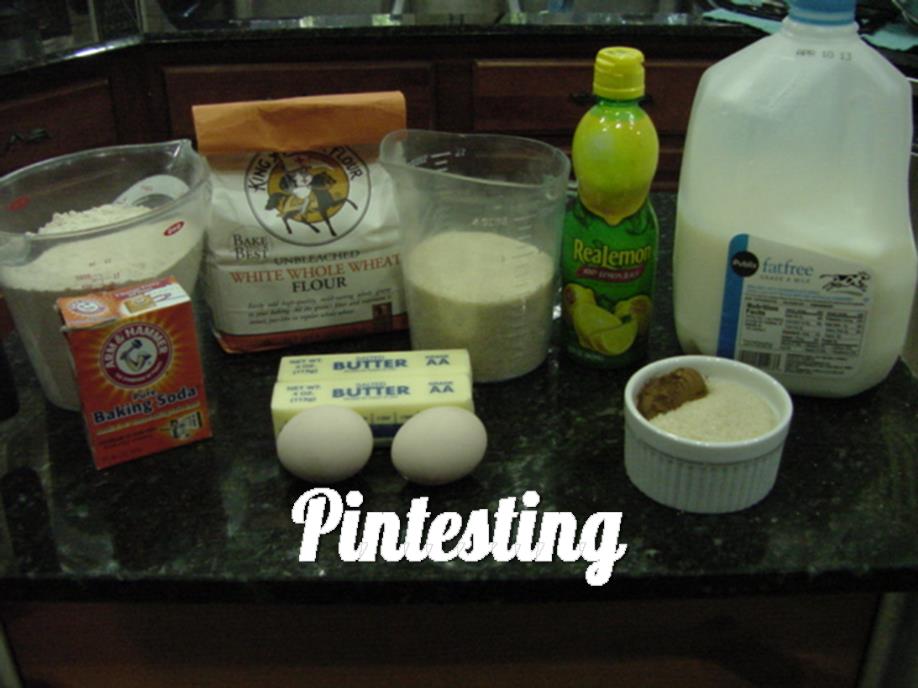
Here are the ingredients. I had everything on hand.
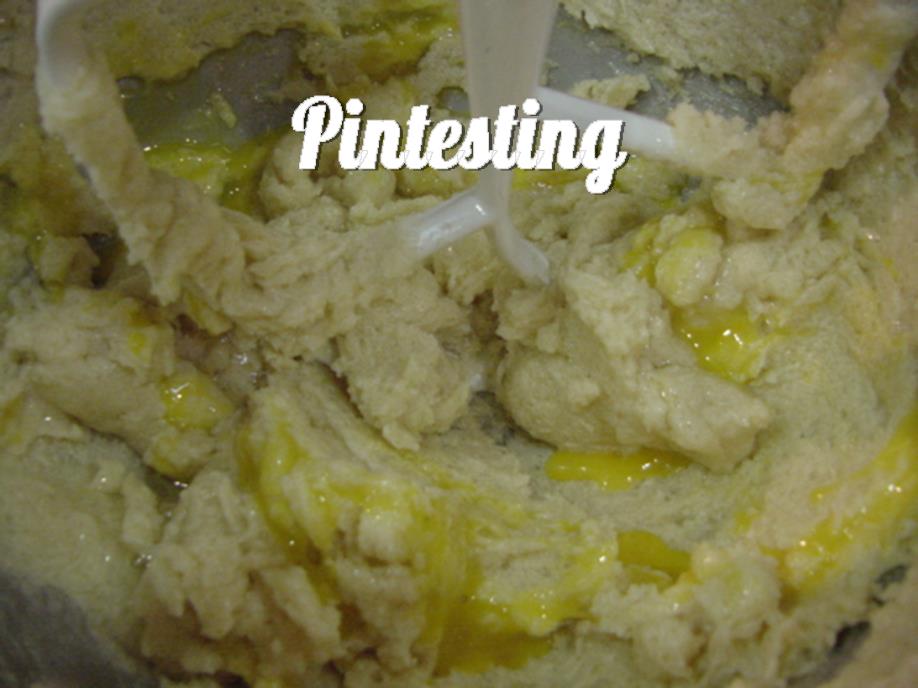
First cream the butter, sugar and eggs.
I like to start creaming the butter and sugar, and then add the eggs.
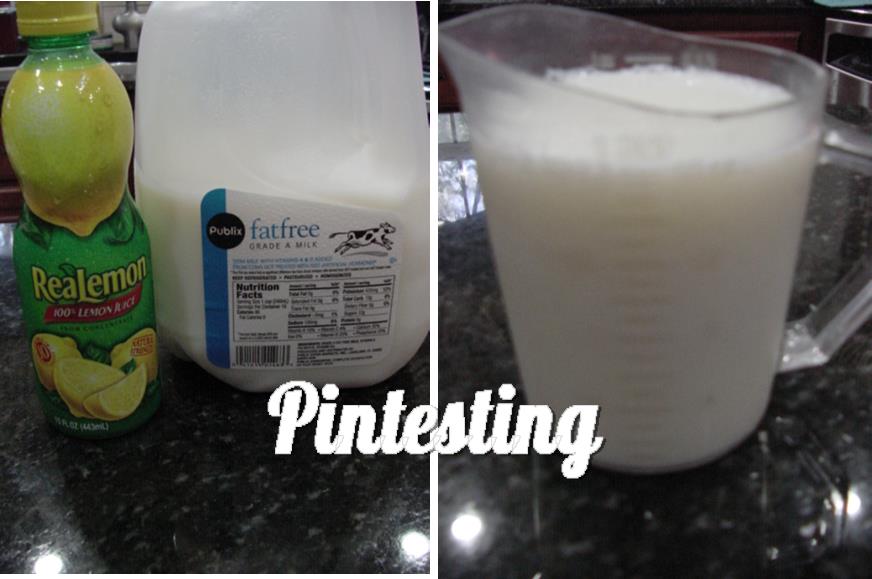
Next, sour the milk (if you don’t have buttermilk) by mixing the lemon juice and milk.
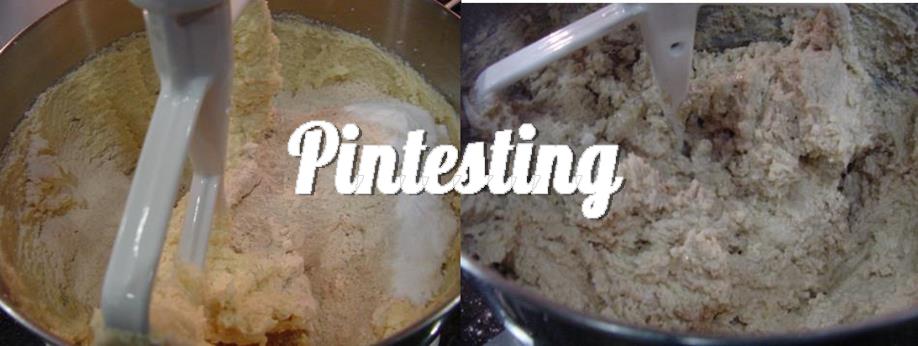
Combine the dry ingredients and the milk to the butter mixture.
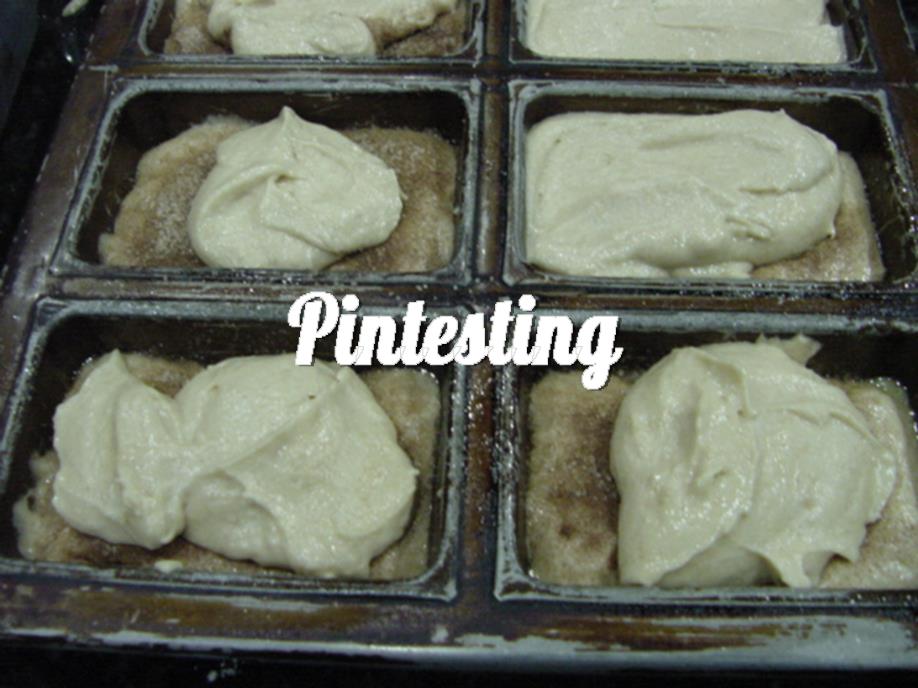
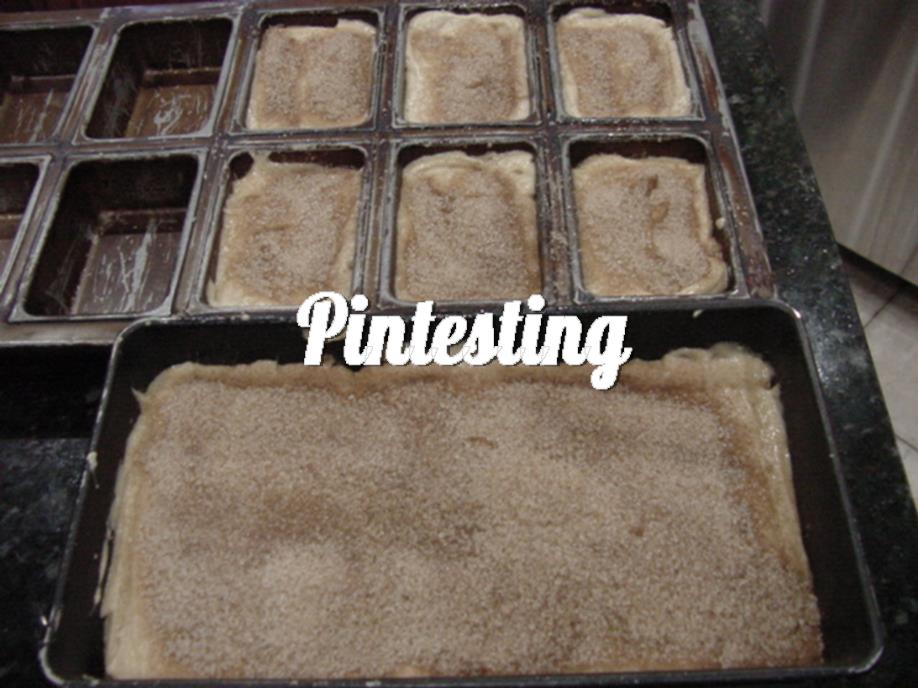
Pour half of the batter into the baking pans, sprinkle with the cinnamon sugar, and repeat.
***A note here. Melissa says to pour into two bread pans, but doesn’t specify the size. Since she also mentions that muffin tins work well, I used one 5×9 bread pan and a half-dozen mini loaf pans.
Swirl with a knife…
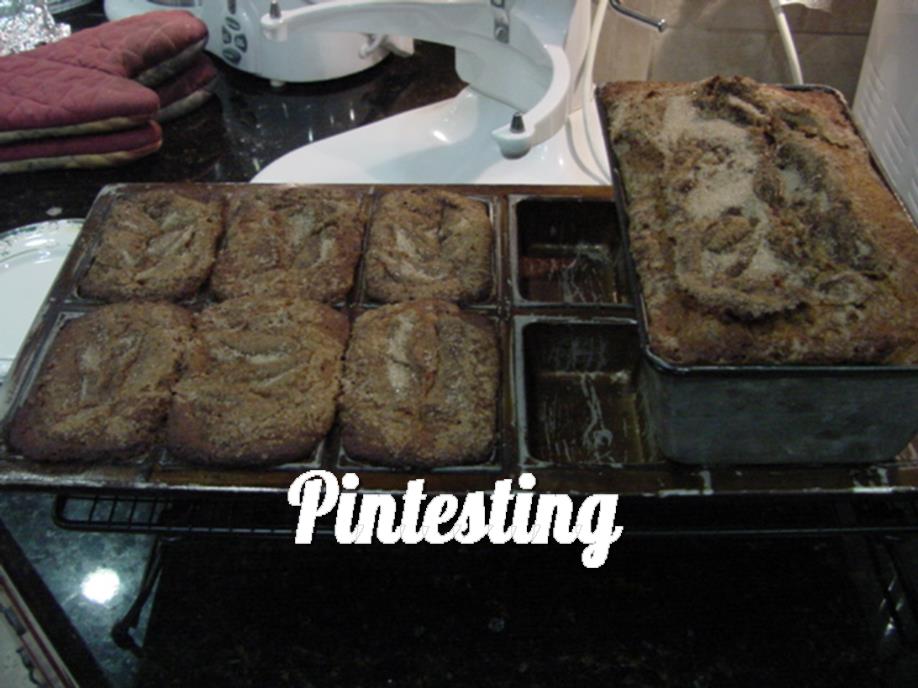
Then bake for 45=50 minutes.
Your house will start to smell amazing!
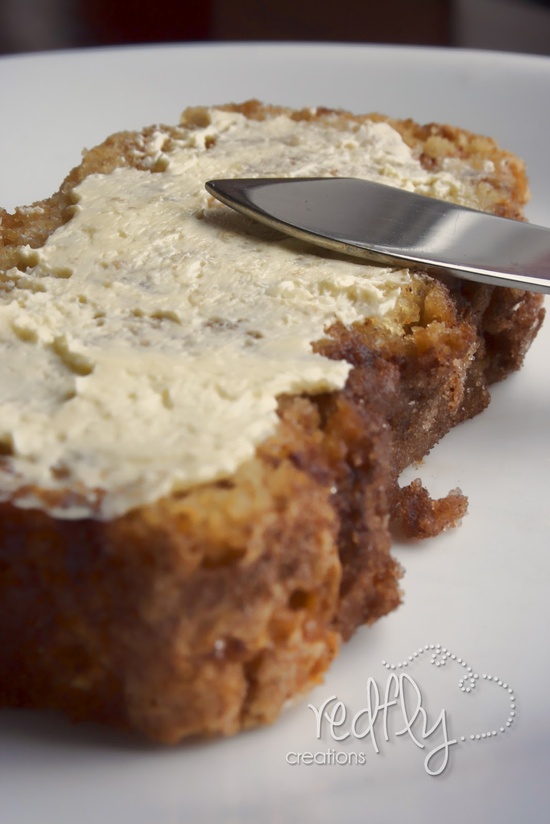
Cool the breads a bit before removing from the pans.
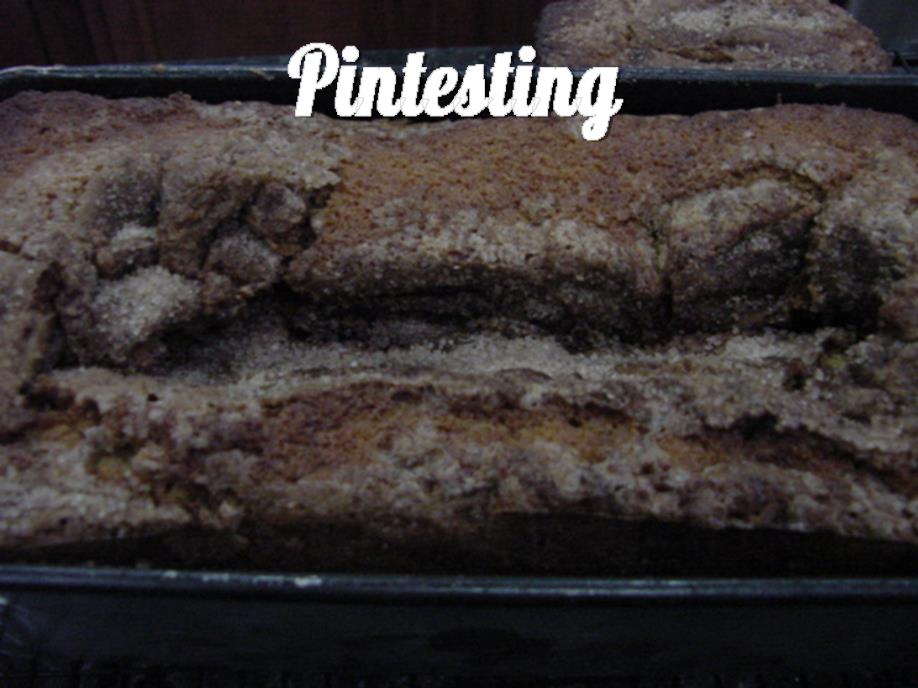
Sadly, the large loaf had sunk in the middle. The mini loaves seemed to do rather well, though.
I left the large loaf to finish cooling in hopes that it would help the texture.
One of the sliced mini loaves was eaten with our Sunday brunch. We ate some of the larger loaf the next few days, but found the extreme denseness of the sunken middle too much. Oh the other hand, the remaining mini loaves were brought to work and devoured with many thumbs up. In this case I think the smaller sizes worked better.
Now, for the Pintesting results.
Overall Rating: 4.3 Pins
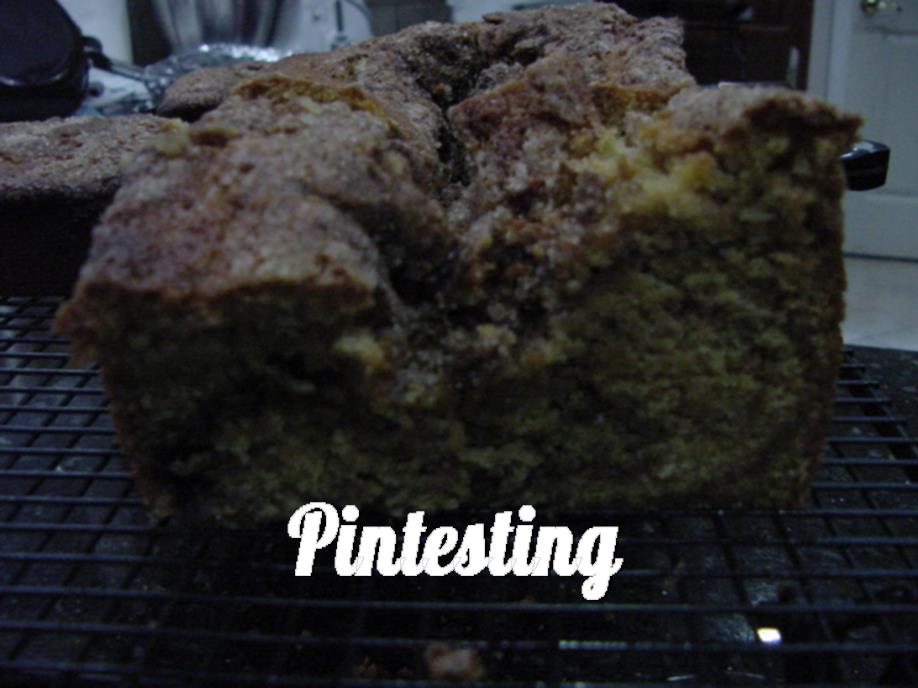
Accuracy: This was a delicious quick bread recipe. Unfortunately, the sinking in of the large loaf, which might be attributed to the lack of specific pan size, didn’t give us great results for half of the dough. Otherwise the texture of the smaller loaves was wonderful; moist with a nice crumb. I love cinnamon and the swirled cinnamon sugar. Done in the two layers, it really distributed the yumminess throughout the bread. I might have cut back a little of the cinnamon sugar, or maybe drizzled a bit of melted butter on the topmost layer to give it a more streusel-like topping and to keep it from baking dry. 4 Pins
Difficulty: The recipe was well written (except for the lack of loaf pan size), and the most difficult part was the process of dividing the batter and cinnamon sugar for the two layers of cinnamon-y goodness. 4 Pins
Time: The recipe calls for softened butter. Since I knew that I was going to make this on a Sunday morning, I put enough butter out before going to bed on Saturday night to soften properly. My own trick is to stick it into the microwave (NOT turning it on, just to keep it free from any kitties that might want some yummy butter) and close the door overnight. I’m not including the 8-hours of butter softening time. The actual prep and baking time was just under an hour, with another 20 minutes for cooling time. 4 Pins
Cost: There are no expensive ingredients on this recipes list. No special trips to the store – especially since Melisssa gave the alternative of soured milk for the buttermilk. (Good job!) 5 Pins
Practicality: I could see this as a great recipe for either muffins or mini loaves; perfect for breakfast, brunch or an afternoon snack. I especially like that the smaller sizes are perfect for freezing ahead and having on hand. 5 Pins
Happy Weekend! I thought it would be nice to do another “Sunday Reflections” post. Here are some of the funny, thought provoking, and inspiring posts I’ve seen that I thought were worth sharing. I hope your weekend had moments of laughter, quiet, joy, peace, awe, love and blessings. Enjoy and have a great week!
Hello my name is Anne… Yes, it’s so true!
Be so happy that it makes people wonder what you’ve been up to.
I know a guy who is a GREAT cleaner. I mean he has a gift that makes Mr. Clean look like an amateur. Lucky for me, he’s also my handsome husband. (Yeah!) Now, that doesn’t mean that I don’t have to clean the house. He has a commercial cleaning company, and usually comes home tired and doesn’t really want to clean at the end of a long day, so I still do most of the house cleaning during the week. But on the weekends, we are able to knock out the housework together in just a couple of hours. Happy Wife!
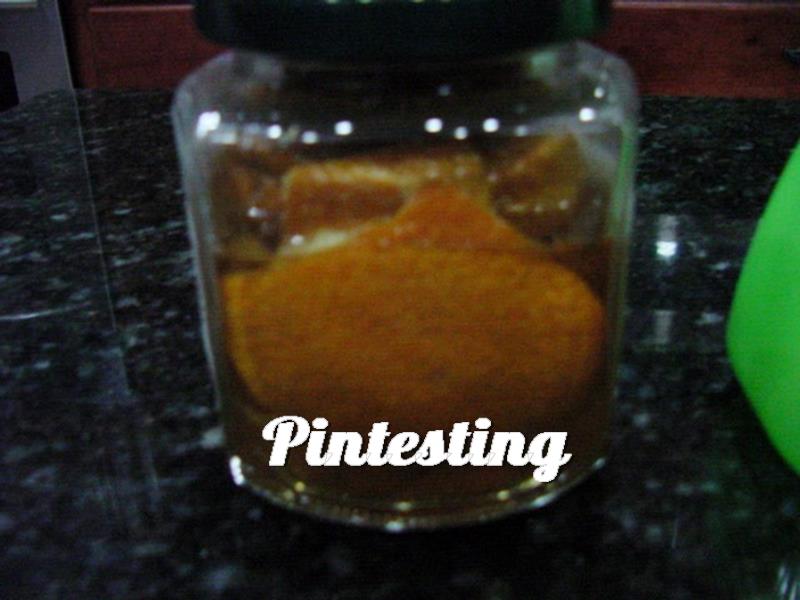
The other day we watched the The Lorax movie. Not only was it well done and entertaining, it made us think about “the trees” and such. We’ve been trying to live more environmentally responsible on a more consistent basis at home. We’re recycling, cutting out plastics, using reusable grocery bags, turning off the water when we brush our teeth… all kinds of little things we’re trying to do to leave less of a carbon footprint. So when I saw this pin for an orange scented vinegar household cleaner, I couldn’t wait to try it. Ann from The Fountain Avenue Kitchen gave a simple way to get rid of the strong vinegar smell – soak it in orange peels.
I peeled a large orange (and shared it with my hard working husband), and put the peels in the jar, then filled it with white vinegar and put it on the counter.
Two weeks later I poured the contents through a strainer and into a spray bottle. The first thing I noticed was the scent. It smelled of orange, but also smelled of vinegar. It wasn’t the overwhelming scent of vinegar, but it was still there. Like Ann, I don’t mind the scent of vinegar, but some people don’t care for the smell of a pickle factory.
On to the cleaning tests. First I tried it on the granite kitchen counter. It left a film on the smooth surface. I asked my husband for his professional opinion, and he thought that the oils in the orange peel was the cause. Since oil cleaners are used on wood, we tried it on the wooden cabinets next. It did a good a good job on the wooden surface.
So here are the Pintesting results:
Overall Rating: 3 Pins
Accuracy: Because of the film from the oil, it didn’t make as good of an all-purpose cleaner as straight vinegar, which doesn’t leave a film. I tried to take pictures to compare the two, but the photos didn’t capture the difference. The film could also be felt when we ran a finger over it. The oil did make it a good wood cleaner, and even though the vinegar smell didn’t completely disappear, it was much more subtle with the orange scent. 3 Pins
Difficulty: Put orange peels in a jar, cover with vinegar, put on the lid and walk away for a couple of weeks. No stirring. No cooking. Not a thing to do but wait. 5 Pins
Time: It took less than 5 minutes to peel the orange, put it in jar, and cover with vinegar. However, two weeks of waiting is a pretty long time. 2 Pins
Cost: This is really inexpensive. Oranges are not expensive (at least they’re not in Florida), and the peels are usually considered rubbish. We get a box of two gallon jugs of white vinegar at Sam’s Club for under $4.00. 5 Pins
Practicality: If someone was very sensitive to chemicals, or was trying to use all natural cleaners, this would be a good wood cleaner. Due to the smearing of the film, I don’t care for it as an all-purpose cleaner. Also, because of the time involved, it’s much easier to purchase environmentally friendly cleaning products at the store. They’re about the same price as the “regular” cleaners and are easy to find in most supermarkets. 3 Pins