Author: Anne Hernandez

Dry Marble Nail Art with a Tutorial Video

Nov 27, 2016 by Anne Hernandez

I recently saw a great nail design on Pinterest by Sam of FingerFood that made me think of mocha or hot chocolate which she called Mocha Coffee Chocolate Frappuccino. Anyone who knows me knows that I’m a coffeeholic. I loved the look of the design and the rich colors work perfectly for cool weather drinks. It has a marbled look but it isn’t water marbled; it uses a technique called dry marbling. Sam referenced a YouTube video for No Water Needed – Marble nail art Tutorial by Robin Moses. It’s this tutorial video that I will be Pintesting.

This is the Mocha Coffee Chocolate Frappuccino nail art that caught my eye. Can you see the swirls of coffee, chocolate, and whipped cream? Yum! Starbucks anyone?Mocha Coffee Chocolate Frappuccino

If you’ve been following my blog, then you might remember the Four Leaf Clover Water Marble Nail Art post. It didn’t end well and, to this day, is still the Pintesting with the lowest score. I haven’t tried the technique since then, so I approached the dry marble technique with a bit of trepidation – even with a video tutorial. After all, the water marble was a video tutorial, too. However, nothing ventured, nothing gained. So let’s start this Pintesting.

The Pintesting:

This is the tutorial video. It used similar colors as the Mocha Coffee Chocolate Frappuccino with a couple of substitutions; Robin used a French manicure base color rather than the milk chocolate taupe and instead of black I used a chocolate brown.

I also made a video so that you could see the whole process rather than step-by-step photos.

So there you have it. One of the things that I really like about this is that because the swirls are random it isn’t hard to do “the other hand” whether you’re right or left-handed. There’s plenty of forgiveness as long as you don’t overdo it.

Now for the results.

Mocha Coffee Chocolate Frappuccino

The Pintesting Results:

Overall Results: 4.3 Pins

4 Pins Overall

Accuracy:  This manicure technique performed rather well. Perhaps a bit of practice would bring this from 4 to 5 Pins, but as it’s my first attempt, this will get 4 Pins.

Pintesting Rating - 4 Pins

Difficulty: The technique of dry marbling is not difficult but there is definitely a fine line between pretty swirls and a muddy mess, as Robin warns in her video. I tried this a second time with not so great results. (Maybe it’s not a great idea to do manicures late at night when you’re tired.). Due to the need for caution, I’m giving this 4 Pins.

Pintesting Rating - 4 Pins

Time: As manicures go, this one takes a bit longer than a straight up single color polish but not horribly so. The trick to “pull” the polish from the edges was brilliant and helped reduce the drying time since it reduces the excess polish. 4 Pins

Pintesting Rating - 4 Pins

Cost: According to a Glamour Magazine survey, the average woman owns 25 nail polishes at a given time. This means that the “average” woman has the supplies to do this technique in any number of color schemes. If, however, you have to purchase each of the 4 polish colors, you’d probably spend about $20 which is the cost of a good manicure so I’m giving this 5 Pins.

Pintesting Rating - 5 Pins

Practicality: I thought this was a cute manicure technique with lots of different color options. It can be as elegant, seasonal, or whimsical as you choose to make it based on the colors. The mani lasted nearly a week without chipping and, due to the swirls, when I did get a small chip on the tip of my nail it wasn’t very noticeable.  5 Pins

Pintesting Rating - 5 Pins

Pintesting the Best of Italy with Pizza

Oct 29, 2016 by Anne Hernandez

October is NATIONAL PIZZA MONTH! Did you know this? I didn’t until the month was nearly over. Pintesting Monini Mutti Pizza I’ve wanted to do a pizza recipe post for quite some time but with so many unique kinds of pizza, I wasn’t sure which would be the best one to start with. There’s the Neapolitan style Margherita, the large thin crust New York style, the deep-dish Chicago style, the thick crusted square shaped Sicilian style, grilled pizza, French bread pizza, regional tomato pies, and so many variations of crusts, sauces, and topping… it’s a bit overwhelming. But then I thought about what Italian pizza from Naples would be like. While at the Florida Restaurant and Lodging Show, I was introduced to Italy’s favorite tomato company, Mutti, and their sister olive oil company, Monini. After tasting them I know why they’re the best of Italy. And now they’re coming to America so that you can cook with the best Italian ingredients, too!

2016 Florida Restaurant & Lodging Show Mutti Exhibit

Below are a few of the appetizers and even a dessert that was made using the Monini and Mutti products.

2016 Florida Restaurant & Lodging Show Mutti Collage

I was given some wonderful products to try at home including a ready-made pizza sauce and a squeeze bottle of olive oil that’s not supposed to drip. Let’s see what Italy’s favorites taste like on a pizza.

The Pintesting:

In our house, we normally make our own pizza dough, but on this busy weeknight I picked up a pack of pre-made crusts and our toppings will be cheese, sausage, and pepperoni.

Pintesting Monini & Mutti Pizza

I brushed the dough with the Monini olive oil in their new squeeze bottle. This is SO MUCH BETTER than having the olive oil drip onto the counter or down the side of the bottle. No Leaks! No Drips!

To really boost the flavor, I cut a garlic clove in half and then rubbed it on the oiled dough. If you love garlic but have trouble with heartburn, this is a great way to get that great taste and be gentle on your stomach.

Pintesting Monini & Mutti Pizza

To get real authentic Italian pizza flavor you need a real authentic Italian pizza sauce.

Pintesting Monini & Mutti Pizza

Cheese Please!

Then we added the toppings. The HH worked at a pizza place many years ago, so he does this part. The sausage is raw when put on the top of the pizza, but it will cook through while the pizza is cooking.

Pintesting Monini & Mutti Pizza

Then we baked it per the crust instructions.

Pintesting Monini & Mutti Pizza

This is how it looked when it came out of the oven. The sausage is perfectly cooked. The cheese is all melted. The hardest part is waiting for it to cool enough to taste it, so I’ll get one more picture while I wait.

Pintesting Monini & Mutti Pizza

The Results:

So THIS is what pizza in Italy tastes like… Monini & Mutti made this pizza incredible. The no-drip squeeze bottle really worked; there was no olive oil anywhere it wasn’t supposed to be. The pizza sauce was very fresh and tasted like real tomatoes – not overprocessed or artificial. I can see why they are the favorites in Italy. The good news is that both of these products will soon be available at grocery stores across the U.S. so watch for them!

The Recipe:

[amd-zlrecipe-recipe:2]


True Bangers and Mash with Onion Gravy

Oct 17, 2016 by Anne Hernandez

The simple recipe of True Bangers and Mash with Onion Gravy is pretty standard fare in Ireland and the U.K; it’s classic comfort food. My local Fresh Market had a variety of sausages on sale recently; including Irish Bangers. My HH had never heard of them and asked what they were like, so we picked up a couple and decided to try the famous dish.

Pintesting True Bangers and Mash with Onion Gravy

After searching several recipes on Pinterest and pinning a few, I saw this pin that claimed to be the True Bangers and Mash with Onion Gravy recipe which was submitted by wsf” on All Recipes. Since I’ve never tried Bangers & Mash before, I wanted to try the “True” real deal recipe. Bia Maith is Irish for Good Food; let’s get on with the Pintesting.

The Pintesting:

Pintesting True Bangers and Mash with Onion Gravy

The ingredients list wasn’t too long and most of it was already in my kitchen.

Pintesting True Bangers and Mash with Onion Gravy

This all started because I saw the bangers sausage on sale at The Fresh Market. If you’re lucky enough to find Irish bangers then use them. If you can’t, you can substitute any milder pork sausage.

Pintesting True Bangers and Mash with Onion Gravy

Cook the bangers, turning them until they’re browned on all sides.

Pintesting True Bangers and Mash with Onion Gravy

Boil potatoes for the mash.

Pintesting True Bangers and Mash with Onion Gravy

Make the mash (mashed potatoes). A unique ingredient was dry mustard for the mashed potatoes. I’ve never used it that way before, but the mash was delicious.

Pintesting True Bangers and Mash with Onion Gravy

The recipe called for two large onions. I don’t know about you, but that’s a LOT of onions in my book. They filled up the whole skillet pan. The next time I make this I’ll use one large or two medium onions.

Pintesting True Bangers and Mash with Onion Gravy

Once the onions are sweated and just browned add the beef broth…

Pintesting True Bangers and Mash with Onion Gravy

…and the wine. Let it reduce for a while.

Pintesting True Bangers and Mash with Onion Gravy

According to the recipe submitter, wsf, “Please note that this is a very thin gravy, as is traditional. It will still be very liquidy.” He was right.

Pintesting True Bangers and Mash with Onion Gravy

After simmering for 12 minutes the gravy smelled great but was much thinner than my usual gravy. Pintesting True Bangers and Mash with Onion Gravy

If “wsf” wouldn’t have mentioned how thin the gravy was, I’d have thought that I’d done something wrong. The flavor was wonderful, though. I thought the banger sausages were mild but flavorful and were complimented by the flavors of the onions, beef broth, and wine. The mashed potatoes were fluffy, creamy, and just what I needed to soak up the gravy.

Pintesting Variation #2:

My HH and I decided to get our Irish on before the sale was over and made a second variation just to test a different gravy. I searched several other recipes and found  “Onion Gravy for British Bangers and Mash,” also from All Recipes (Lupin Pooter).  This recipe called for chicken broth rather than beef broth, dijon mustard instead of dry mustard, added Worcestershire sauce, and used a roux as a thickener. Not wanting to risk another thin gravy, I skipped the wine and added 3 cubes of beef bouillon to the chicken broth to add richness instead. THIS is the gravy we were looking for. When we make this again, and we absolutely will, we’ll use the “True Bangers and Mash” recipe with the “Onion Gravy for British Bangers and Mash” (plus the beef bullion) for the gravy.

Sláinte!

The Pintesting Results:

Overall Results: 4.3 Pins

4 Pins Overall

Accuracy:  The recipe gave the warning that the gravy would be thin (aka runny), but the gravy in the photo looked a bit thicker than mine turned out. I checked with some Irish friends who’ve had real and proper Irish Bangers. They said that the gravy should be thicker rather than thinner. “It should flow like lava as you pour it over the food.”  I omitted the red wine to make the recipe thicker but, I was told, it’s traditional to the gravy. The next time I try this I’ll add the red wine and use a cornstarch slurry to thicken up the gravy. Due to the questionable thinness of the gravy, this gets 4 Pins.

Pintesting Rating - 4 Pins

Difficulty:  There’s a reason Bangers and Mash is common fare in the U.K. Brown the sausage, make the gravy, and serve with mashed potatoes. It reminds me of  Salisbury Steak, but with Irish sausage – simpler since you don’t have to make the patties. There is a bit of chopping with the potatoes and onions, and the boiling, browning, and reducing takes a wee bit of cooking. Therefore this gets 4 Pins.

Pintesting Rating - 4 Pins

Time:  Dinner took roughly an hour from start to finish with either recipe. The second gravy took a little less time because of the roux. An hour for dinner isn’t bad, but I’m giving this 4 Pins.

Pintesting Rating - 4 Pins

Cost:  The Irish banger sausages were the most expensive part of the meal(s), and you can see that 2 sausages were $2.81. The wine was the second most costly ingredient, but you don’t have to use an expensive wine. This transforms simple ingredients into a hearty and tasty meal with leftovers at a cost of ~$3.00 per serving. 5 Pins

Pintesting Rating - 5 Pins

Practicality:  This was a simple yet flavorful meal that would go well with peas or other veggies. If you have kids you can either omit the wine from the sauce or let it simmer long enough to cook the alcohol off. It’s the kind of hearty home-style cooking that makes me think of pubs, pints, fireplaces, and family. 5 Pins

Pintesting Rating - 5 Pins

7-Layer Greek Dip

Sep 24, 2016 by Anne Hernandez

Going to the movies is fun, but there are some downsides to seeing a film at the theater. I don’t like the overpriced snacks. I like real butter on my popcorn rather than that bright yellow butter-flavored oil. No wine. The theater folks frown upon patrons coming in their pajamas and slippers. Oh, and they won’t pause the movie to let you use the restroom after you’ve had a 44-oz large soft drink. This is why we prefer to watch most movies at home. One video that recently came out was My Big Fat Greek Wedding 2. Since we’re not limited to popcorn and soda at home, my HH and I decided that we needed Greek movie snacks. So when I saw this pin by Delish for their 7-Layer Greek Dip, I knew this was going to be our movie date night dish.

Here’s the video that was floating around Pinterest. How appropriate that this, too, is a movie?

The Pintesting:

The ingredients are traditionally Greek. Please note that there is a little dish of red onions off to the side. It’s not one of the listed ingredients, so watch for this special guest ingredient later. Let’s go through the layers.

Pintesting 7-layer Greek Dip

1: Hummus

Pintesting 7-Layer Greek Dip

2: Cucumbers

Pintesting 7-Layer Greek Dip

3: OlivesPintesting 7-Layer Greek Dip

4: Artichokes

Pintesting 7-Layer Greek Dip

Make the sauce by combining the Greek yogurt, lemon juice, and dill. Pintesting 7-Layer Greek Dip

5: Yogurt Sauce

Pintesting 7-Layer Greek Dip

6: Tomatoes

Pintesting 7-Layer Greek Dip

7: Feta & Parsley

Pintesting 7-Layer Greek Dip

8:  but this is a 7-Layer Greek Dip? I added minced red onions since they’re in so many Greek dishes. Red onions are often found in Greek food and I thought it would add a nice flavor. This is totally optional.

Pintesting 7-Layer Greek Dip

Opa! You can let it chill in the fridge or just grab some pita chips and dig in, which is what we did.

Pintesting 7-Layer Greek Dip

Since it’s movie night, here’s my video of how to make the 7-Layer Greek Dip.

This is loaded with so many good ingredients that I had no trouble substituting it for a light supper, and my HH agreed. It felt like we ate a LOT but most, at least two-thirds, of the bowl was leftover, so the next day we scooped it over a mixture of romaine lettuce and spinach to make a Greek-style salad. I topped it with leftover salmon and crumbled the remaining pita chips as croutons – delish!

Pintesting Results:

Overall Results:  4.85 Pins

Pintesting - 5 Pins Overall Rating

Accuracy:  My glass dish didn’t spin like the one in the Delish video did and I added the 8th layer of red onions, but I have to say that this was as delicious as the original video suggested. The Greek flavors would be what you would expect in the Mediterranean. I would risk sneaking this into the theater. 5 Pins

Pintesting Rating - 5 Pins

Difficulty:  Once all of the prep work is done, this is easy to layer up. Do pay attention if you’re slicing the olives yourself. Even if the jar says that they’re pitted, you might come across some that still have the pits so use caution. Pintesting 7-Layer Greek Dip Due to the amount of chopping involved, I’m giving this 4 Pins.

Pintesting Rating - 4 Pins

Time:  There is a bit of prep work in chopping the cucumbers, artichokes, tomatoes, and olives (if you don’t get them sliced) and making the yogurt sauce. However, start to finish this came together in 15 minutes. 5 Pins

Pintesting Rating - 5 Pins

Cost:  We eat a lot of Mediterranean-inspired food, so most of these ingredients are on hand in our home. If you had to buy everything it would run you about $10, but you’d have a lot of leftover ingredients to use in other dishes. The recipe had leftovers that perfectly repurposed into a lunch salad. We ended up with two large servings of dip and four lunch salads from this recipe, so that’s $1.67/serving. 5 Pins

Pintesting Rating - 5 Pins

Practicality:  I loved how this could be used as a great dip and also made an easy Gree-style salad. The wholesome ingredients make this a healthier snack or appetizer and are a great way to sneak in more veggies. Adding red onions as the 8th layer was my customization, but you can change it up however you like. 5 Pins

Pintesting Rating - 5 Pins

Homemade Pumpkin Spice Coffee Syrup

Sep 19, 2016 by Anne Hernandez

I’m one of those who can’t wait for the first PSL (that’s Pumpkin Spice Latte) of the season and I make a point to get it on the first day available. Even though it still feels like 100 degrees in Florida, there’s something about that taste that officially makes it feel like autumn. Pintesting Homemade Pumpkin Spice Coffee SyrupGoing to Starbucks or any other coffee venue for a PSL on a daily basis is not good for my budget or waistline. Thankfully, my Pinterest feed has been flooded in Pumpkin Spice EVERYTHING; including this pin by Katrina of Katrina’s Kitchen. Sometimes I REALLY love trying out Pinterest pins, and Pintesting Homemade Pumpkin Spice Coffee Syrup is one that I’m really looking forward to.

Pintesting Homemade Pumpkin Spice Coffee Syrup

One of my best friends was coming over, so it was the perfect time to do this Pintesting. Let’s get started!

The Pintesting:

Pintesting Homemade Pumpkin Spice Coffee Syrup

There are only four ingredients. That’s right – just 4 and one of them is water.

Pintesting Homemade Pumpkin Spice Coffee Syrup

Mix the brown sugar and water in a microwavable bowl and heat until the sugar is dissolved.

Pintesting Homemade Pumpkin Spice Coffee Syrup

Add the pumpkin and pumpkin pie spice.

Pintesting Homemade Pumpkin Spice Coffee Syrup

Strain the mixture through a sieve. This is important or your syrup will be gritty.

Pintesting Homemade Pumpkin Spice Coffee Syrup

See all those particles? That’s why it needs to be strained.

Pintesting Homemade Pumpkin Spice Coffee Syrup

Make your coffee and enjoy the taste of a PSL at home. Aren’t the pumpkin mugs perfect?

We tried the Homemade Pumpkin Spice Coffee Syrup in coffee rather than a latte. I thought the flavor perfectly captured the PSL taste that I’ve come to love, but I would cook this on the stovetop rather than microwave it to let the pumpkin and spice better dissolve and allow the flavor to develop further. I’m also going to double the recipe because it ran out too fast.

The Pintesting Results:

Overall Results: 4.85 Pins

Pintesting Seal 5 Pins

Accuracy:  This syrup tastes every bit as good as a PSL, and it turned out exactly as the recipe said it would. There were no problems or unexpected issues. 5 Pins

Pintesting Rating - 5 Pins

Difficulty:  The ONLY reason I’m giving this 4 rather than 5 Pins is that there’s hot sugar water involved. It’s incredibly simple and easy, but children would need proper supervision. So for the sake of safety, I’m giving this 4 Pins.

Pintesting Rating - 4 Pins

Time:  The whole process took just a little longer than it took to brew the coffee; just under 10 minutes with the photography. That’s a LOT faster than driving to the coffee shop. 5 Pins

Pintesting Rating - 5 Pins

Cost:  One 15-oz. can of pumpkin is enough to make 30 recipes. As Katrina said, it’s pennies to make. Compare that to over $4.00 for a 16-oz. Grande PSL. 5 Pins

Pintesting Rating - 5 Pins

Practicality:  This Homemade Pumpkin Spice Coffee Syrup is great in coffee, but is also delicious in tea. It’s going to save me the time and cost of running to get a PSL when the cravings hit. I also love that 4 simple ingredients (with no unwanted chemicals) are all that’s in this. Not only will I make this a lot this fall, but it will make a great gift idea in cute little bottles. 5 Pins

Pintesting Rating - 5 Pins

Gradient French Mani

Lately, it seems like the days are getting shorter. I’m not referring to the amount of time that the sun is shining now that summer is turning to autumn. It feels like someone decided that there needed to be time budget cuts, so they made each day 20 hours instead of 24. Trying to balance work, school, HH, and home has left little time for blogging and nearly no time for me things like working out or manicures. The good news is that I’ve made some life changes to help balance things out a bit, and I’m back to  Pintesting again. I missed you! So today I’m Pintesting the Gradient French Mani because I needed to spoil myself – thank you for the indulgence.

I saw this pin and was struck by its simplicity, elegance, and practicality. It’s hard to go wrong with a French manicure as a classic nail look, but I often have two problems with them. First, is getting the lines perfect. Second is that the tips always seem to chip; probably because the tips have more polish than the rest of the finger. Using a gradient approach solves both problems!

One of the things that I LOVE about gradient manicures is that you don’t have to worry about perfection. You choose your colors, blend  while you apply, and smooth it all out with a top coat. If you haven’t tried this manicure method before, please check out this Pintesting Ombré Nail Art post for more detailed instructions. Since that post, I’ve learned that there is a difference between ombré and gradient.

  • Gradient uses two or more different colors so that they blend together where they meet. (It’s what I’m doing this Pintesting on).
  • Ombré is a gradual changing of shades of a single color from light to dark (or dark to light). For manicures, this is often done as a gradual progression of the individual shades of the color from one finger to the other with each finger having one shade of color.
  • Ombré Gradient blends the shades of the same color on each nail or in a blended progression from one fingernail to the next.

Pintesting Gradient French Mani

The Pintesting:

The elegance of the French mani keeps this very simple; white tips on a natural base. Because I’m doing a gradient I will need the two colors and a makeup sponge cut in half. I also used a base coat and top coat (as you always should).

I had to try a few different combinations of nail polish colors to get the look of the original pin. Because the French manicure is supposed to be white tips on a natural or close-to-natural base, the exact colors will vary by each person’s skin tones and personal preferences. The color below isn’t the one that I went with in the end, but it was the best photo for to show the general idea.

Pintesting Gradient French Mani

Paint the two nail colors on your makeup sponge. You don’t have to mix the colors in the middle; that will happen in the application. If you’re looking for a deeper pop of color, you can put a base of either the white or natural before you apply the gradient. I didn’t because I wanted this to be more subtle.

Pintesting Gradient French Mani

Dab and blot the sponge over your nail to apply the color. The dabbing motion will blend the colors in the middle and give the gradient effect. I did a second coat with the same process to get complete coverage. The polish did end up on my skin from on each finger and half way up to each first knuckle. This is after I cleaned most of the extra with the acetone and cotton swabs in the background of the picture.

Pintesting Gradient French Mani

Finish with the top coat to protect your beautiful nails. I love the twist on this classic look. It’s classy enough to wear for business or an occasion, but the gradient gives it a playful twist.

APPLICATION TIPS:

  1. If you want to keep from having a ton of polish to clean off of your skin and cuticles, there are a few things you can do to prep them.
    1. First, use a really deep moisturizer or moisture barrier on the skin around your nails; petroleum jelly or Aquaphor work very well.
    2. After applying your lotion, clean your fingernails with a cotton swab and white vinegar so the polish will better adhere.
    3. Some professionals use latex body paint around each nail so that once the polish is on, you just peel off the latex “skin” and you’re good to go. If you’re in a hurry or on a budget, you can apply a thin layer of rubber cement or white school glue with a dollar store paint brush and you’ll have the same result. Just make sure the glue is DRY – completely dry.
  2. The polish will have a bumpy from the makeup sponge. DON’T WORRY! This will smooth right out when you put on the top coat.
  3. If you still have a bit of polish on your fingers, clean them up with a cotton swab or small natural-bristle paint brush and polish remover.

The Pintesting Results:

Overall Results:  4.3 Pins

4 Pins Overall

Accuracy:  Like many of the Pinterest nail pins, this linked back to a picture; one of 50 in the collection. There were no instructions or other links, nor could I find a contact or about page (thus the absence of the artist’s name). I was going to give this a rating of 3 Pins, but because I did have some experience with gradient nails, because it’s not difficult to find how-to instructions and videos online, and because the French manicure is a simple process anyway, I chose to give this 4 Pins.

Pintesting Rating - 4 Pins

Difficulty:  I thought that this was an easier way to achieve a French mani look than lining up tape or stickers, or trying to keep a steady hand. 5 Pins

Pintesting Rating - 5 Pins

Time:  When I do a French manicure at home, I use the curved stickers to achieve the look of salon precision. That takes some time and effort to make sure they’re aligned at the right angle and with the proper spacing for each nail. The gradient version isn’t as fast as painting your nails with a solid color, but it isn’t as long as traditional French nails. 4 Pins

Pintesting Rating - 4 Pins

Cost:  A salon manicure usually runs about $15-$20. This is decidedly less expensive – if you already have some or all of the necessary items. If you have to purchase the polishes, top and base coats, and makeup sponges, then it would be roughly the same amount as a salon mani, but you would have the supplies to last for months. 4 Pins

Pintesting Rating - 4 Pins

Practicality:  I love the classic look of a French manicure, and this Gradient French Mani is a simple way to make this an everyday look. 5 Pins

Pintesting Rating - 5 Pins

Pintesting Salmon Wellington

Aug 31, 2016 by Anne Hernandez

Pintesting Salmon Wellington

If you’re a foodie or have watched TV in the last decade, then you’ve likely heard Gordon Ramsay yelling at the contestants on his reality show, Hell’s Kitchen.  After watching for many years and seasons, one thing that I learned is that you can’t be considered a serious cook unless you can make an excellent Risotto and Beef Wellington. Eating at 5-star restaurants is a bit out of my normal budget, so the opportunity to try Beef Wellington in a restaurant is rather slim. Fortunately, the ingredients aren’t overly expensive, nor are the techniques difficult. (Thank you, YouTube!) So in order to up my culinary game and finally try some fine dining, a few years ago I decided to conquer both of these dishes; risotto for my birthday and the wellington for Valentine’s Day. But that was the OLD Beef Wellington – the NEW dish is Salmon Wellington.

In an effort to eat healthier, we are trying to have fish and seafood a couple of times a week. Not only is it healthy, but also delicious with so many varieties from which to choose: grilled shrimp on a salad, oven roasted Italian herbed white fish, pan seared scallops, fried catfish, parmesan crusted tilapia with lemon and caper sauce (post to come), and now… *drumroll, please* …Salmon Wellington.

Yes, it deserves a drumroll.

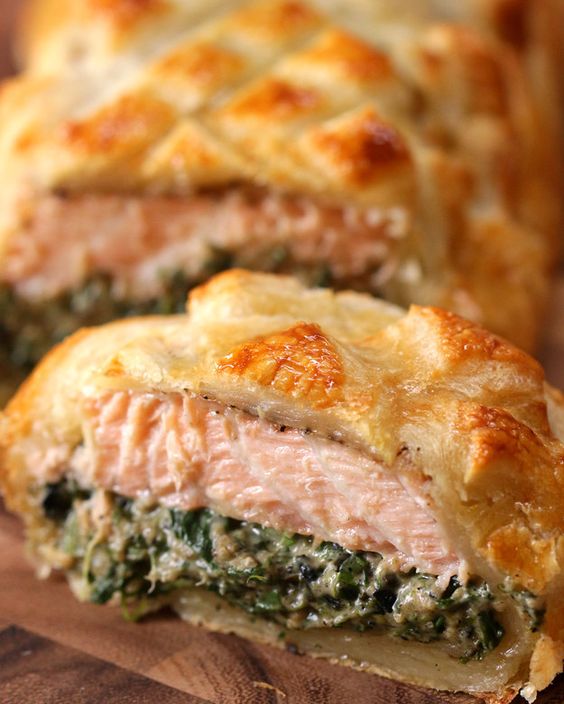
This pin by BuzzFeed Tasty has been all over Pinterest and I’ve seen the video on Facebook and Twitter. With this much notoriety, and because it just looks delicious, and because we love salmon, and because I had almost all of the ingredients on hand, I had to try this. Plus doesn’t puff pastry make everyday food look elegant? Let’s begin the fancy food Pintesting!

Pintesting Salmon Wellington

The Pintesting:

The ingredients list was surprisingly small and simple compared to beef wellington. There is no Foie Gras or duxelles in this recipe.

Pintesting Salmon Wellington

Saute the aromatics and then wilt the spinach.

Pintesting Salmon Wellington

Add the breadcrumbs, seasonings, and cheeses.

Pintesting Salmon Wellington

Stir to mix well. Set the spinach mixture to the side.

NOTE: It’s a lot easier if you add the cream cheese first to let it get a bit melty before adding the rest. You can see that mine is a bit clumpy. This didn’t seem to affect the taste, but it will look a lot nicer.

Pintesting Salmon Wellington

The recipe doesn’t specify whether to get the salmon with or without the skin. Mine had skin so I trimmed it since I don’t want to eat it hiding under puff pastry. I recommend asking your butcher/fishmonger for salmon without the skin if you want to avoid this step.

Season with salt and pepper, then lay the salmon in the center of the puff pastry.

Pintesting Salmon Wellington

Top the salmon with the spinach mixture. I went back and forth between spooning it on and shaping it on top with my hands. Once it’s all on, fold the puff pastry over in thirds to cover and seal everything.

Pintesting Salmon Wellington

Place the filled pastry onto a parchment lined baking sheet seam  side down, tucking in the seams, and then give it a good egg wash.

Pintesting Salmon Wellington

Use a sharp knife to make a crosshatch pattern on the top of the pastry, then give it a final egg wash.

Pintesting Salmon Wellington

Bake it in a preheated oven until your house smells incredible and you’re drooling.

Pintesting Salmon Wellington

DON’T cut right into this immediately. You’ll want to give it at least 5 minutes to rest in order to keep the pastry from smooshing under the knife and the filling from oozing all over the cutting board or plate.

Pintesting Salmon Wellington

Slice it in half to make two impressive and generous servings. (See? No smooshing or oozing.)

Pintesting Salmon Wellington

Plate it. Serve it. Become a superhero – or a supper-hero. There is a serious amount of wow factor with this dish, so enjoy. You deserve it.

Pintesting Salmon Wellington

“This is the best thing you’ve ever made!” said my HH as he quickly tucked in for the next bite. “I could eat this every day!”

Wow! I was expecting a positive response, but the best thing ever?! There you have it. Please excuse me. I’m going to go straighten my cape, gloat in my glory, and see if Gordon Ramsey wants to work in my kitchen.

Pintesting Salmon Wellington

The Pintesting Results:

OVERALL RATING:  4.7 Pins

Pintesting - 5 Pins Overall Rating

Accuracy:  The end result was precisely what the recipe, pictures, and video promised. The puff pastry crust was light and flakey. The salmon was cooked to perfection; juicy but done. The spinach mixture gave a nice brightness to balance the whole dish. I also want to point out that 2 servings are extremely generous – neither of us could finish our portion, which just meant that we got to enjoy the leftovers for lunch the next day. 5 Pins

Pintesting Rating - 5 Pins

Difficulty: The recipe was easy to follow, and the video made it even easier. Although not mentioned, you would definitely want to remove the skin from the salmon. And while none of the steps are difficult, it does take a few steps to put this together. Due to these factors, I’m giving this 4 Pins.

Pintesting Rating - 4 Pins

Time: Although there are a few steps to this recipe, it took 40 minutes from start to finish. This included the 20 minutes of baking time and all of my picture taking. Since 30 minutes is considered a standard for a quick meal and this was only 10 minutes longer for such elegance, I’m giving this 5 Pins.

Pintesting Rating - 5 Pins

Cost: I was surprised at how low-cost this dish is! The salmon is the most expensive component, but it’s usually on sale at one of our local grocers. My fillet was too large for the puff pastry, so I had to cut it in half which made it an even better deal. The puff pastry can be found in the freezer section of most grocery stores, and you get 2 sheets for less than $4. The rest of the ingredients are common to most kitchens and I had them all on hand. The final cost per serving comes to $2.50 if you make 4 servings (like we did) or $5.00 if you make 2 servings. Either way, that’s a fantastic price for a high-end restaurant quality dish. But since the salmon and puff pastry aren’t common to most kitchens, I’m giving this 4 Pins.

Pintesting Rating - 4 Pins

Practicality:  The best thing about this dish (aside from the great flavor, the loving accolades, and the surprising ease of preparation) is that it works just as well for a quick weeknight supper as it does for an impressive special meal. After all, who doesn’t want to be a supper-hero?  5 Pins

Pintesting Rating - 5 Pins


BLT Lettuce Wraps (No-Carb BLT)

Aug 20, 2016 by Anne Hernandez

Sometimes I get things that look amazing as an impulse purchase. Some people might be tempted by a cute pair of shoes, a new outfit, or the latest tech gadget. More often than not, my impulse buys are food related. I see a recipe that sounds good and I’m off to the store, and that’s what happened when I saw these BLT Lettuce Wraps.

I first saw this video clip on Facebook and then the pin popped up on my Pinterest feed. I love BLT sandwiches as you can see from the Weave Your Bacon BLT and Egg Salad BLTA Sandwich posts. This BLT Lettuce Wraps recipe was trying to sound healthy since it doesn’t have any bread and is, therefore, no-carb. I thought, sure, let’s go with it. Anytime you want to try to combine BLT + healthy I’m willing to give it a try.

Pintesting BLT Lettuce Wraps

The Pintesting:

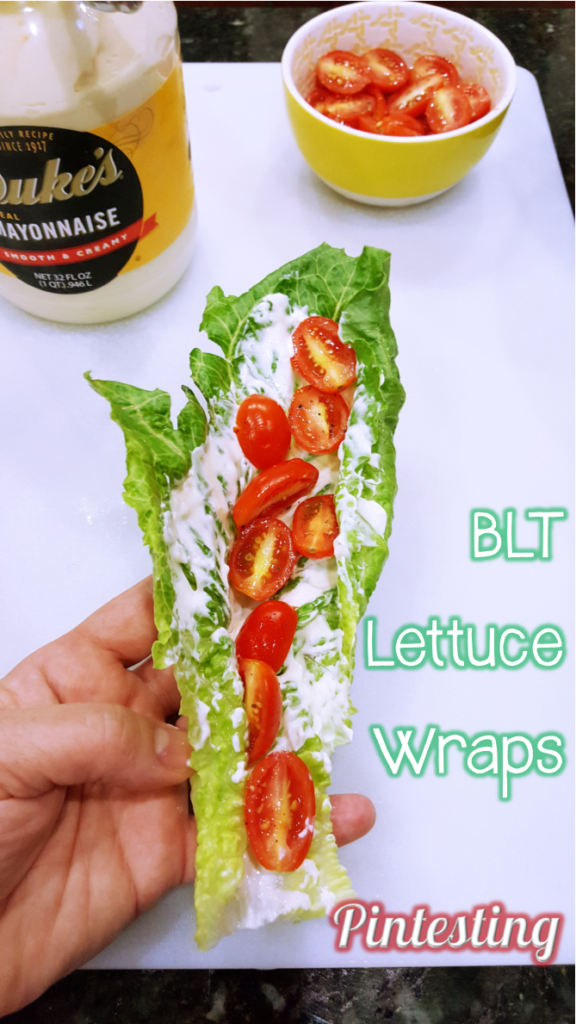
The beauty of this recipe is in its simplicity. Large leafy romaine lettuce, juicy tomatoes, mayo and bacon. Although not specified, I seasoned my tomato halves with salt and pepper.

Pintesting BLT Lettuce Wraps

Spread some mayonnaise on a romaine lettuce leaf and top with several tomato halves.  TIP: make sure your romaine lettuce leaves are blotted dry if you want the mayo to stick.

Pintesting BLT Lettuce Wraps

Add the bacon and you’re done.

Pintesting BLT Lettuce Wraps

I put three on a plate thinking that this should be the serving size because that’s what the video did. After all, these BLT Lettuce Wraps are supposed to replace a BLT sandwich.

Pintesting BLT Lettuce Wraps

I have to say that it was not easy to get the pictures before digging into these BLT Lettuce Wraps.

Pintesting BLT Lettuce Wraps

I made a total of 6; three each for my HH and me. They were delicious if just a wee bit messy. I’m not sure if I should have used two slices of bacon on each wrap, but I think that would have thrown off the balance of the B-L-T. That said, after finishing them we both still felt hungry and agreed that these would be a fantastic appetizer, salad, or finger salad (if there’s such a thing, and if not I just made it up).

The Pintesting Results:

OVERALL RESULTS:  4.85 PINS

Pintesting - 5 Pins Overall Rating


Accuracy:  The recipe was very simple and straight forward and the taste was delicious. I was very pleased that it turned out exactly as the recipe and video said that it would. I also liked how refreshing they looked. 5 Pins

Pintesting Rating - 5 Pins

Difficulty: This was one step easier than a traditional BLT in that there’s no bread to toast, but the rest of the process was pretty much the same. 5 Pins

Pintesting Rating - 5 Pins

Time: Putting this together took very little time. The longest part was cooking the bacon, and I did that on the stove-top so it took about 15 minutes for crispy thick-cut bacon. From prep to plate took 20 minutes – 5 Pins.

Pintesting Rating - 5 Pins

Cost: This is a low cost dish – especially if you get the bacon on sale (which I did; buy one get one free). The romaine  came two heads to a package and there was a LOT leftover that I used for salads.  The tomatoes were also buy one get one free, so the cost per BLT wrap was less than a dollar. 5 Pins

Pintesting Rating - 5 Pins

Practicality: If you’re looking for a satisfying meal then you might be disappointed. If you’re looking for some great taste, a gluten-free or paleo BLT snack, an appetizer, or a salad that’s finger food, then this is a fantastic recipe. The original recipe doesn’t specify that it will be as filling as a BLT sandwich, but three to a serving size should have at least been close. Even people on diets don’t want to feel hungry after eating. Therefore, I’m giving this  4 Pins.

Pintesting Rating - 4 Pins


Tuscan Lentil Soup

Jun 20, 2016 by Anne Hernandez

There is something very comforting about soup; it seems to nourish your soul as it feeds your body. You’ve never heard of a book series called, “Chicken Casserole for the Soul.” Don’t get me wrong, I love casseroles, but there’s just something about soup. Tuscan Lentil Soup.

Most soups fall into one of two categories: the kind that takes all day to cook (usually in the crock pot), and the kind that you can whip up in short order but still tastes delicious. I had picked up a bag of lentils while shopping because they’re high in protein, high in fiber, have vitamins and mineral, and are low in calories – perfect for our healthy diet. I’ve used them in salads before (Salad Swag: 3 Cures for the Common Salad) but we were looking for something warm and hearty for supper.

Pintesting Tuscan Lentil Soup

When searching for lentil soup recipes, I found this Pin by Natalie of Life Made Simple. Our family is trying to stick to a Mediterranian diet because it’s very healthy and still tasty, so this recipe really stood out. One look at the picture and my HH gave an enthusiastic thumbs up. It helped that we also had most of the ingredients on hand, so a quick trip to the store was all that was needed to start dinner.

Pintesting Tuscan Lentil Soup - ORIGINAL PIN

The Pintesting:

The ingredients include lots of veggies and aromatics, lentils, and Italian sausage. We had mild sausage, so I used that instead. I had some Progresso Tuscany chicken broth on hand and thought this would be the perfect use for it. (Take a look at those cute tomatoes that came from our garden!)

Pintesting Tuscan Lentil Soup - Ingredients

Brown the sausage and onion.

Pintesting Tuscan Lentil Soup - Sausage

Add the garlic and seasonings.

Pintesting Tuscan Lentil Soup - Sausage & Seasonings

Stir in the broth, lentils, and potatoes, and simmer for 10 minutes. Add the tomatoes and zucchini; simmer for 15 more minutes.

Pintesting Tuscan Lentil Soup - Broth & Veggies

Wilt in the spinach for a couple of minutes.

Pintesting Tuscan Lentil Soup - Spinach

Remove the bay leaf and the soup is done.

Pintesting Tuscan Lentil Soup - Done

Natalie recommends serving with parmesan shavings, so I grated some onto the soup.

Pintesting Tuscan Lentil Soup - Served

I served this with a hot-from-the-oven, crusty baguette. My HH loved the flavors and went back for seconds. This will be a regular in this family. And now for the Pintesting Results:

Overall Results:  4.7 Pins

5 Pins Overall - MED.

Accuracy: The soup turned out exactly like the recipe, including the estimated prep and cook times. It was hearty and had a lot of flavor for less than an hour of cook time. 5 Pins

Rated 5 Pins - SMALL

Difficulty:  There is a fair amount of prep work in cutting up the vegetables. Natalie uses a mandoline for her zucchini, but I’ve nearly lost fingertips using mine, and since I already had my French Chef knife out for the other ingredients I just used my trusty tool of choice. Once the prep work was done, this recipe was very simple to make. There wasn’t any pre-soaking of the lentils (I’m not sure why I thought there would be) or other extra steps. 4 Pins

Rated 4 Pins - SMALL

Time:  From start to finish this took less than an hour. The prep work took about 10 minutes and the cook time was just under 40 minutes (of which roughly half an hour was for simmering). 4 Pins

Rated 4 Pins - SMALL

Cost:  Most of the ingredients are common to my kitchen and this makes a BIG pot of soup. I had already bought the lentils and just needed to pick the tomatoes from our garden and buy a couple of ingredients – and the bread to go with it. When I put the leftovers in the refrigerator, the lentils soaked up so much of the chicken broth that I had to add another 3 or 4 cups to make it into soup again. We had supper and two lunches from this pot before we froze the rest so it wouldn’t go to waste. 5 Pins

Rated 5 Pins - SMALL

Practicality: This recipe is definitely going to be a regular for us. It is delicious, makes a lot, is low cost, and is healthy. 5 Pins

Rated 5 Pins - SMALL

Pintesting The Perfect Chocolate Chip Cookie

Apr 15, 2016 by Anne Hernandez

When I was a college freshman living 700 miles away from home and “independent” for the first time in my life, I felt that I was seriously underfunded – as most freshmen do. I had a nice dorm room with a great roommate, a cafeteria card that would provide all the cafeteria food that I cared to eat, and all my needs were more than met. But that’s not the same as having spending money to go hang out with my friends (never mind that I was supposed to be studying). Pintesting The Perfect Chocolate Chip CookieOne day I was feeling rather homesick, so I made Chocolate Chip Cookies in our dorm kitchen. I had girls rushing in offering to buy the cookies (and cookie dough). That was my Aha! moment. I found out that two hours of serious cookie making in the cafeteria during their down time on Saturday afternoons could turn my $20/week allowance into $80 or more, and got me the nickname, Betty Crocker.

Since then I’ve made hundreds of dozens of cookies, but I’m always looking for a way to improve upon the standard. I’ve tried chilling the dough, using different kinds of flours, using different kinds of chocolate, and so many other tips. So when I saw this recipe for The Perfect Chocolate Chip Cookie, I was rather sceptical. . . until I saw the source – America’s test Kitchen.

I’ve watched their PBS show, Cook’s Country, for years and I have a subscription to their magazine, Cook’s Illustrated. For those who don’t know, they test recipes, ingredients, gadgets, and products. Per their website, “we test each recipe 30, 40, sometimes as many as 70 times, until we arrive at the combination of ingredients, technique, temperature, cooking time, and equipment that yields the best, most-foolproof recipe.”

Well, I’m accepting the challenge to see if theirs really is The Perfect Chocolate Chip Cookie. Let the Pintesting begin!

Pintesting Perfect Chocolate Chip Cookie - ORIGINAL PIN

The Pintesting:

They make several changes to the original Toll House cookie recipe, so please go to their recipe to read the logic and science behind the changes.

One of the biggest differences is that instead of creaming softened butter with sugars, this recipe starts by browning most of the butter to develop the butterscotch notes and deepen the flavor.

You can see how the butter melts and then browns below. Then the browned butter is added to and melts the remaining butter.

Pintesting The Perfect Chocolate Chip Cookie - Melt Butter Collage

Whisk the sugars, salt, and vanilla with the melted butter and then add the egg. Even here they modified the recipe from 2 eggs to 1 whole egg and 1 egg yolk. They have their reasons – just go with it.

Now walk away for 3 minutes.

Pintesting The Perfect Chocolate Chip Cookie - Add Sugars & Salt

Whisk and wait for 3 minutes two more times. This allows the sugars to completely dissolve rather than having a grainy creamed mixture.

Pintesting The Perfect Chocolate Chip Cookie - Whisk & Wait

You can see that the mixture is satiny smooth. No graininess in these cookies.

Pintesting The Perfect Chocolate Chip Cookie - Add Flour Mixture

Next, stir in the flour and baking soda mixture.

Pintesting The Perfect Chocolate Chip Cookie - Dough

Here’s the dough made without a mixer. Doesn’t it look like peanut butter?

Pintesting The Perfect Chocolate Chip Cookie - Add Nuts & Chips

Add the chocolate and *optional* nuts. My HH LOVES chocolate chip cookies with nuts and he chose pecan pieces this time.

Pintesting The Perfect Chocolate Chip Cookie - Cookie Dough

Oh. My. Gosh. Just look at that dough. This is the stuff that dreams are made of.

I scooped it for uniformity, as I usually do with cookie dough, and baked them in a 375-degree oven.

Pintesting The Perfect Chocolate Chip Cookie - Baking

Even without chilling the cookies didn’t melt into flat cookie pancakes. I was so happy to see that they had nice volume and height.

Pintesting The Perfect Chocolate Chip Cookie - Done

And after the torture of waiting for them to cool (because cookies don’t taste as good when they’ve melted the flesh from the roof of your mouth), they did recede a little. But only just a little.

Pintesting The Perfect Chocolate Chip Cookie - Closeup

You need to try these cookies. The flavor and texture are beyond what I could have imagined from a humble chocolate chip cookie.

Pintesting The Perfect Chocolate Chip Cookie

And now for the Pintesting results – and a large glass of milk.

The Results:

OVERALL RESULTS:  4.85 Pins

Pintesting - 5 Pins Overall Rating

Accuracy:  The recipe promised cookies that are “moist and chewy on the inside and crisp at the edges, with deep notes of toffee and butterscotch to balance its sweetness,” and this cookie definitely delivered. The taste and texture were incredible. My HH gave it 500 pins so I’m giving it 5 Pins.

Pintesting Rating - 5 Pins

Difficulty: This recipe involved browning the butter, but because the butter was melted no mixer was needed. If it’s easier to just mix in the bowl, then I think it’s just all-around easier. But because there is the extra step of browning the butter, I’m giving this 4 Pins.

Pintesting Rating - 4 Pins

Time:  Most cookie recipes require a minimum of an hour to make and bake (not including dishes). This includes 30 minutes (give or take) to soften the butter, a minimum of 5 minutes of creaming time, and chilling time (30 minutes to overnight) in order to keep the cookies from going flat in the oven. But this recipe uses melted butter and although there were roughly 10 minutes of mix/wait time, they went straight from the mixing bowl to the oven and the cookies maintained a nice thickness. 5 Pins

Pintesting Rating - 5 Pins

Cost: There were no weird, unique, or specialty ingredients to pull off these cookies. Most of the ingredients are common to most kitchens, so I’m giving this 5 Pins.

Pintesting Rating - 5 Pins

Practicality:  These are ridiculously delicious cookies when they come out of the oven. They were still moist, chewy, crispy, and delicious four days later. (They’re big cookies and it’s just the two of us.) This is now my go-to chocolate chip cookie recipe. 5 Pins

Pintesting Rating - 5 Pins