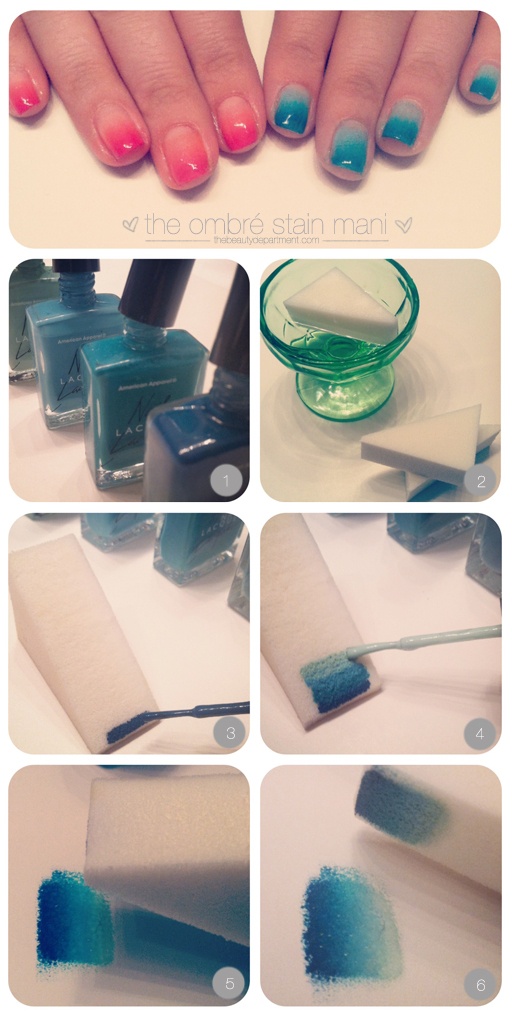
I had seen quite a few examples on Pinterest, and thought it was time to give it a go. There were two pins that convinced me that I could accomplish this technique. The first was from the ladies at The Beauty Department and it gave detailed pictures and instructions for different shades of one color.
The second is from Laynie’s blog, Layniefingers, with instructions and a video. I always like to watch videos so I can see exactly how someone else does something. I also liked how the pastel colors looked so perfect for Easter and spring. Does that remind anyone else of an Easter Egg?

So after watching the technique, which is relatively simple, I went to my local Sally’s Beauty Supply store to find the nail polishes. I thought this might be a little expensive since both blogs instructed the use of 3-5 colors, but China Glaze had put out this Ombré kit that included 4 full sized nail colors and 10 application sponges all for the sale price of two polishes! These kits come in Teal, Pink and Grape. (Disclaimer: I did not receive any compensation for using this product. It was just easier to buy it all in a kit.)

I also had the Orly Top 2 Bottom for base and top coat, polish remover, a cotton ball and some cotton swabs – just in case of user error.
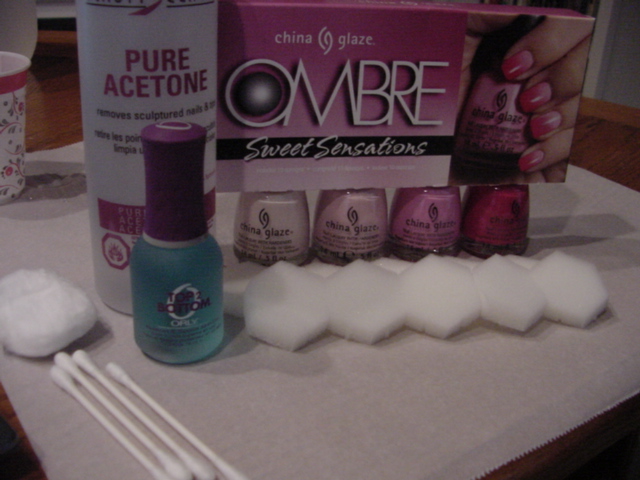
First I put the base coat and let it dry. Then I put a coat of the lightest color on my nails and let that dry, too. The instructions on the packaging said to paint the stripes of polish onto a flat surface. I used a strip of parchment paper and went from light to dark.

Blot the nail color with the sponge, then dab across the nail while slightly moving up and down to blend the colors.

Lastly, finish with a top coat to smooth it out and set the manicure.
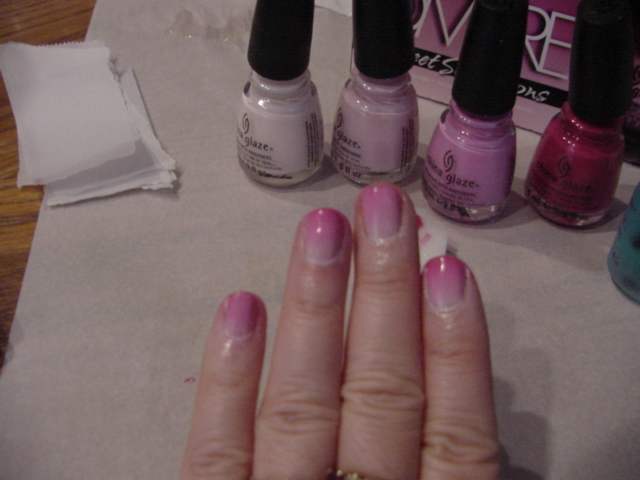
The results are pretty, easy and impressive. It does get a bit of polish on the skin surrounding the nails, but that’s what the polish remover ans swabs are for.
Results for the Ombré Manicure are as follows:
Overall Score: 5 Pins

Accuracy: The two blogs gave great instructions that were similar to the directions on the packaged kit. Whether painting the polish onto a surface or directly onto the sponge, the results were the same. I only did one pass of the sponging, so my colors weren’t quite as vivid as the picture on the package, but it directed to do a second pass for brighter results once the first one dried. 5 Pins

Difficulty: The technique is an easy one to achieve since you are looking for blending rather than precision. It’s a great way to get trendy nails if you’re a beginner to nail art. 5 Pins
Time: This definitely takes a little longer than just polishing the nails, but not by a lot. I usually do a base coat, two to three color coats and a top coat which takes a little under an hour. This can be done in about 1 hour for base coat, solid coat, sponged gradient coat and top coat. 4 Pins

Cost: The cost of a basic salon manicure is roughly $20 on sale. I bought the China Glaze kit on sale for $11, and it will do a lot of manicures with the 4 full sized bottles of polish. However, if you have to buy everything separately, it would be closer to the salon price, but you’d still get multiple manis out of it. 4 Pins
Practicality: You can do this with any polishes you might already have on hand, so buying lots of polish is not necessary if you have a decent collection. You can switch up the color combinations for seasons, holidays, even add glitter, crackle polish or stamps over the top for super custom looks. It’s easy, quick and not very expensive, and you don’t need to have the hands of an artist to make it look good. Very practical – 5 Pins
2 Comments
Comments are closed.